ROI Operation Guide
1. Introduction to ROI
ROI, the full name is Region Of Interest (ROI), in the field of machine vision, refers to the area selected from the target image that needs to be focused.
ROI is divided into two categories. One is ROI 2D (two-dimensional ROI), which is an area selected on a two-dimensional plane. Only the two dimensions of length and width are considered. It is usually a rectangular, circular or other shaped area on an image or screen, similar to delineating a specific range on a piece of paper.
The other type is ROI 3D (three-dimensional ROI), which is an area selected in three-dimensional space. In addition to length and width, depth also needs to be considered. It can be imagined as delineating a three-dimensional area in real space.
ROI has three functions:
Improve processing efficiency: When processing image data with larger resolution, analyzing and processing the entire image often requires a large amount of computing resources and time. By specifying an ROI, you can limit the scope of processing to a specific area, significantly reducing the amount of calculations.
**Enhanced analysis accuracy: **ROI is the most critical specific area in the image. Through fine analysis of ROI, the detection, identification and measurement accuracy of specific targets can be improved.
Exclude interfering factors: In the image, there may be some areas that are irrelevant to the analysis target, and these areas will affect the accuracy of the analysis results. By defining ROI, you can eliminate these interfering factors and improve the reliability of the analysis.
2. Set ROI
In PickWiz, ROI settings include settings for ROI 2D and ROI 3D.
2.1 New ROI
(1) Click ROI in the running configuration, and then click +Add ROI to add an ROI configuration. The interface will automatically jump to the ROI configuration interface, where you can configure the new ROI.
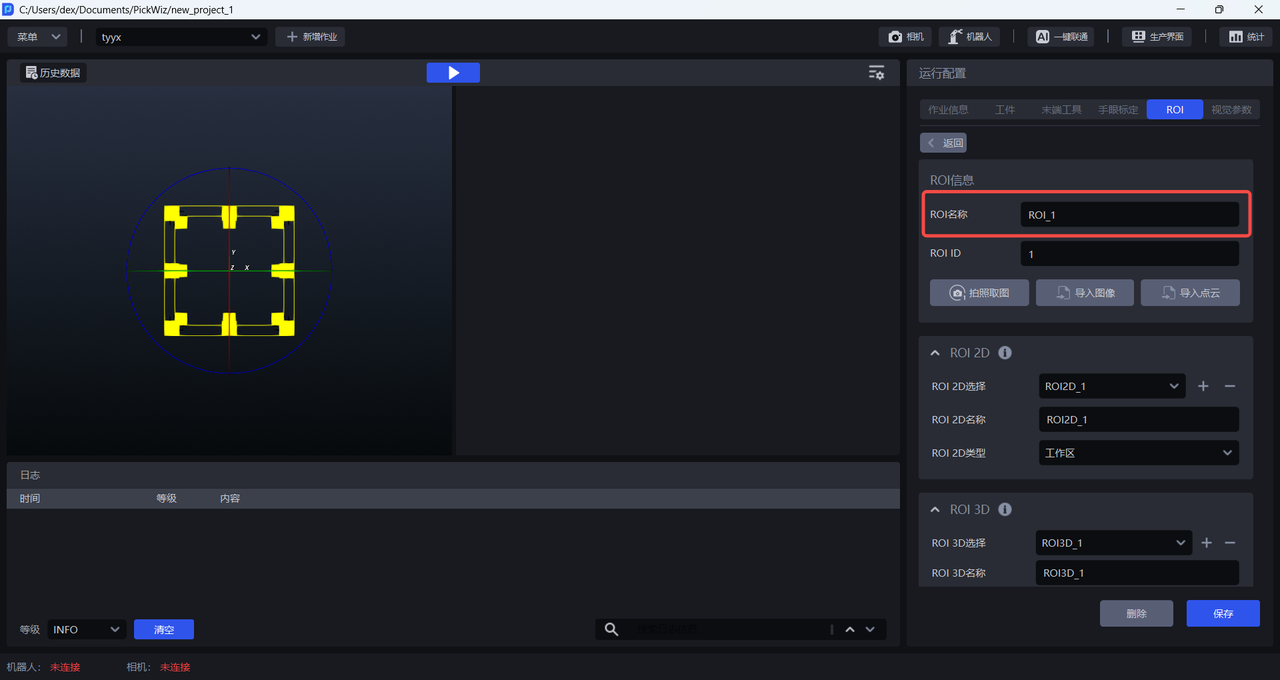
(2) You can edit the name of the ROI configuration by yourself. It supports Chinese and English uppercase and lowercase letters, and does not support punctuation characters.
(3) Before setting the ROI, the target image needs to be loaded. There are two loading methods:
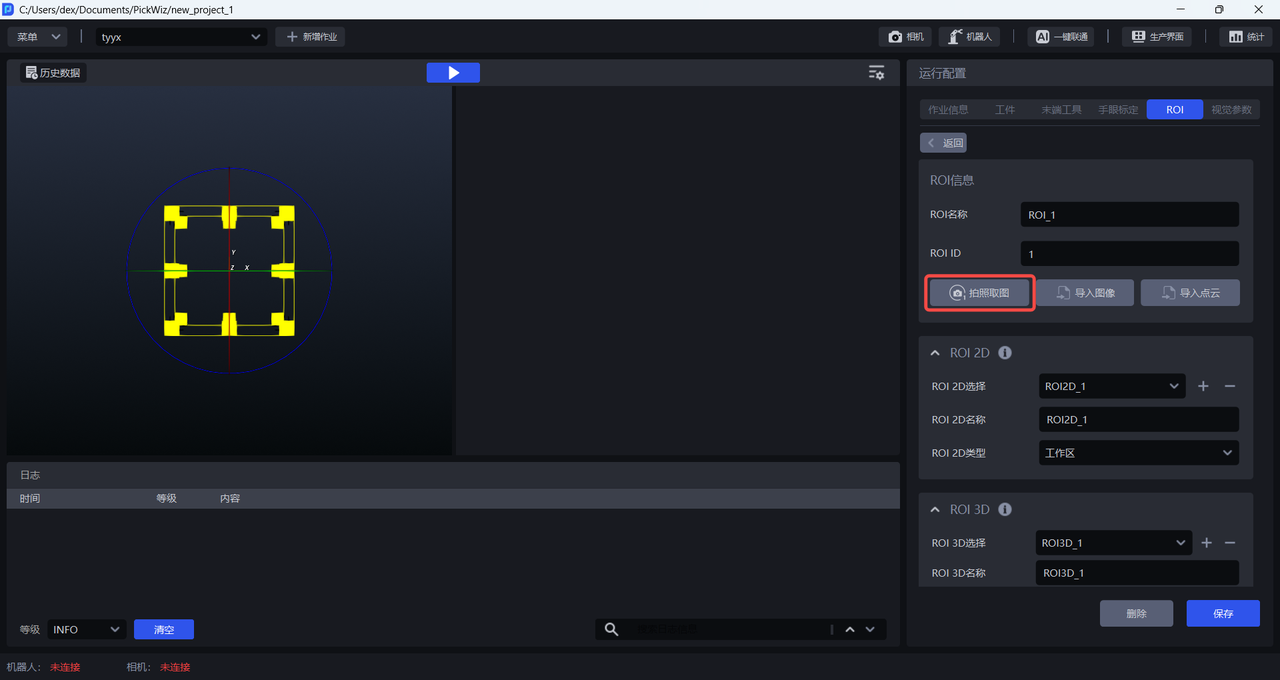
- Click
Take a picture, Pickwiz will trigger the Camera to take a picture and automatically obtain the 2D image and 3DPoint Cloud.
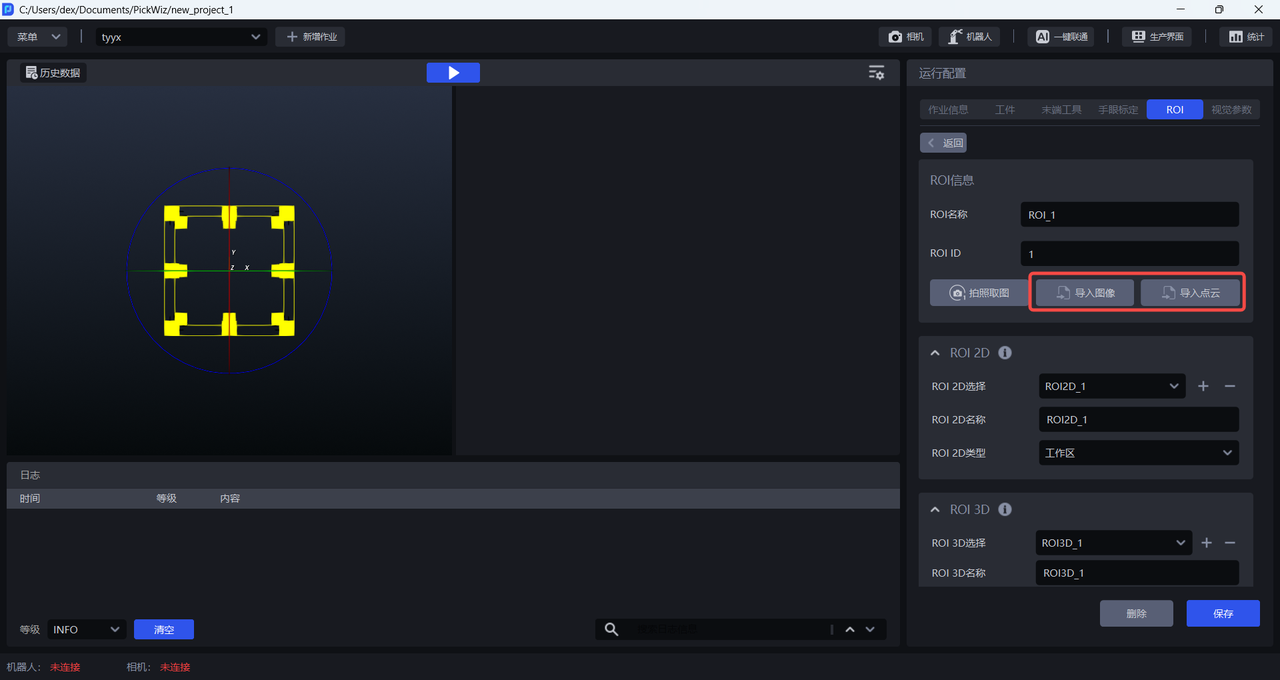
- Click
Import ImageorImport Point Cloudand manually select the target image in the folder to load into PickWiz. ClickImport Imageto import a 2D image to set the ROI 2D, and clickImport Point Cloudto import a 3DPoint Cloud to set the ROI 3D.
(4) After loading the target image, you can set the ROI 2D/3D.
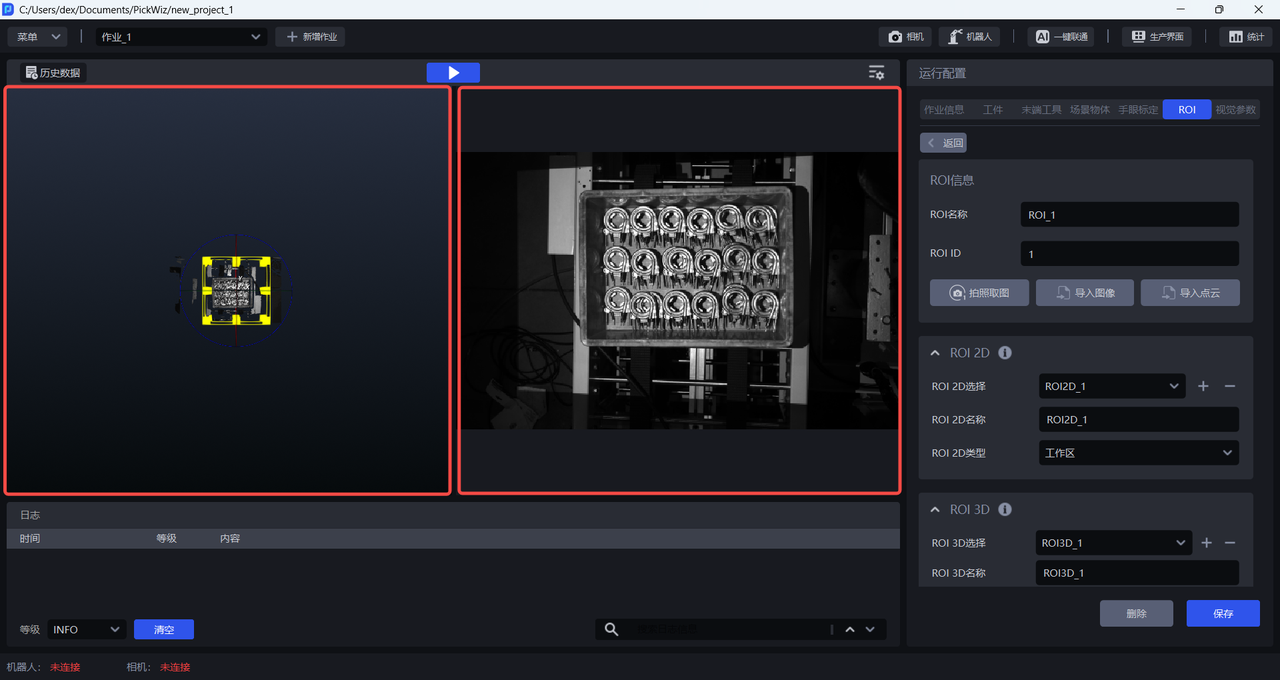
The left side of the visualization window is the 3DPoint Cloud window, and the right side is the 2D image window. You can drag and drop to adjust the size of the 3DPoint Cloud window and the 2D image window, as shown in the figure below.
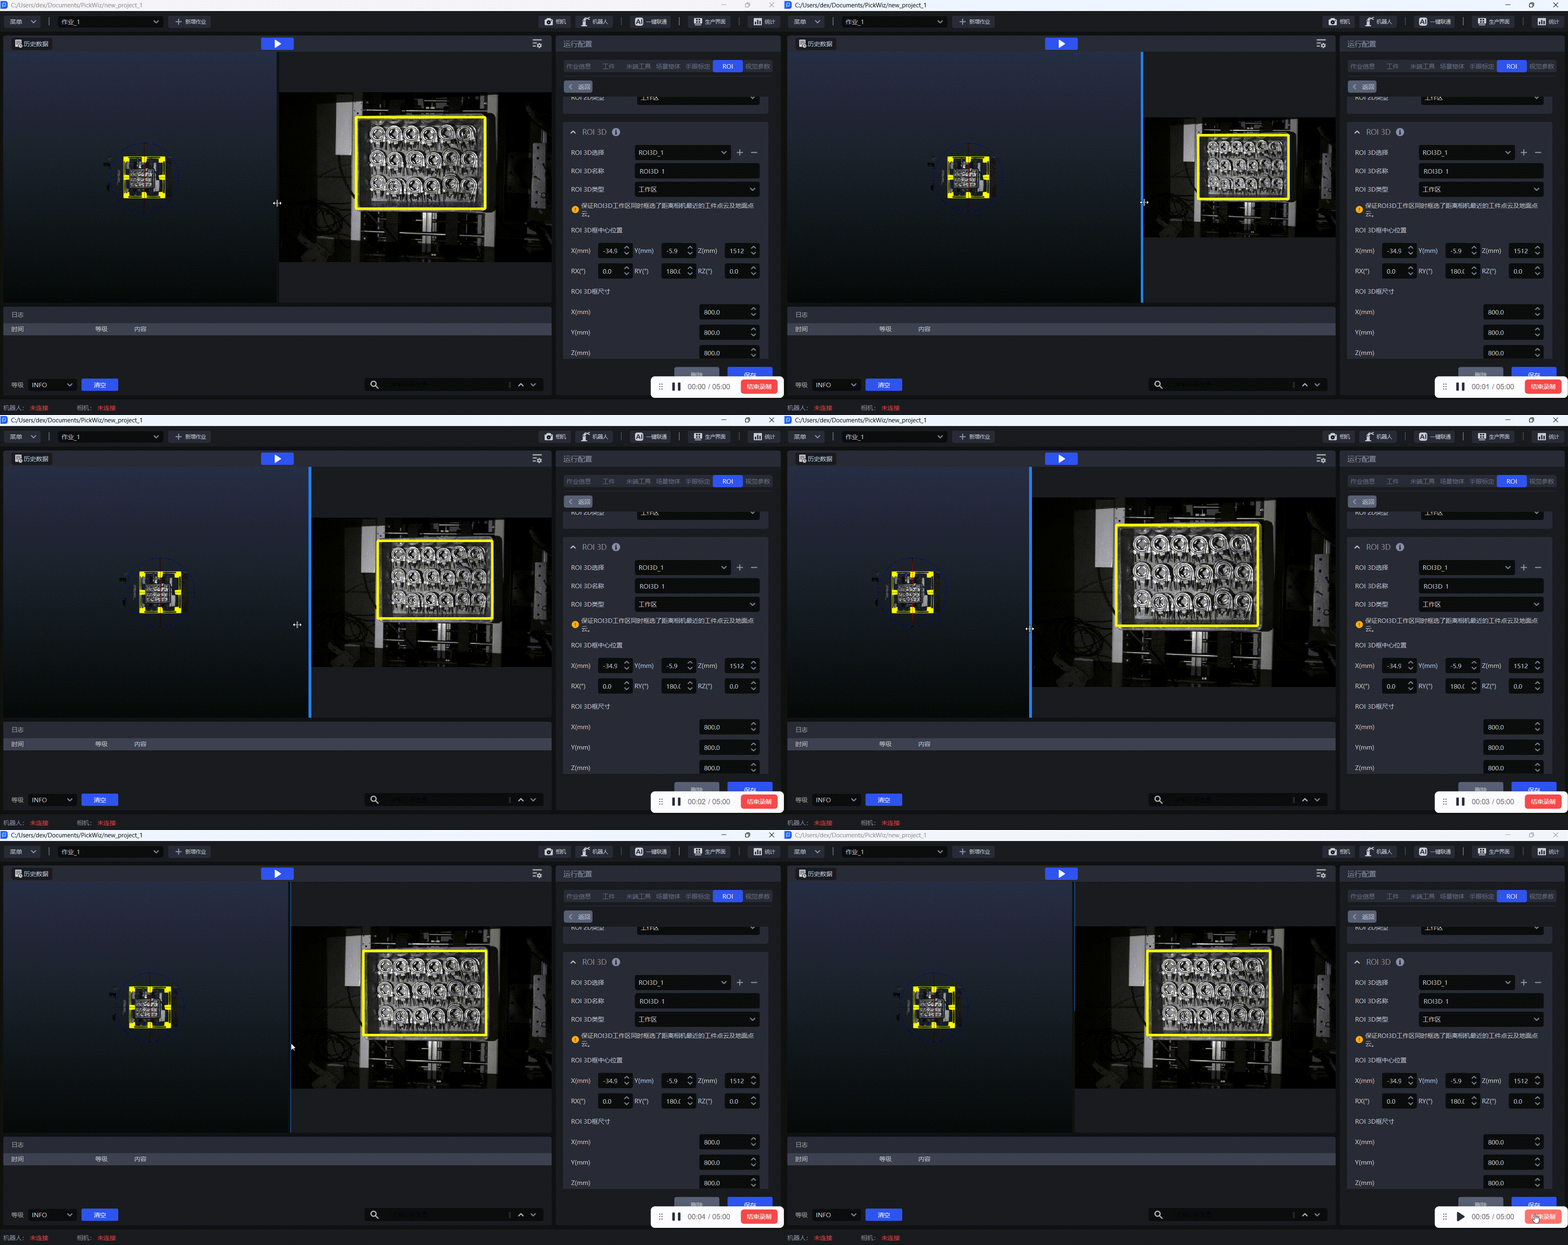
2.2 Set ROI 2D
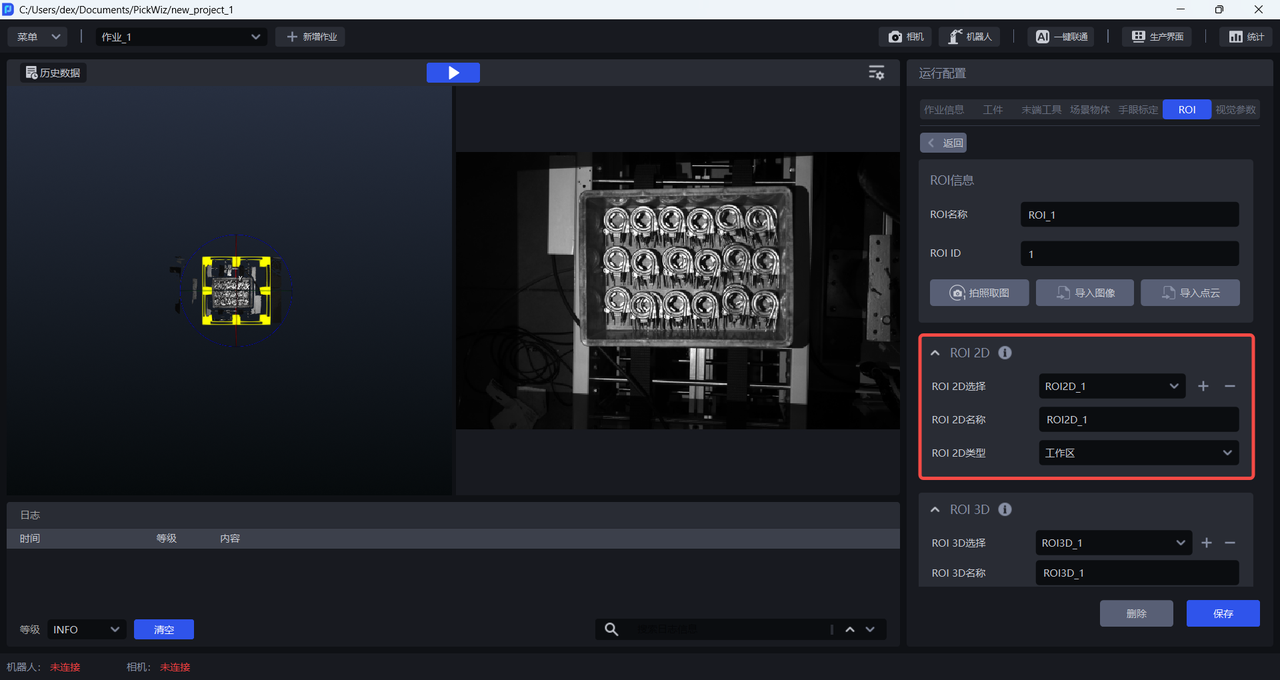
(1) ROI 2D selection is to select a certain ROI 2D for editing;
ROI 2D name can be changed and supports Chinese and English upper and lower case;
ROI 2D type is divided into work area, material frame/pallet/bottom, and observation area. Each ROI 2D needs to select the corresponding ROI 2D type. PickWiz will perform specific processing and analysis for each type area.
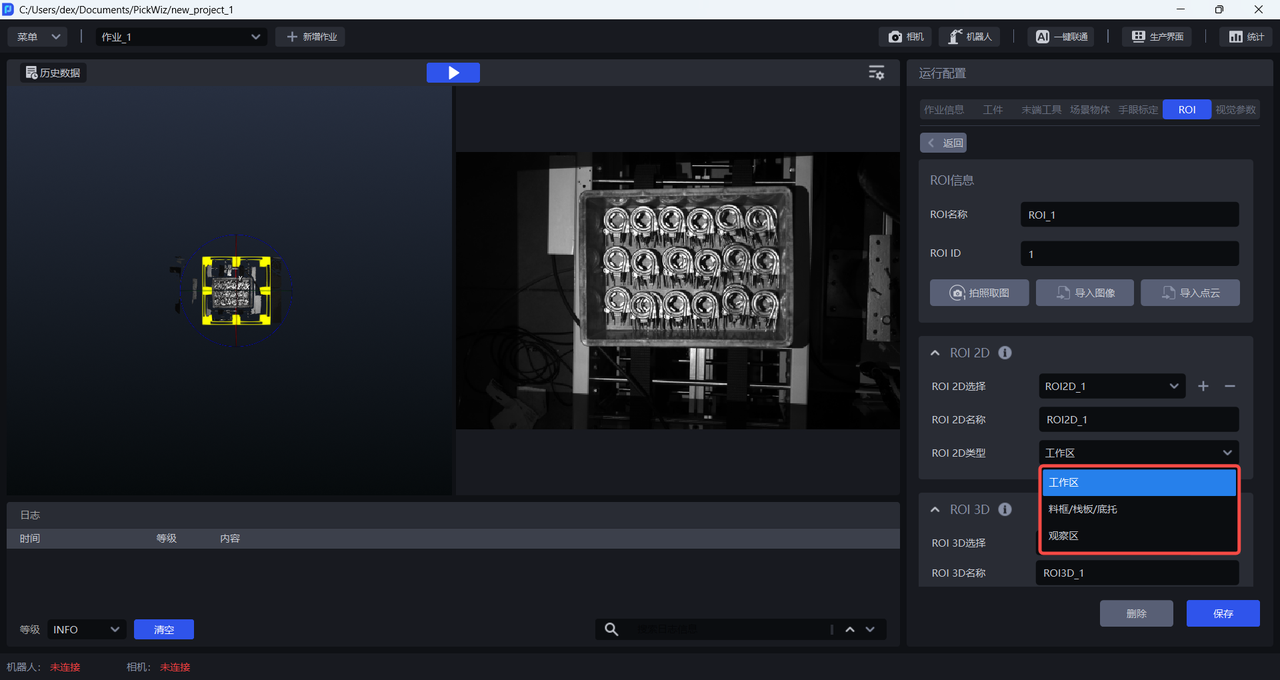
- Work area: It mainly covers the accessible work area of the Robot and vision system, and is also the most commonly used type of area.
Notice
During the process of adding ROI 2D, the system will add a workspace by default, and each ROI 2D must set a workspace.
Material frame/pallet/bottom tray: The material frame/pallet/bottom tray mainly covers the material frame/pallet/bottom tray and other objects, which is helpful for subsequent identification or differentiation of the material frame/pallet/bottom tray, etc.
Observation area: Mainly used in binocular Scene, please see KINGFISHER Series Camera User Manual for details
(2) In the 2D image window, click the left mouse button and manually drag a quadrilateral ROI 2D box. Make sure that the ROI 2D box contains the target area, which is the selected ROI 2D type.
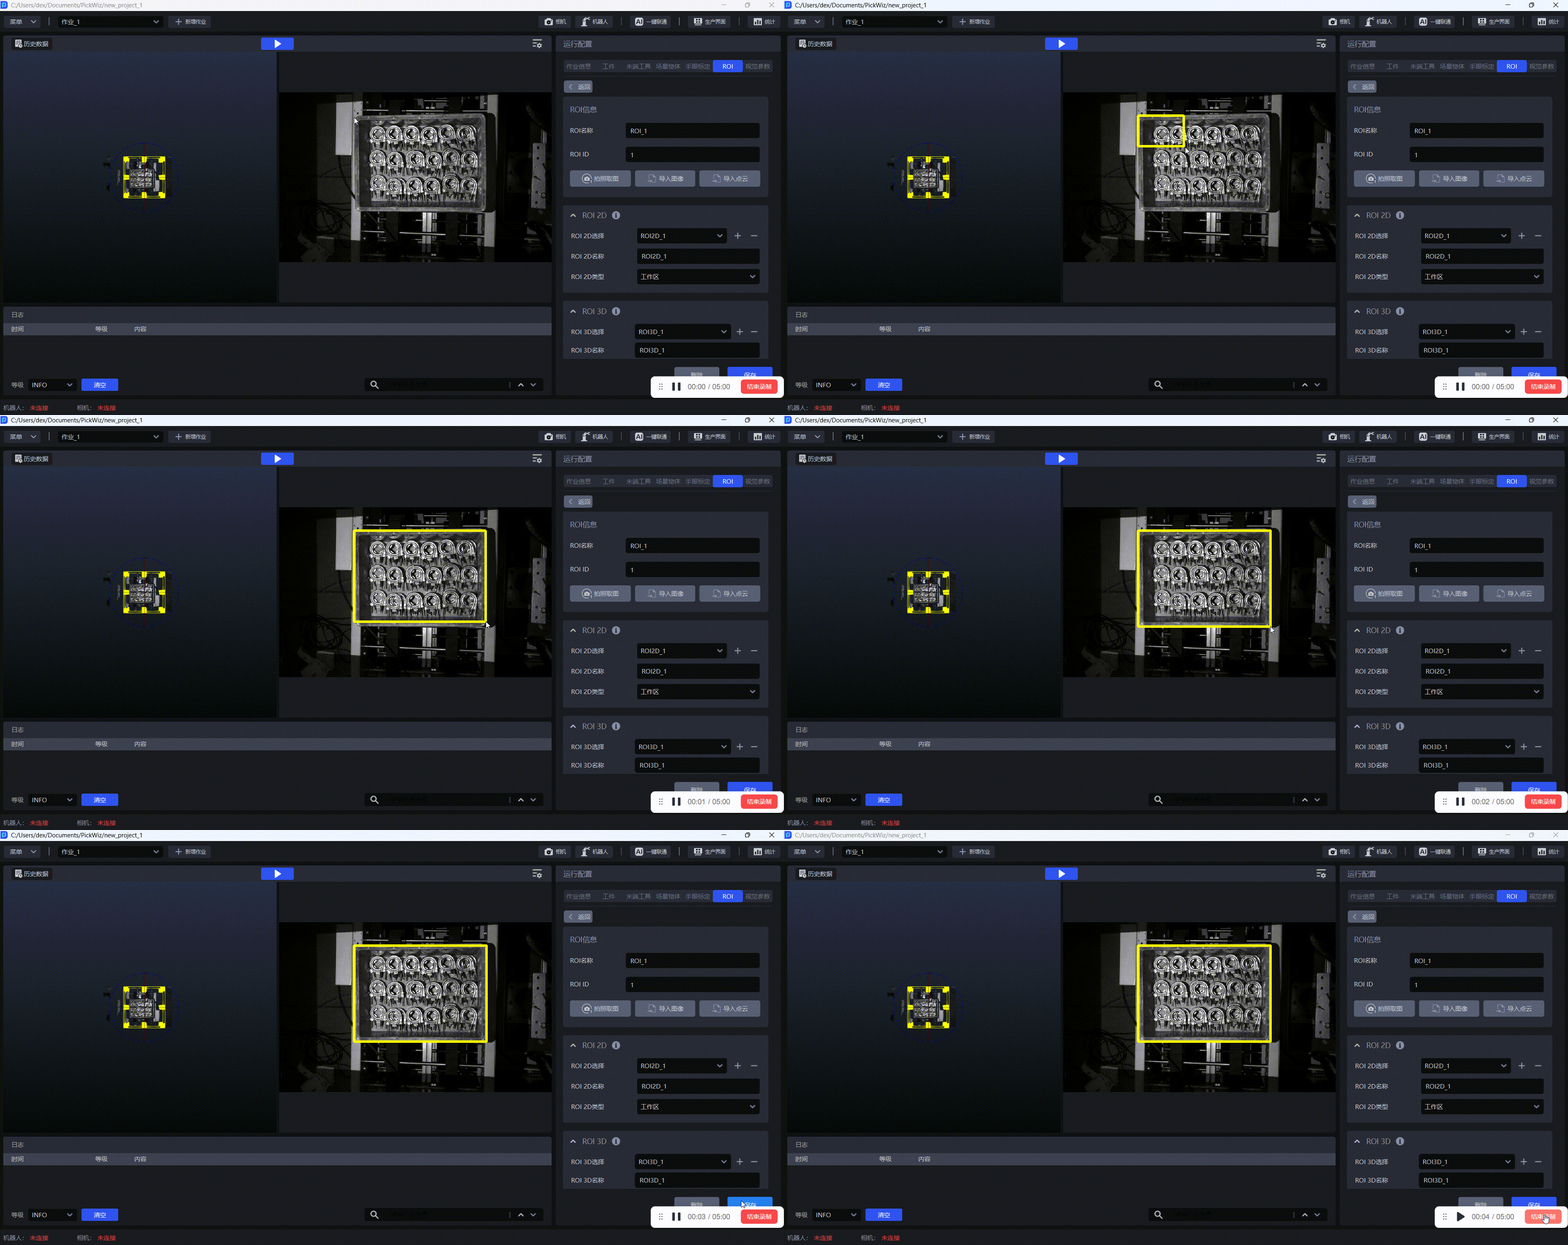
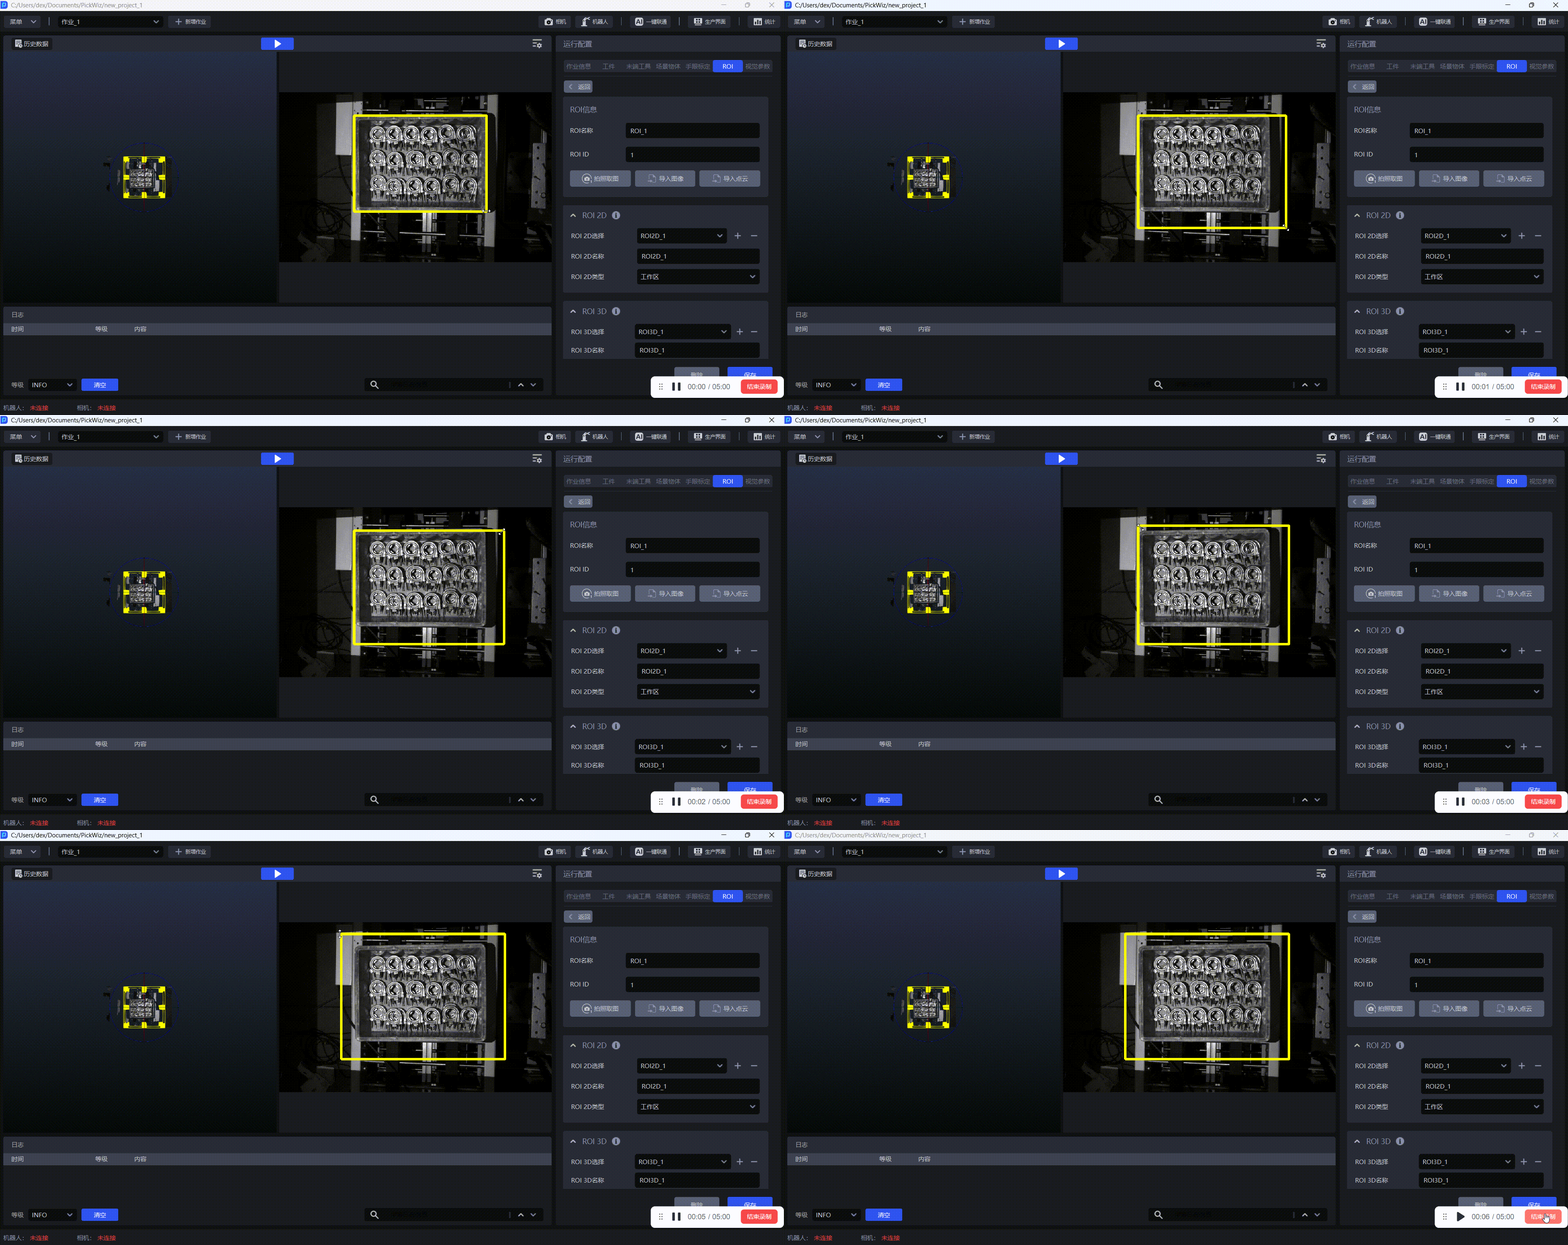
(3) If you need to adjust the size of the ROI 2D box, long press the left mouse button and drag the four sides or corners of the quadrilateral box;
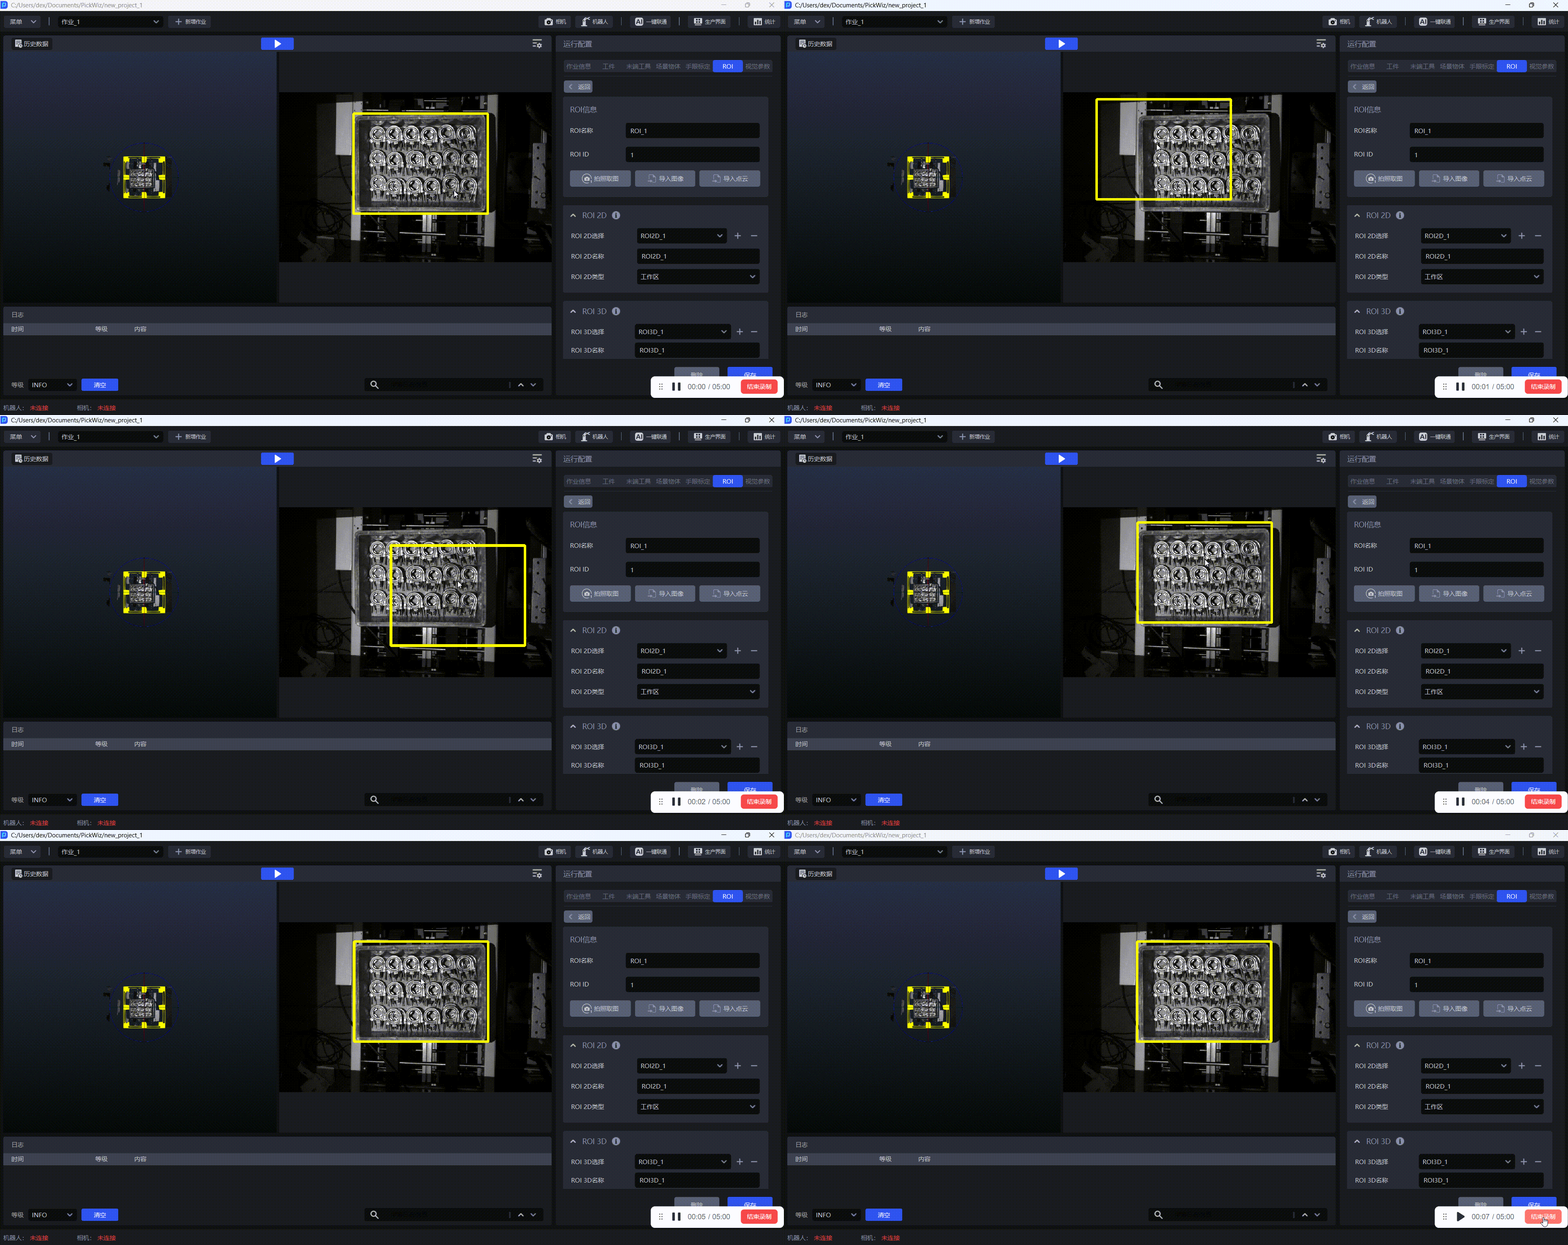
If you need to move the position of the ROI 2D box, select any area in the ROI 2D box and then press and hold the left mouse button and drag.
(4) If you need to delete the ROI 2D box, select any area in the 2D image window with the left mouse button, and then click the Backspace button on the keyboard to delete it.
(5) Click Save to save the current ROI 2D configuration.
(6) If you need to set multiple ROI 2D type areas, you can click + to add a new ROI 2D configuration; conversely, click - to delete the current ROI 2D configuration.
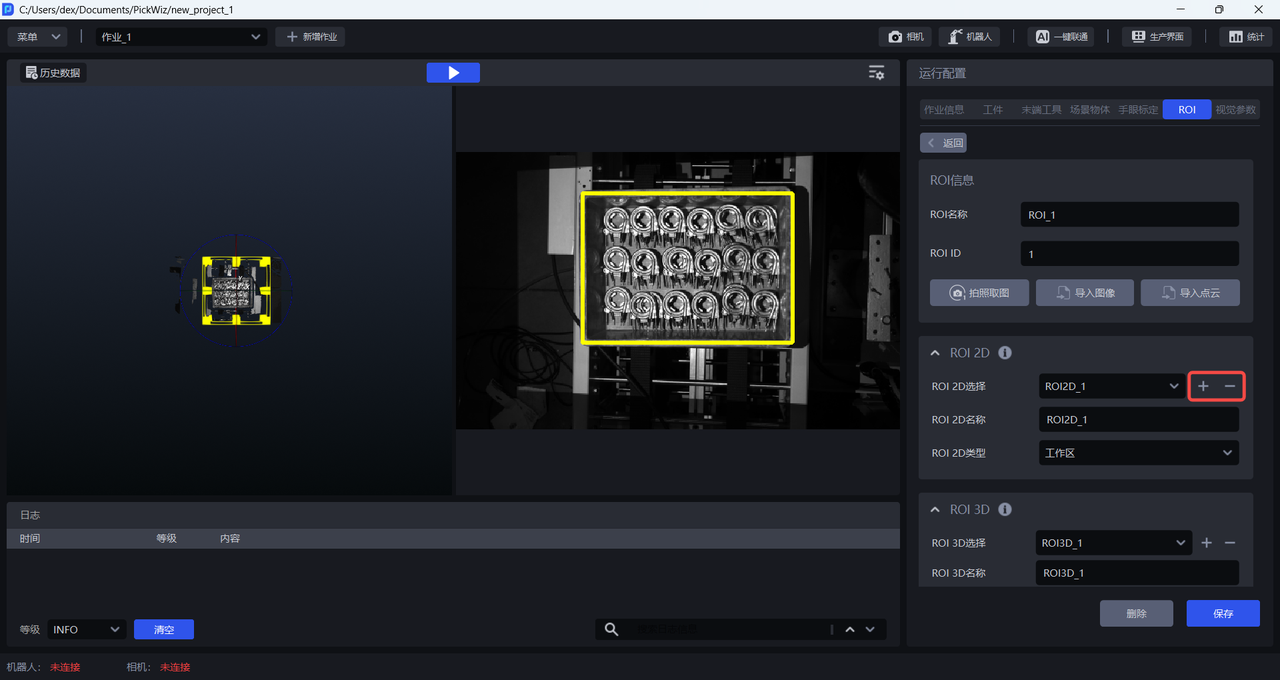
Each time a new ROI 2D configuration is added, the system will name the ROI 2D in the order of addition by default. It also supports custom editing of the ROI 2D name. Then follow the above steps to set the ROI 2D.
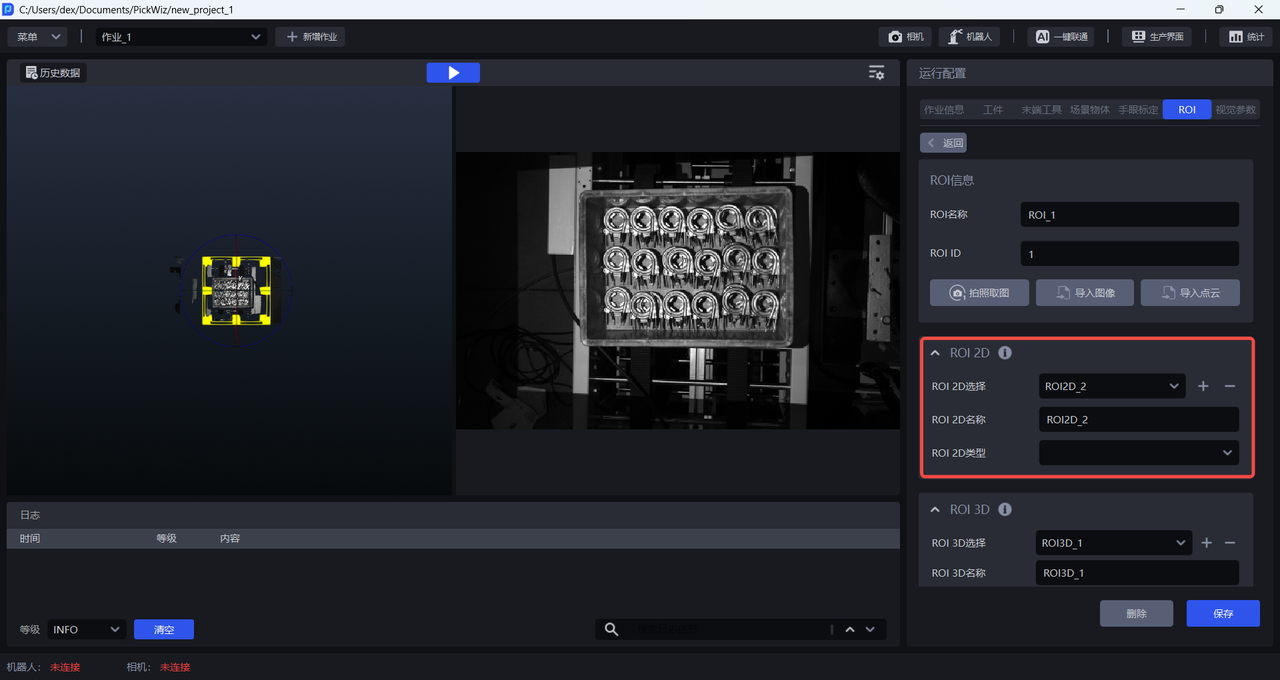
Notice
Under the same ROI configuration, when setting multiple ROI 2D, the ROI 2D types cannot be repeated. For example, ROI2D_1 and ROI2D_2 cannot be set as workspaces at the same time.
2.3 Set ROI 3D
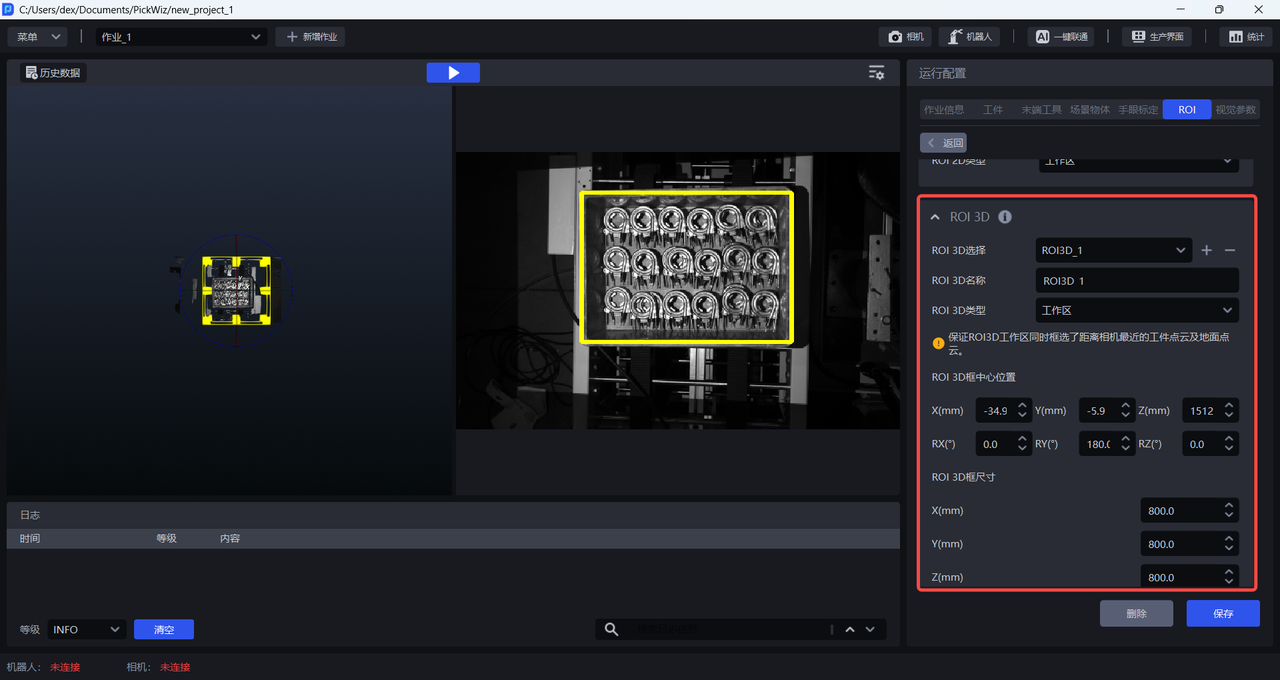
(1) ROI 3D selection is to select a certain ROI 3D for editing;
Work area: It mainly covers the accessible work area of the Robot and vision system, and is also the most commonly used type of area.
Notice
During the process of adding ROI 3D, the system will add a workspace by default, and each ROI 3D must set up a workspace.
Material frame/pallet/bottom tray: The material frame/pallet/bottom tray mainly covers the material frame/pallet/bottom tray and other objects, which helps to identify or distinguish the material frame/pallet/bottom tray in the future.
Grab area: It mainly covers the area where the Pick Point of Target Object recognized by the vision system is located. Generally, the grab area is smaller than the work area. The purpose of setting up the grab area is to solve some posture problems of the destacking Scene or the orderly loading and unloading Scene, and avoid collisions caused by recognition errors.
Observation area: Mainly covers the area of frequent observation and monitoring.
(2) After importing the Point Cloud, PickWiz will automatically generate an ROI 3D box on the target Point Cloud. The center of the ROI 3D box is near the center of the target Point Cloud. It can be fine-tuned. There are two adjustment methods:
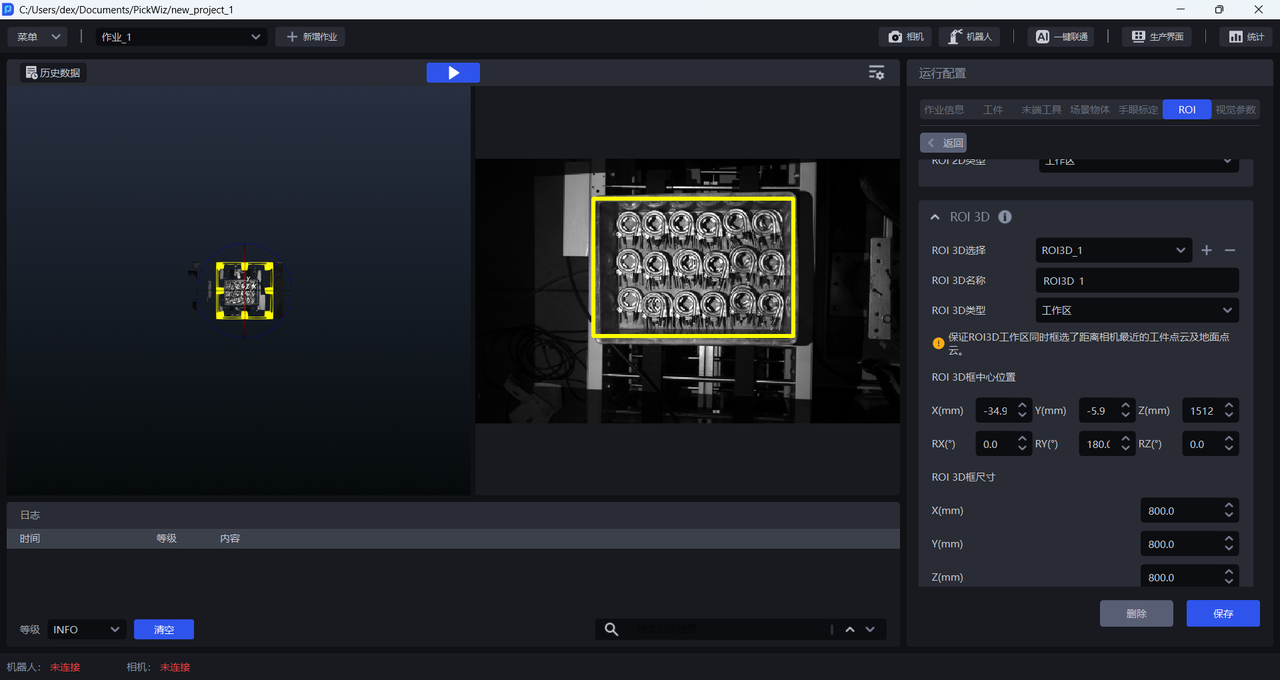
- Manual drag and drop within the 3DPoint Cloud window
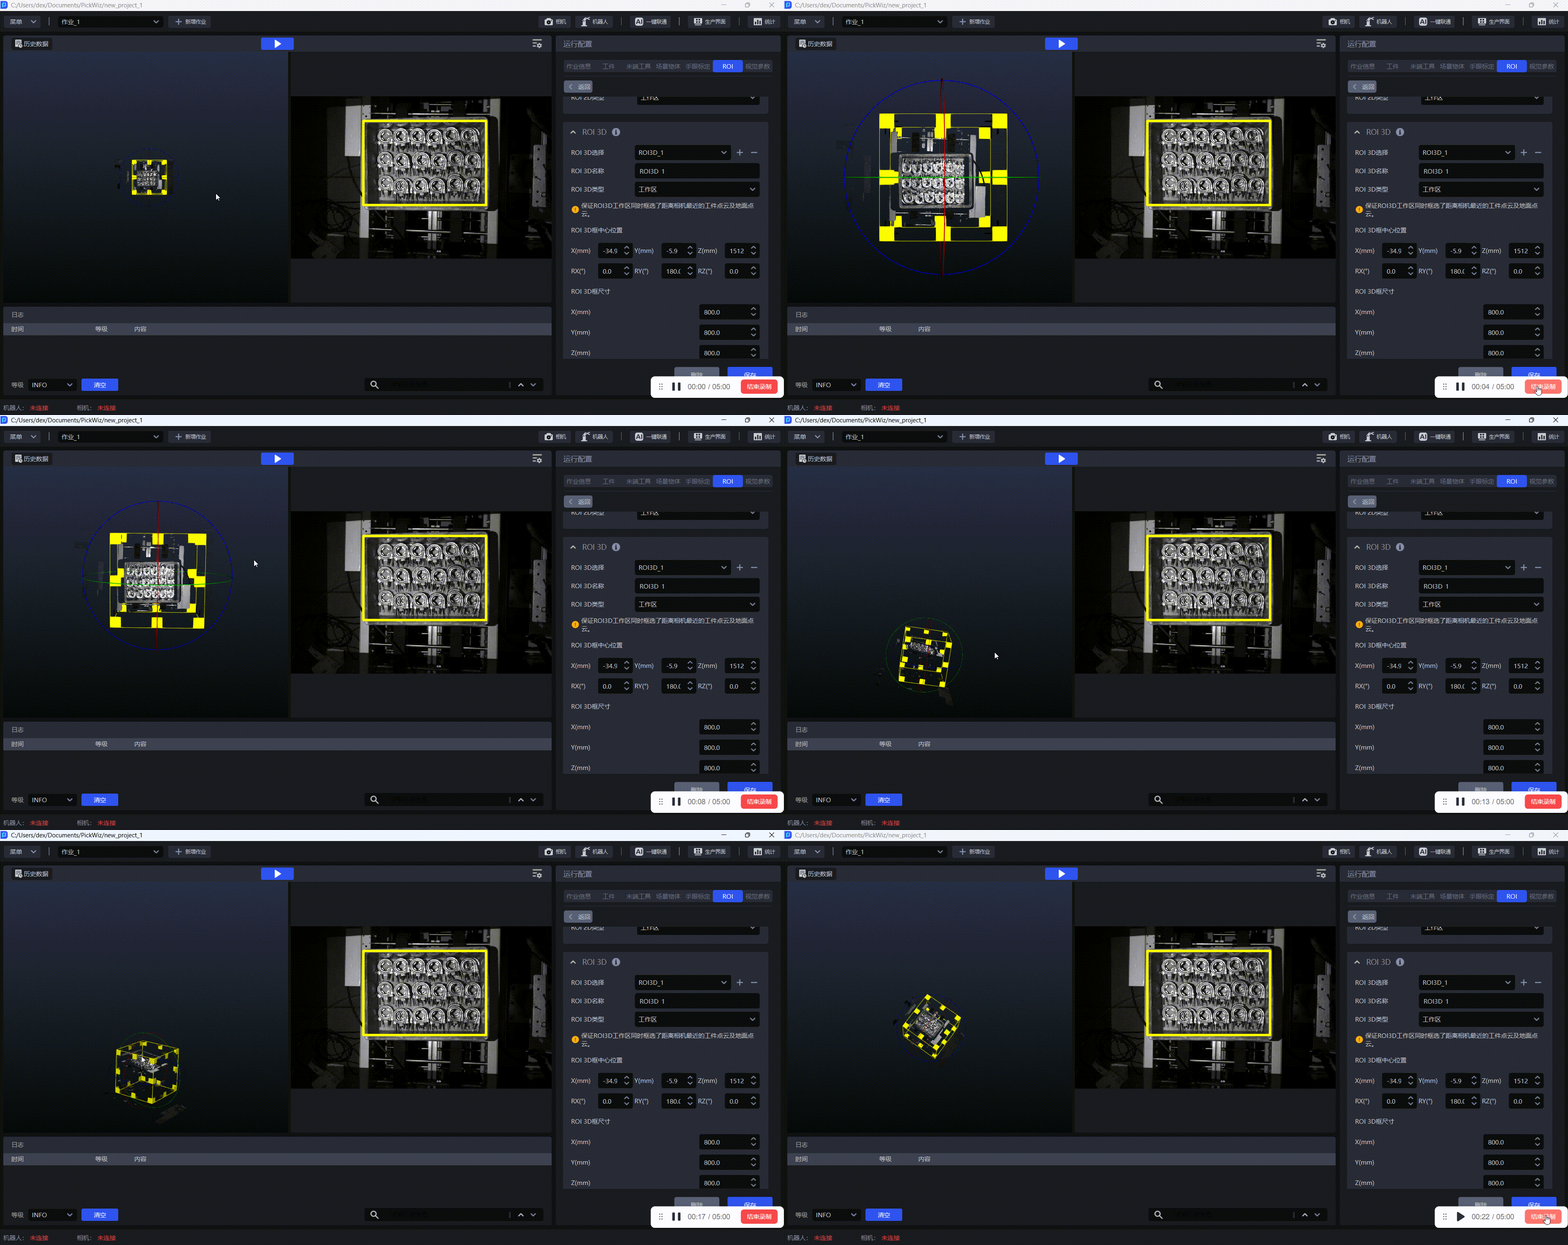
Place the cursor in the 3DPoint Cloud window and slide the mouse wheel up and down to adjust the display size of the ROI 3D box, as shown in the figure below.
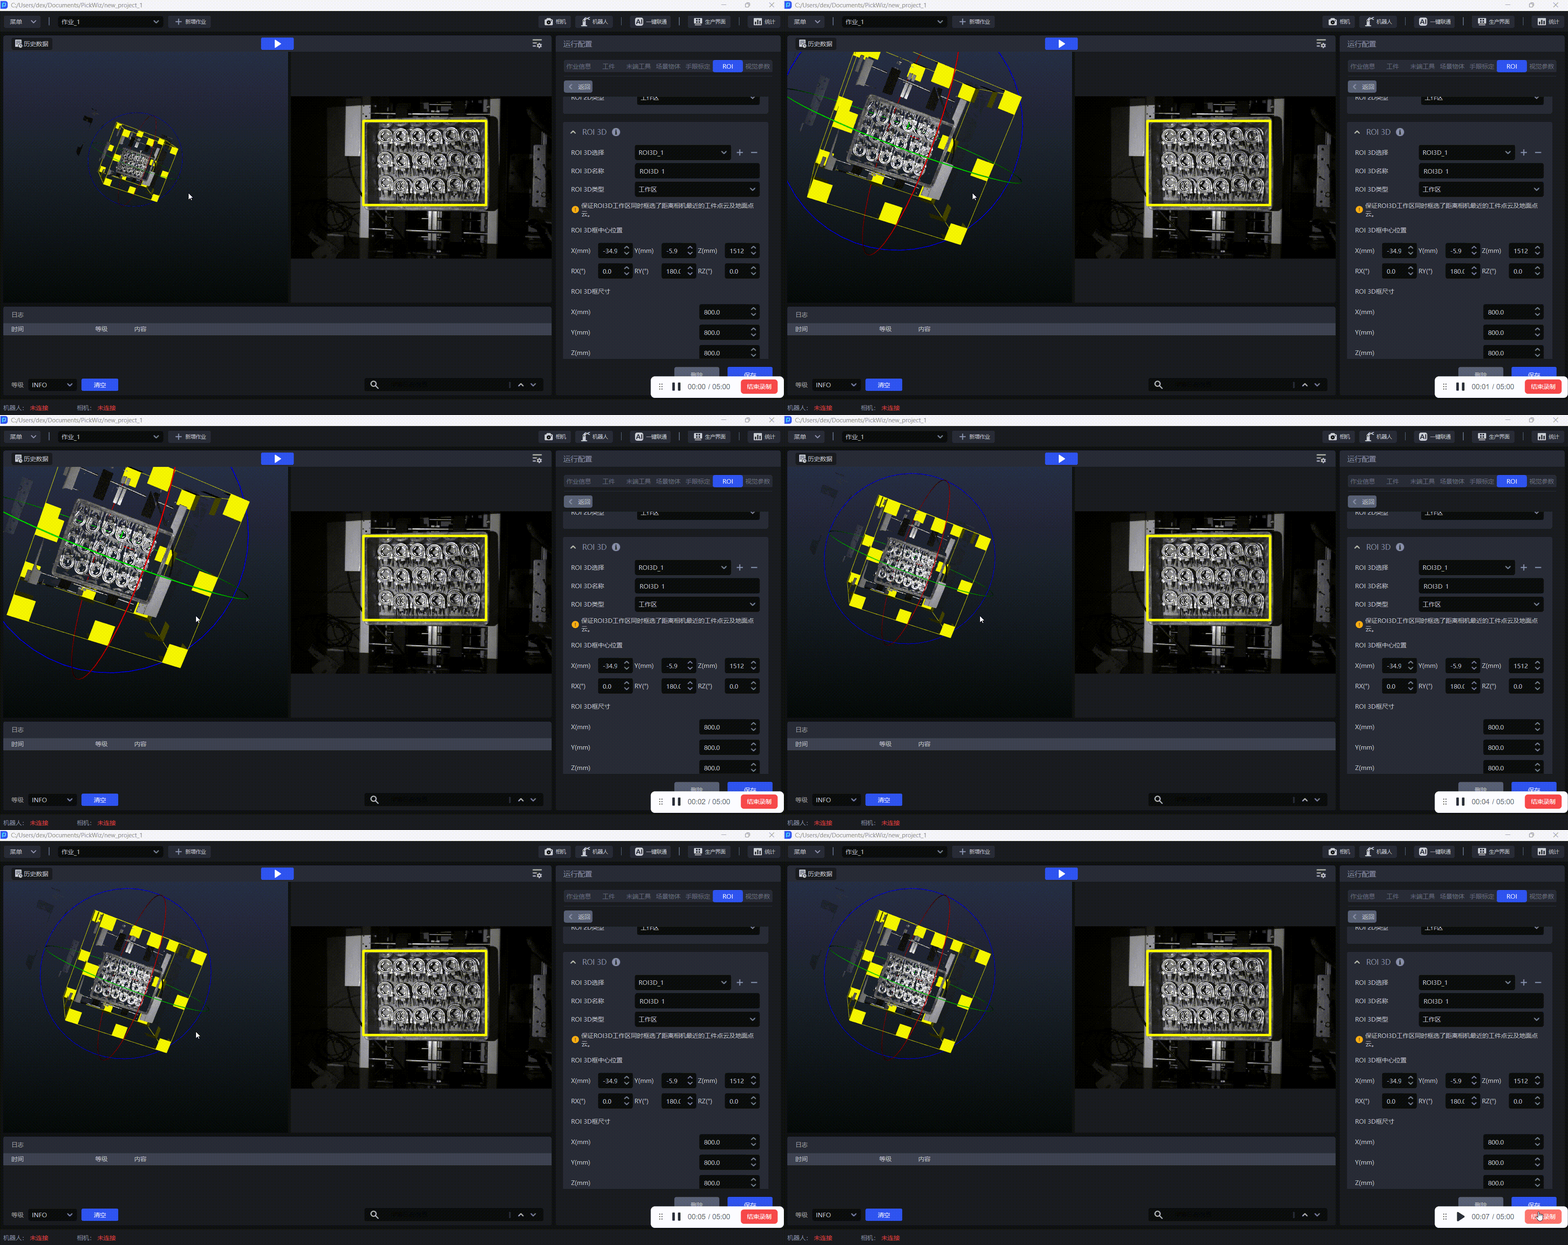
Place the cursor in the 3DPoint Cloud window and long press the left mouse button to move the cursor to adjust the observation angle of the ROI 3D box, as shown in the figure below.
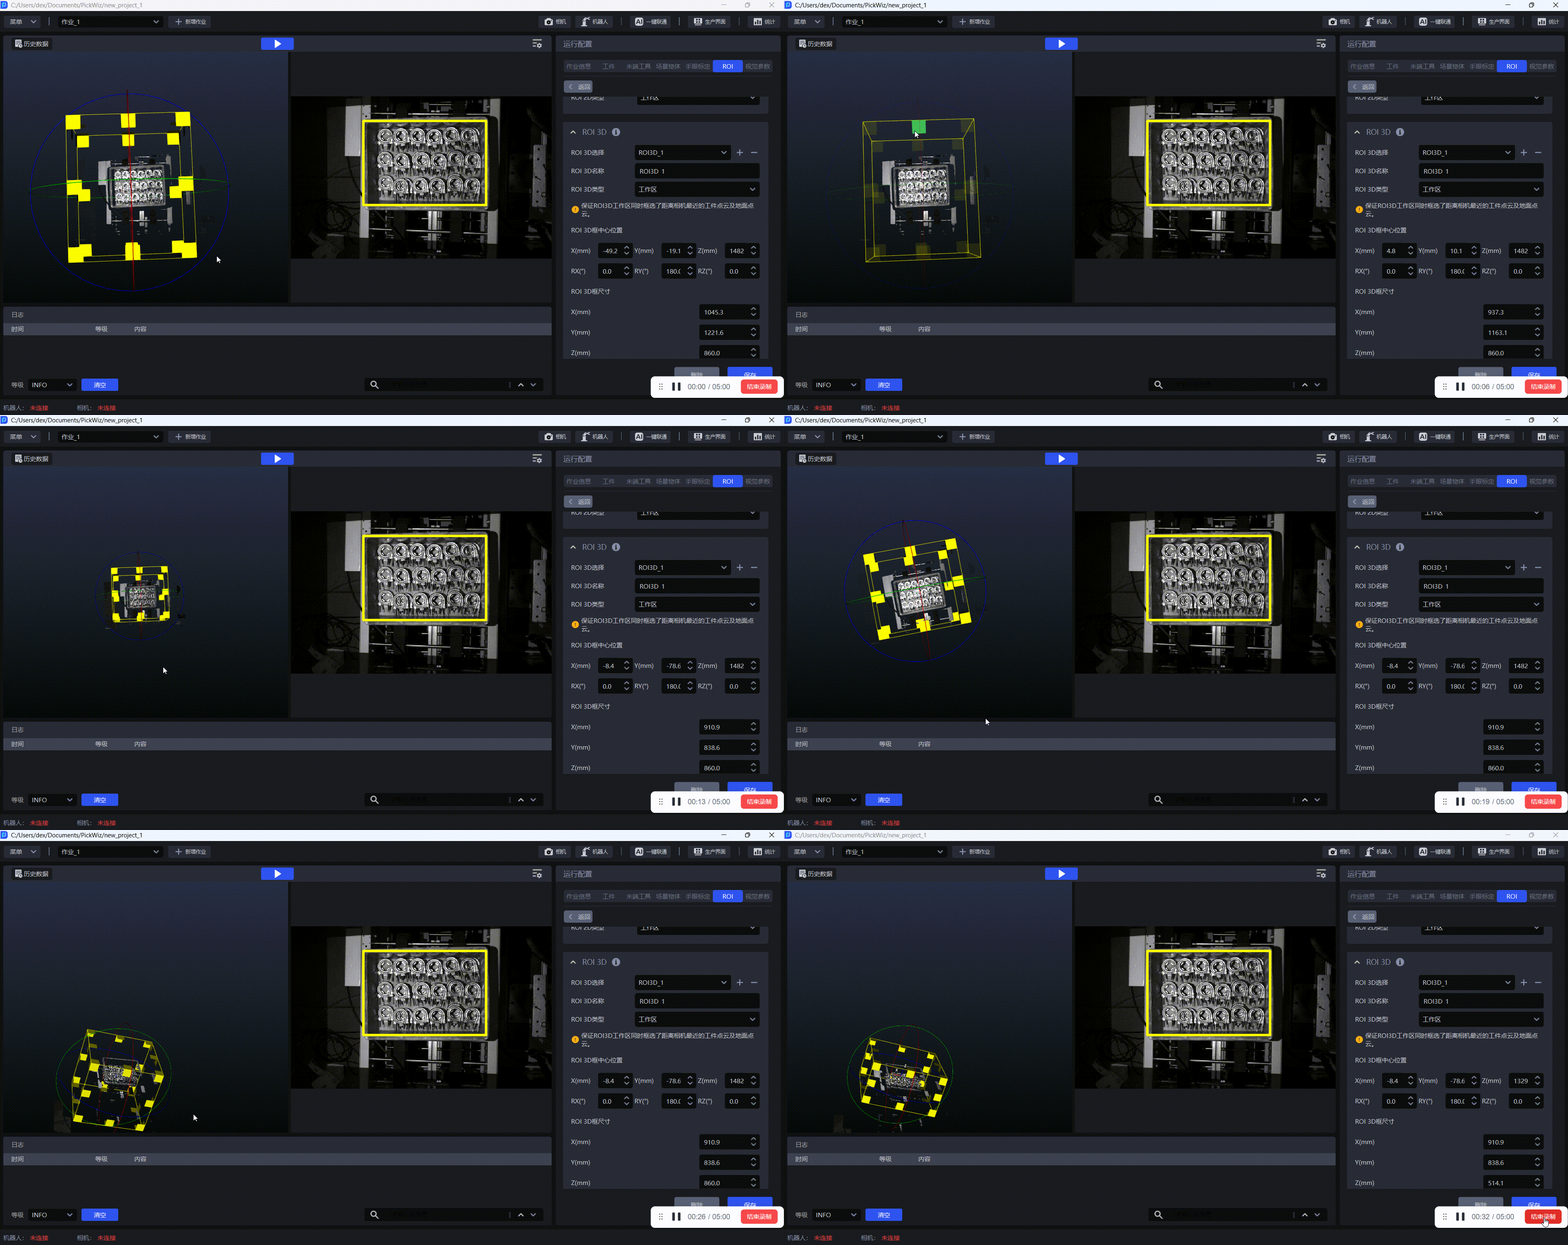
Place the cursor in the 3DPoint Cloud window, long press the right mouse button and drag the yellow mark to adjust the size of the ROI 3D box. The ROI 3D box should completely surround the Target Object and be slightly larger than the Target Object, as shown in the figure below.
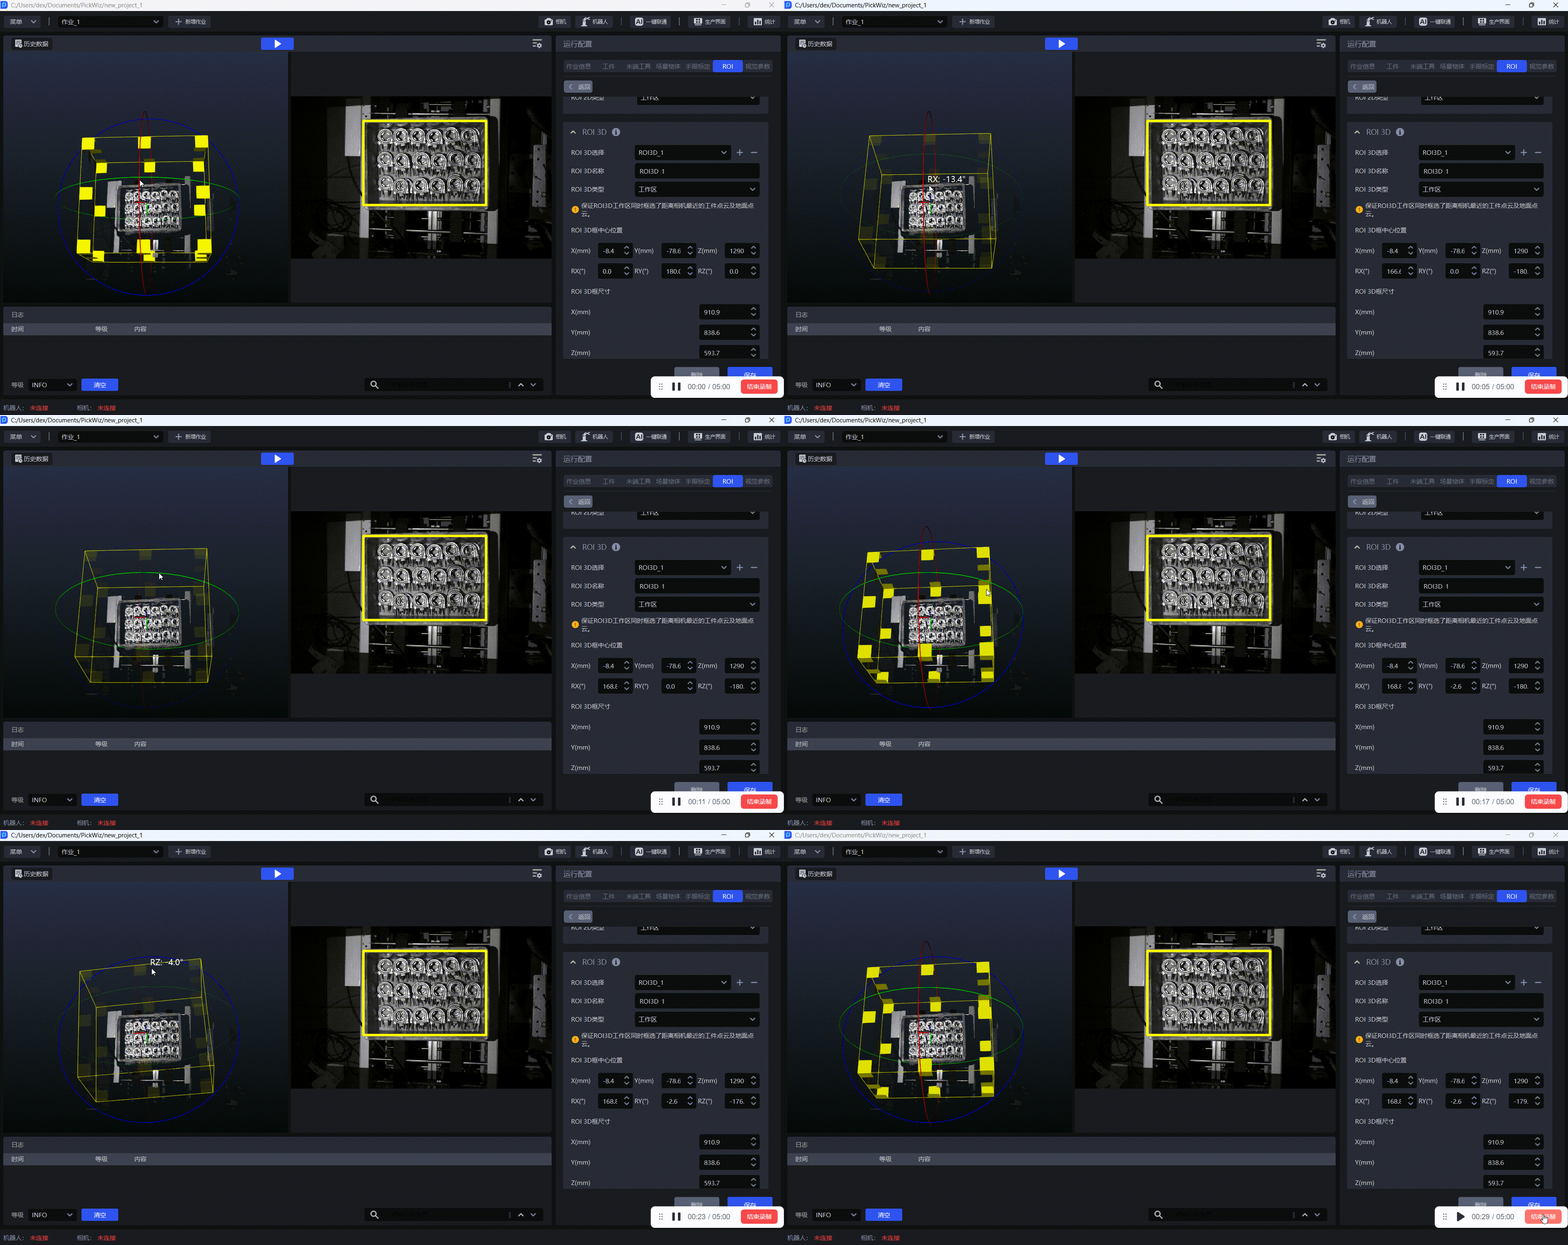
Long press the right mouse button and drag the red/green/blue arc to rotate the ROI 3D frame. Red represents the X-axis, green represents the Y-axis, and blue represents the Z-axis. When you drag the arc to rotate the ROI 3D box, the rotation angle value will be displayed in real time.
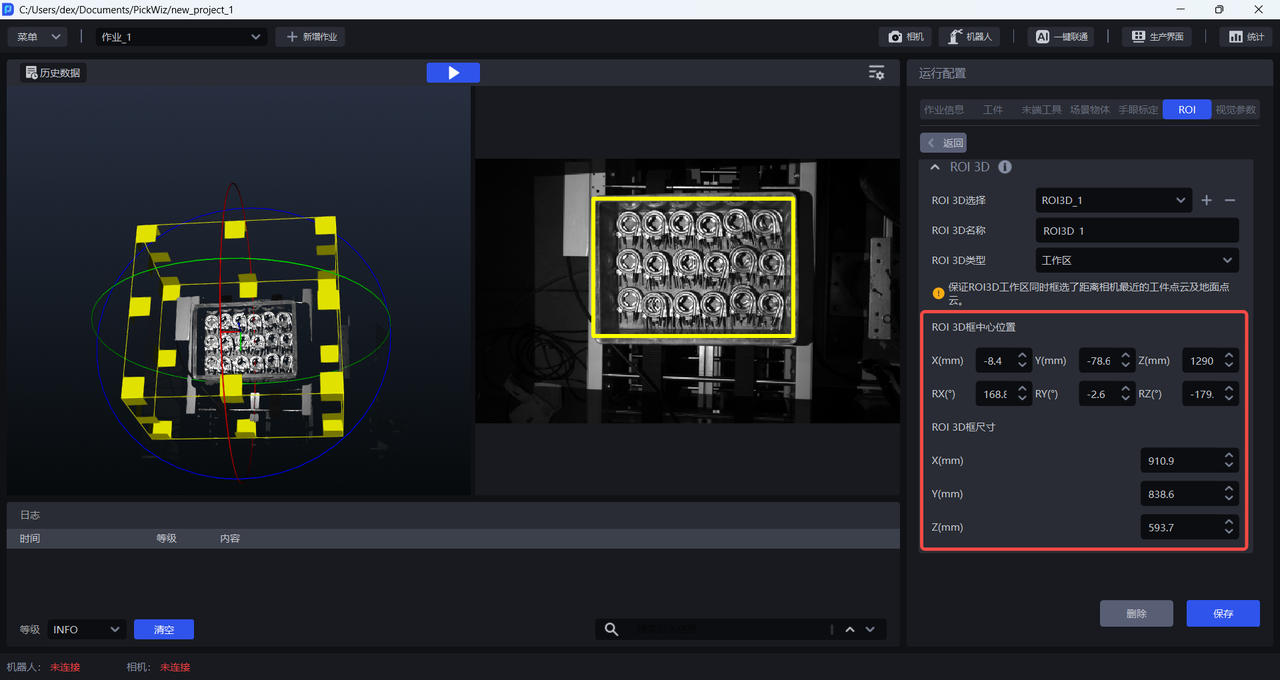
- Enter value
Set the pose and ROI 3D frame center position and ROI 3D frame size, and adjust the size and position of the ROI 3D frame.
(4) Click Save to save the current ROI 3D configuration.
(5) If you need to set multiple ROI 3D type areas, you can click + to add a new ROI 3D configuration; conversely, click - to delete the current ROI 3D configuration.
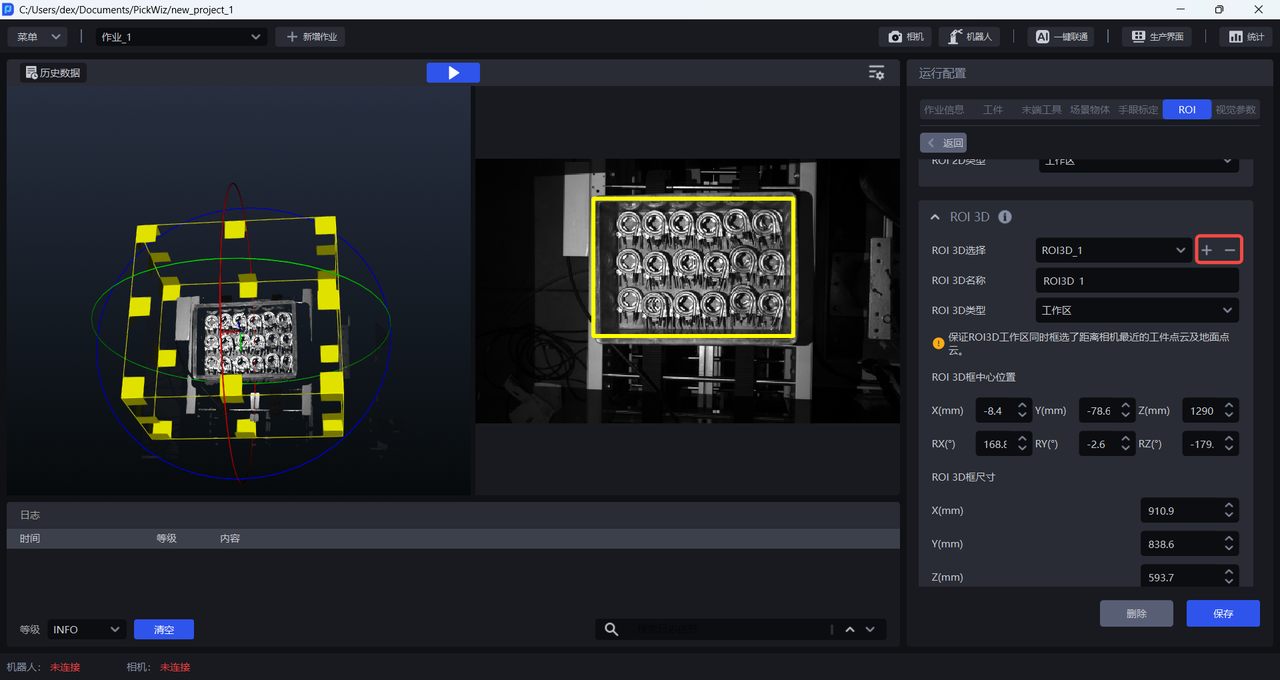
Each time a new ROI 3D configuration is added, the system will name it in the order of addition by default. It also supports custom ROI 3D names; and the size and position of the 3D box will inherit the configuration of the current ROI 3D box. Then follow the above steps to set up ROI 3D.
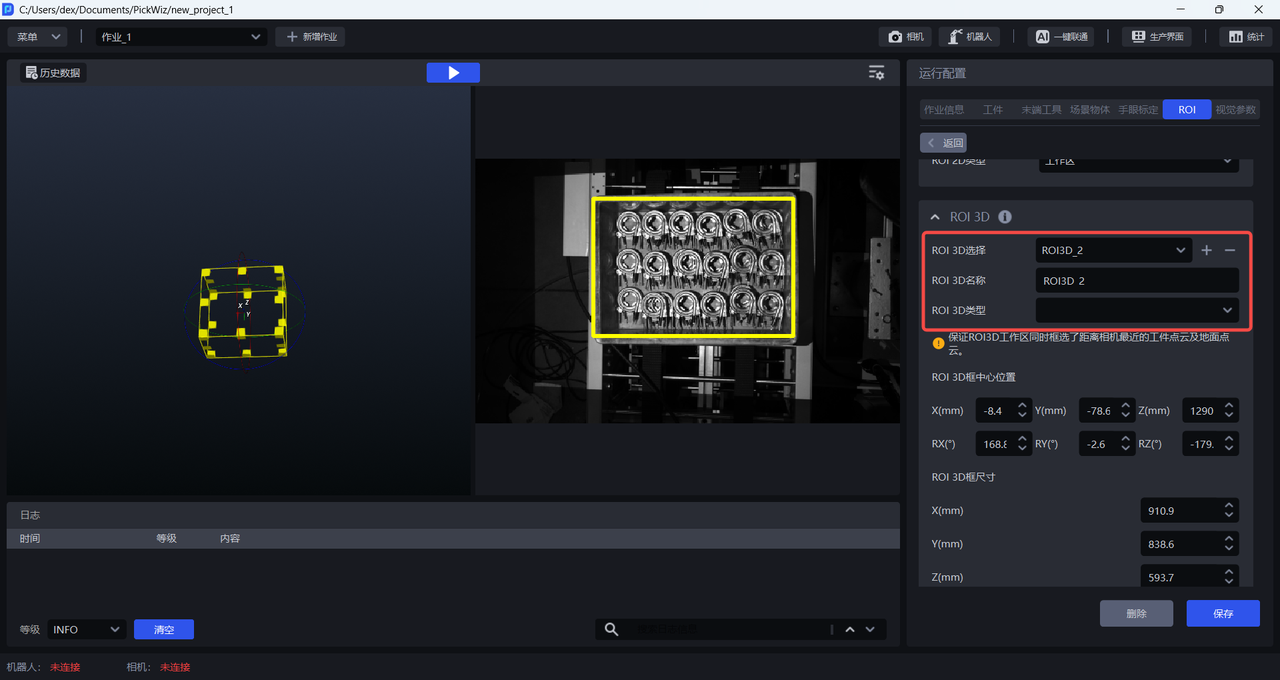
Notice
Under the same ROI configuration, when setting multiple ROI 3Ds, the ROI 3D types cannot be repeated. For example, ROI3D_1 and ROI3D_2 cannot be set as workspaces at the same time.
2.4 Delete ROI
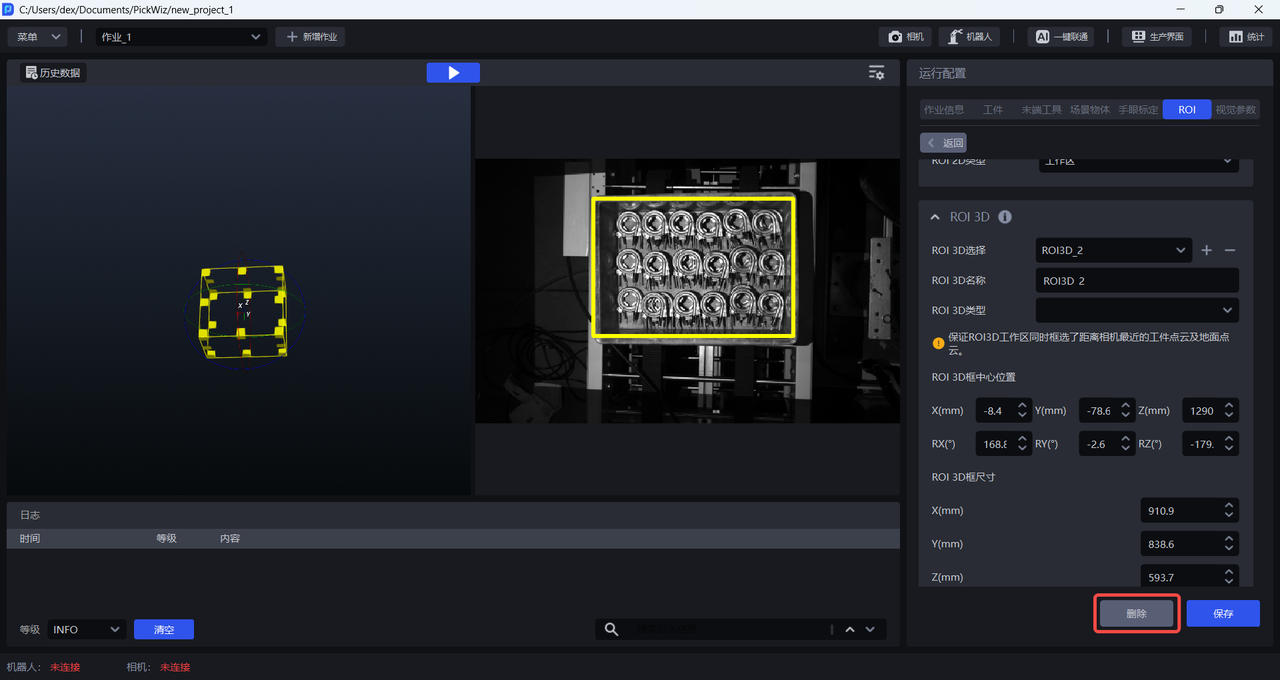
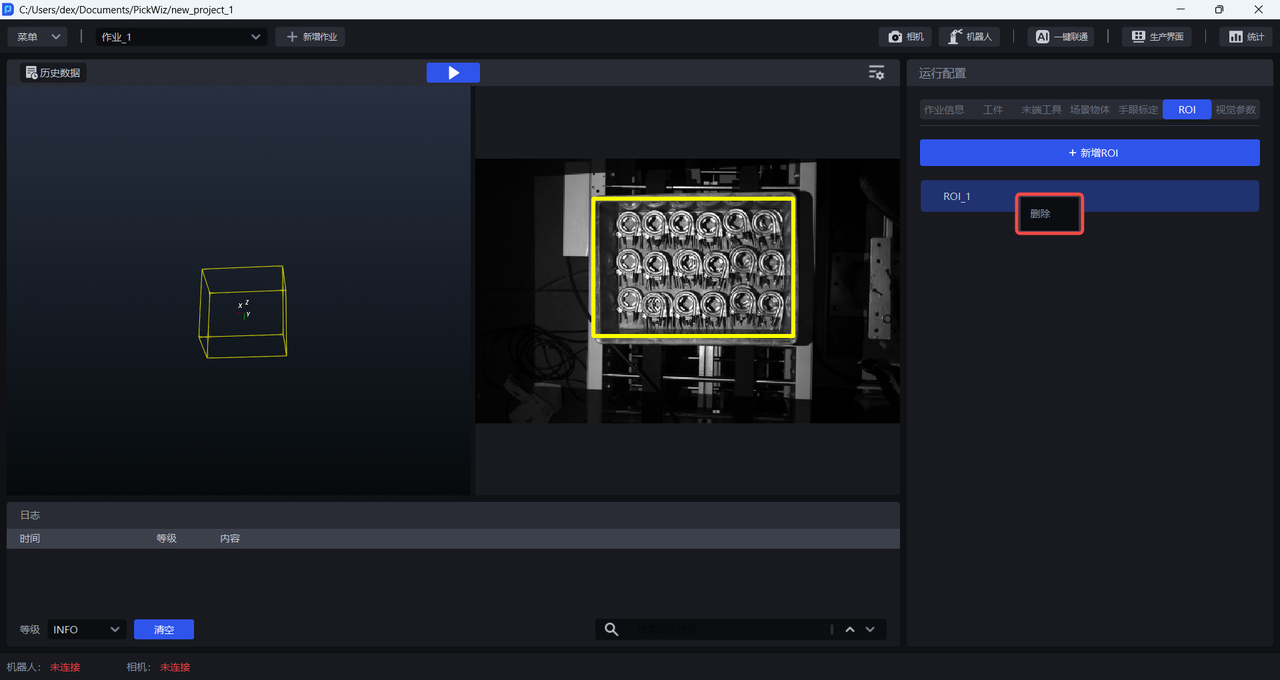
If you need to delete the current ROI configuration, you can click Delete on the ROI configuration interface, or right-click the ROI configuration to be deleted in the ROI list and click Delete.
3. Select ROI
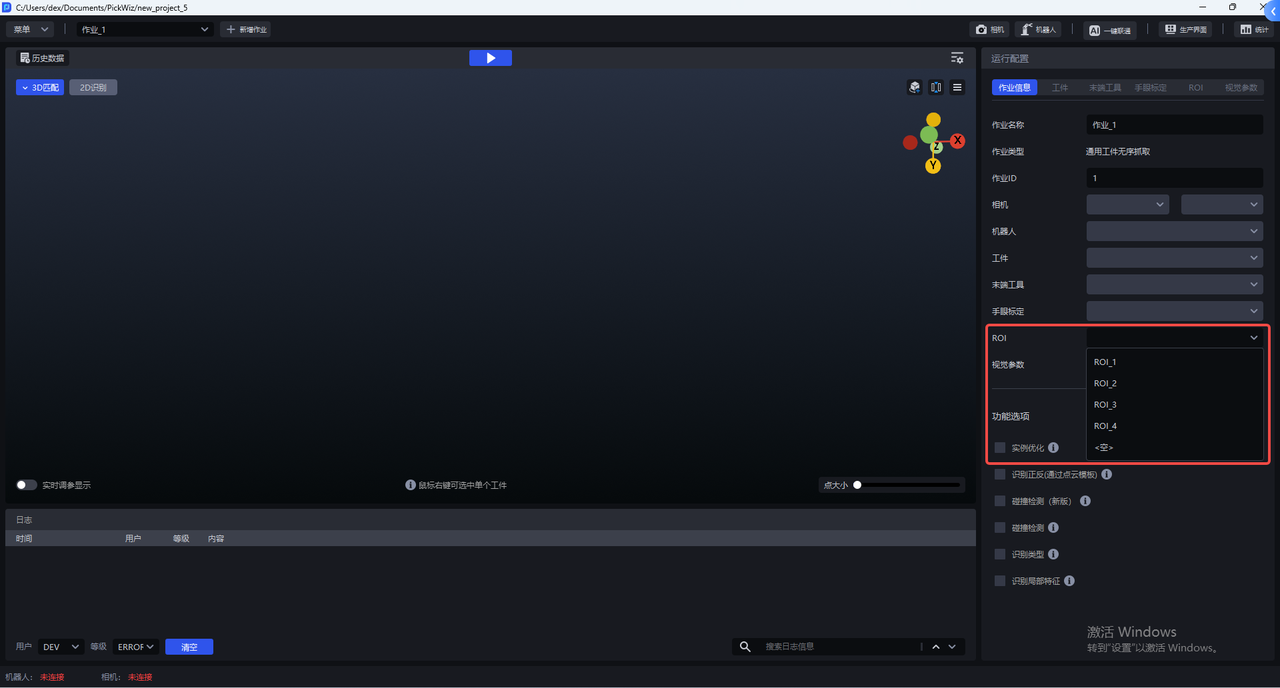
When configuring Task information, you need to select the required ROI configuration. Only one ROI configuration can be selected for a Task, and multiple Tasks can use the same ROI configuration.