Target Operation Guide
Target is the Target Object that Robot needs to capture. Different types of Target require different configuration content. Please select the corresponding configuration process according to the Target type.
1. sack
1.1 New Target
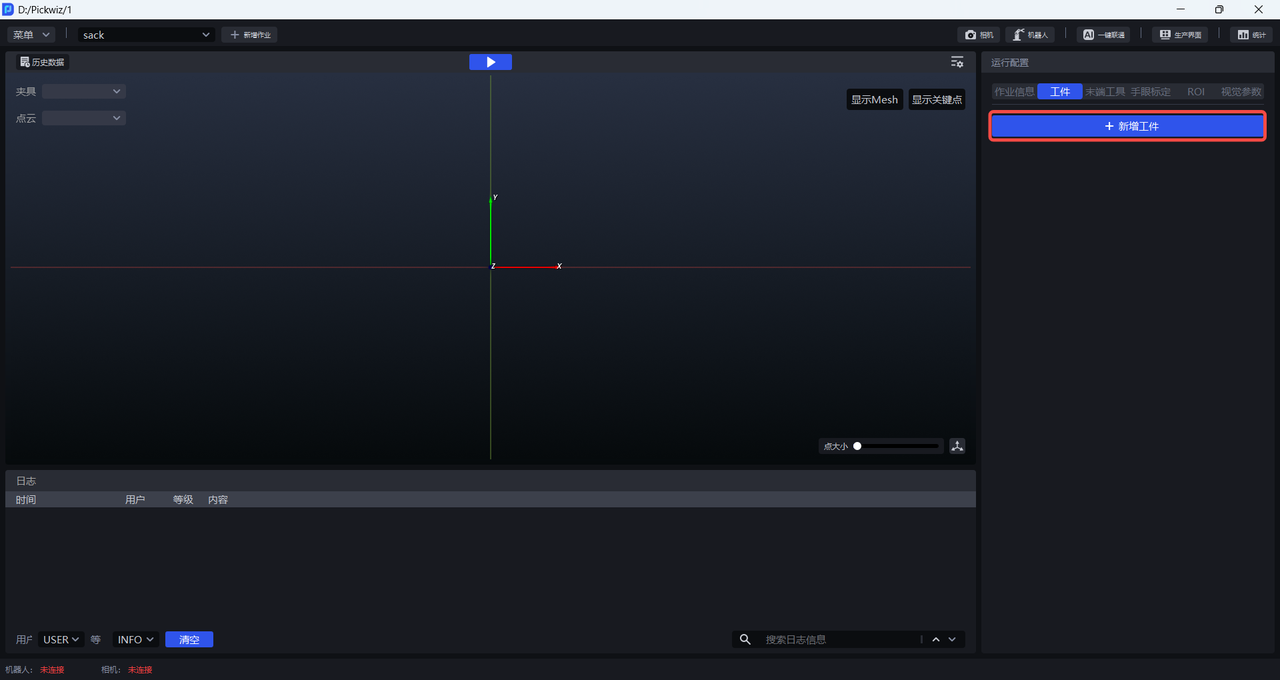
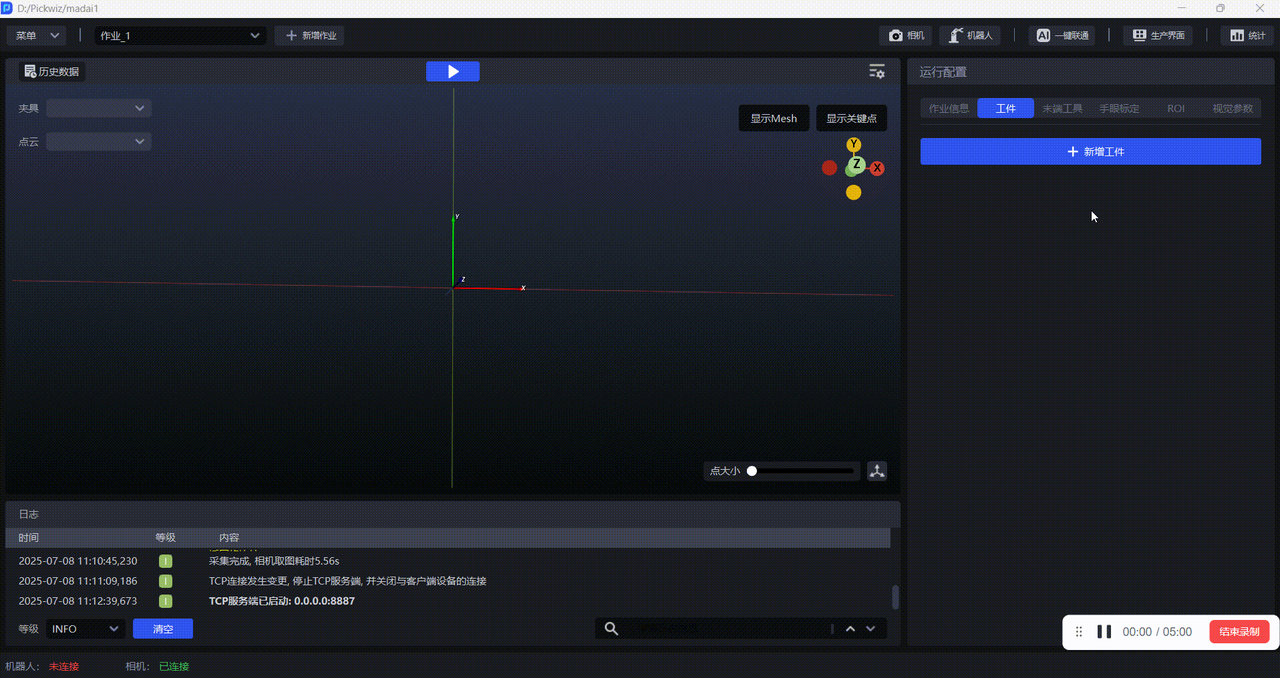
Click + Add Target in the Target column in Run Configuration to enter the Target interface.
1.2 Configure Target
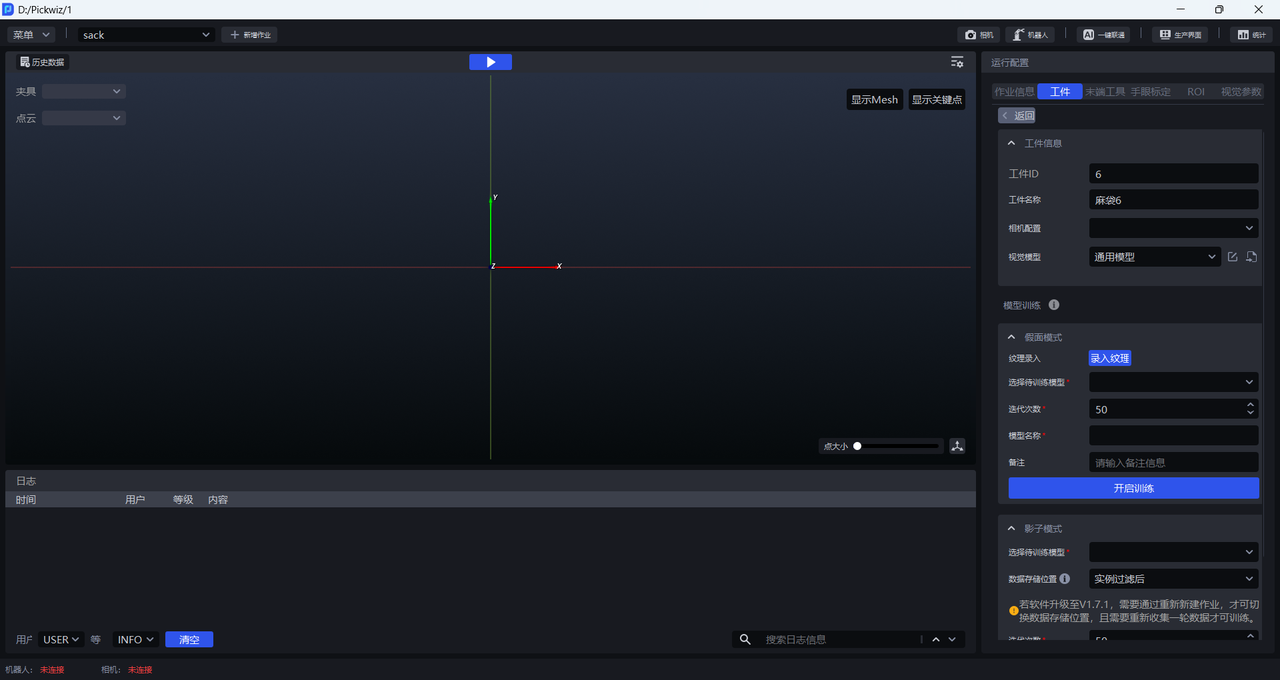
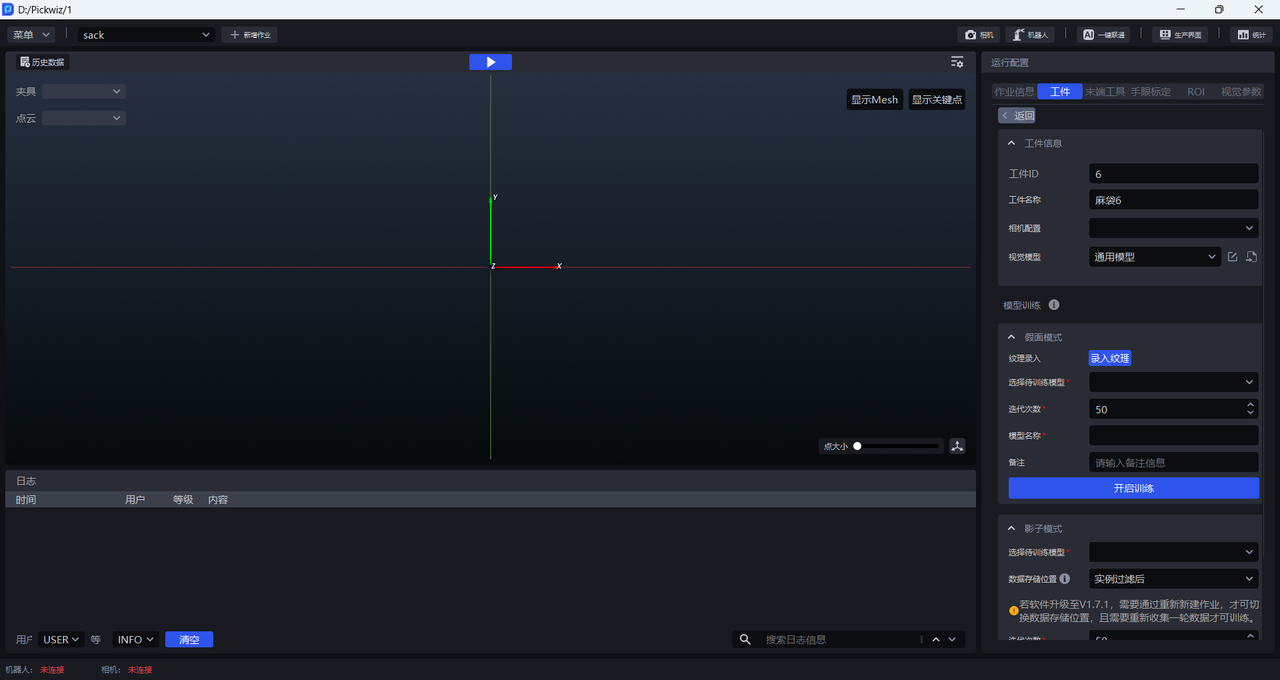
(1) Target information
| TargetID | TargetID, usually used when changing production, Robot uses TargetID to switch Target, | can be modified
| Target name | The default Target name is Target type sack TargetID, which can be modified |
| Camera configuration | can choose Camera configuration, optional |
| Visual Model | deep learning model is used to segment instances from Scene. The default Visual Model of Sack is the general model of Sack. If the general model of Sack does not perform well on instance segmentation, mask mode or shadow mode can be applied to optimize the Visual Model. |
(2) Model training
| Mask Mode | Optionally, if the sack general model does not perform well on instance segmentation, you can apply Mask mode to optimize the Visual Model's segmentation effect. Mask mode needs to input new textures and use synthetic data to train the model. For specific operations, please refer to [How to use Mask mode] (如何使用假面模式.md) |
| Shadow Mode | Optionally, if the sack general model does not perform well on instance segmentation, you can apply shadow mode to optimize the visual model's segmentation effect. Shadow mode needs to use real running data to train the model and optimize the segmentation effect of Visual Model. For specific operations, please refer to [How to use Target shadow mode] (如何使用工件影子模式.md) |
1.3 Select Target
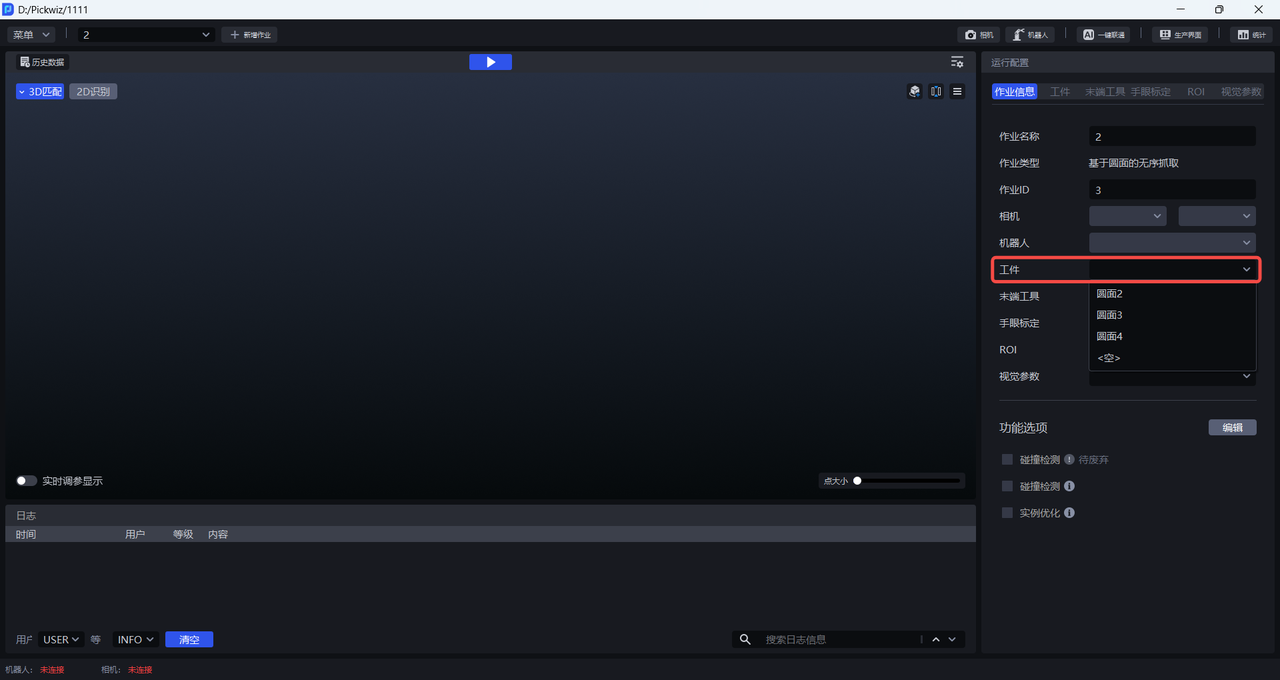
After configuring the sack, click Return to return to the main interface, and select the corresponding sack in Task Information-Target.
1.4 example
2. Carton
2.1 New Target
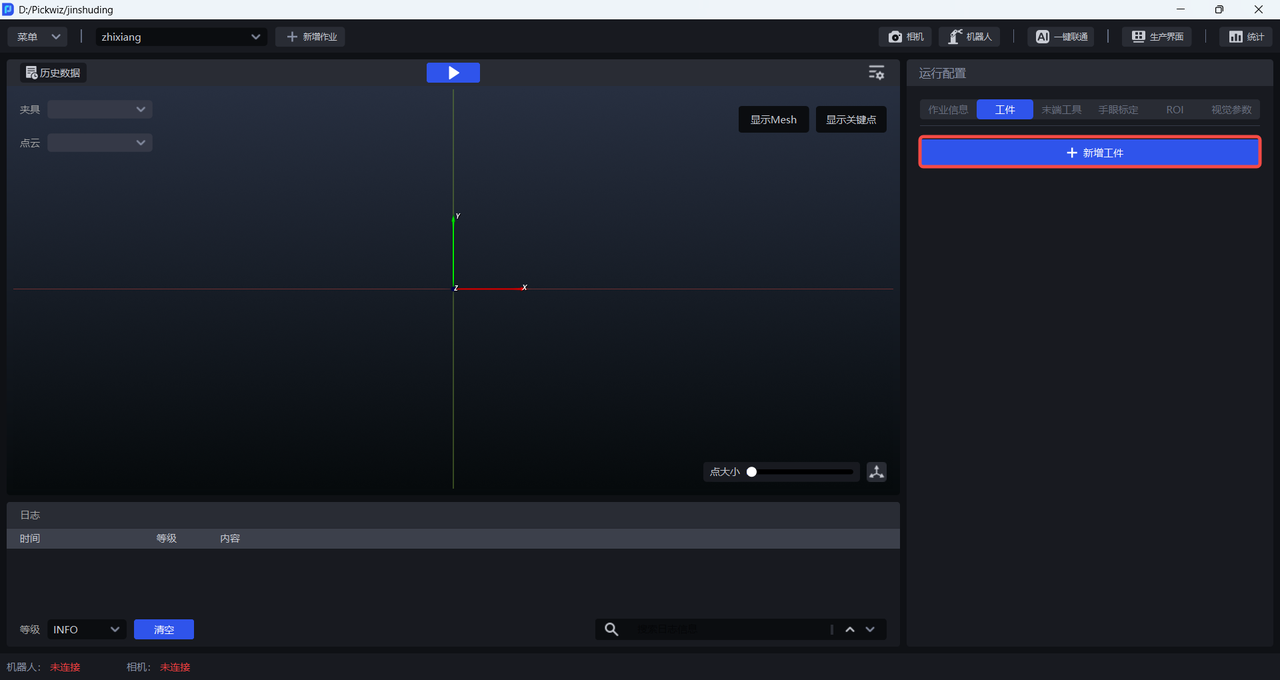
Click + Add Target in the Target column in Run Configuration to enter the Target interface.
2.2 Configure Target
(1) Target information
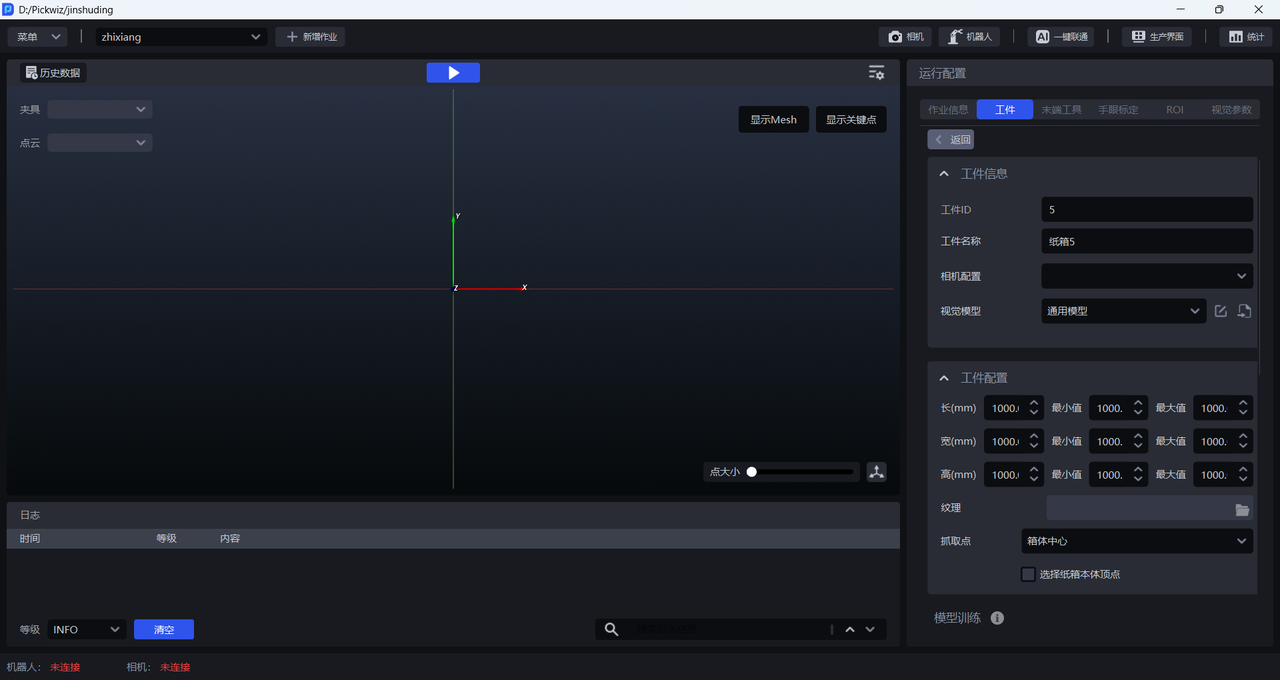
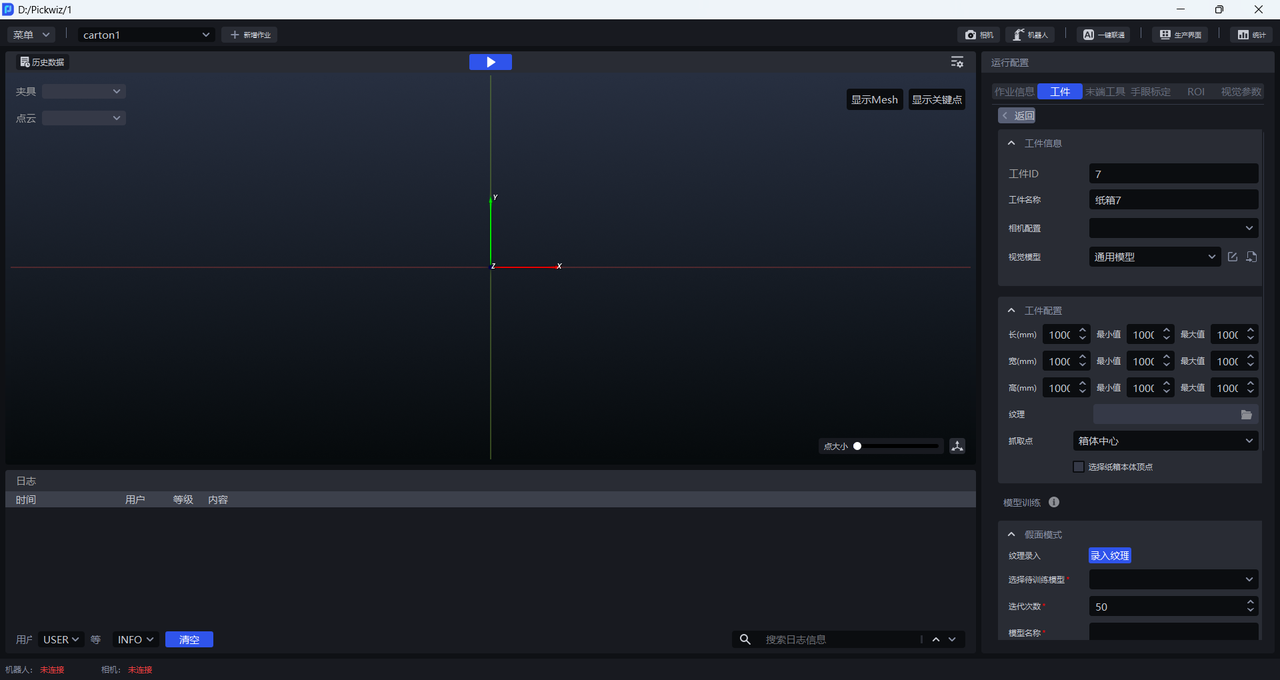
| TargetID | TargetID, usually used when changing production, Robot uses TargetID to switch Target, | can be modified
| Target name | The default Target name ofis carton & TargetID, which can be modified |
| Camera configuration | can choose Camera configuration, optional |
| Visual Model | Thedeep learning model is used to segment instances from the Scene. The default Visual Model of the carton is a universal model of the carton. If the universal model of the carton does not perform well on instance segmentation, the mask mode or shadow mode can be applied to optimize the Visual Model. |
(2) Target configuration
| length, width and height | Configure the length, width and height of the carton to prevent Visual Model segmentation errors. Optional item |
| texture | Import the texture image of the carton, use the texture to control the grabbing direction, disabled, no need to fill in |
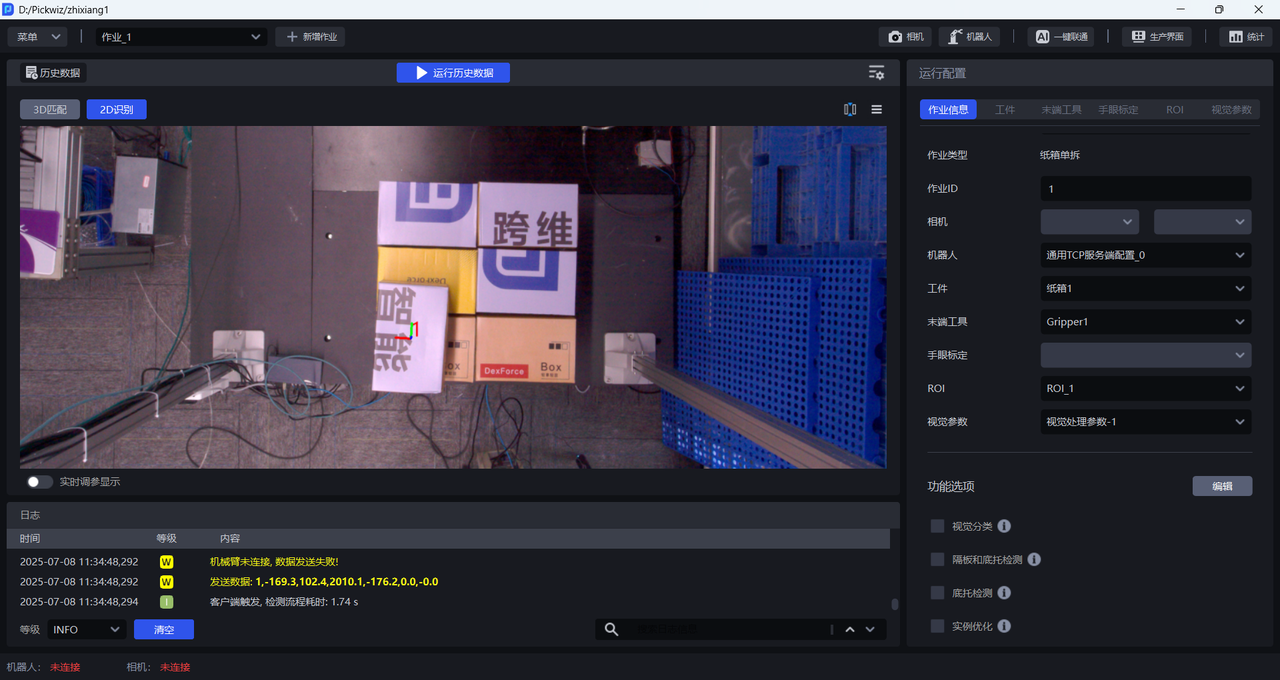
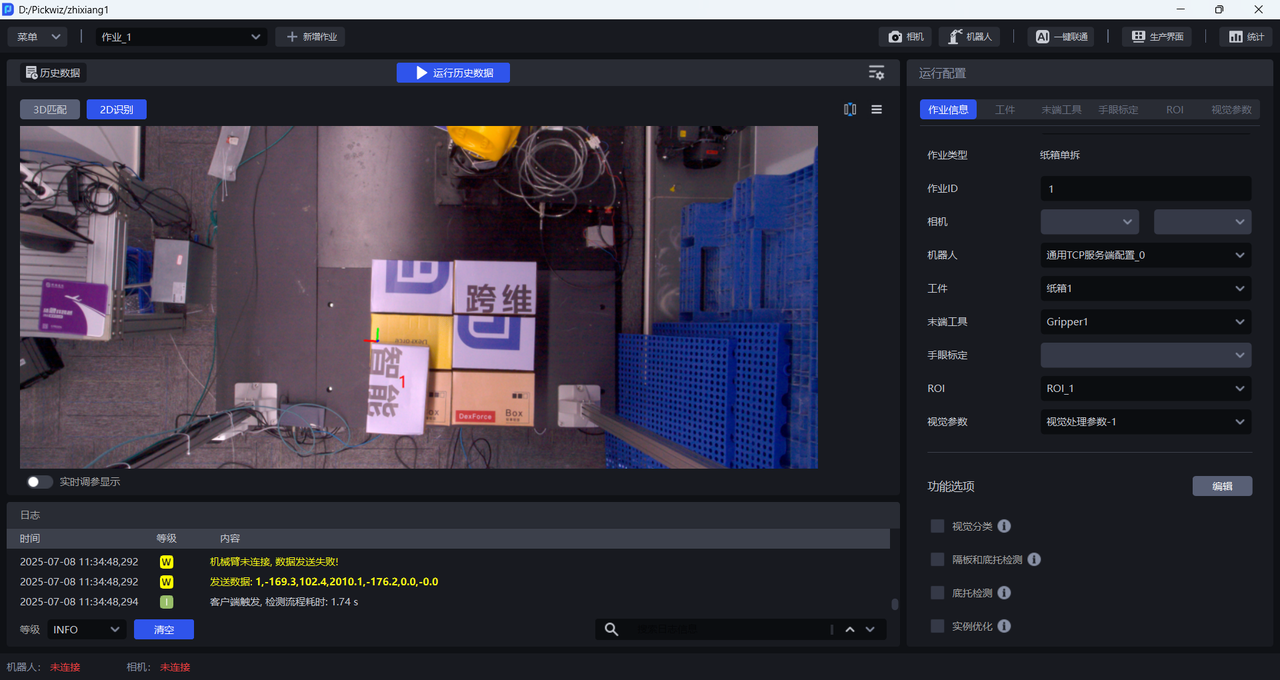
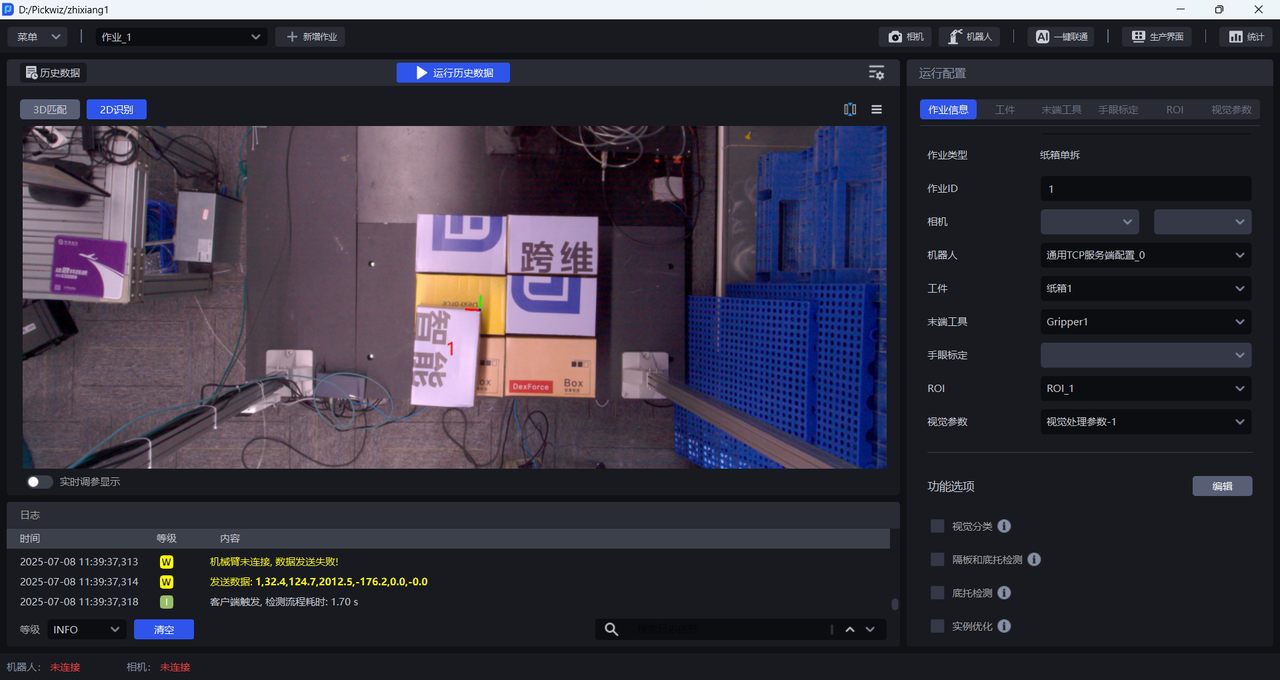
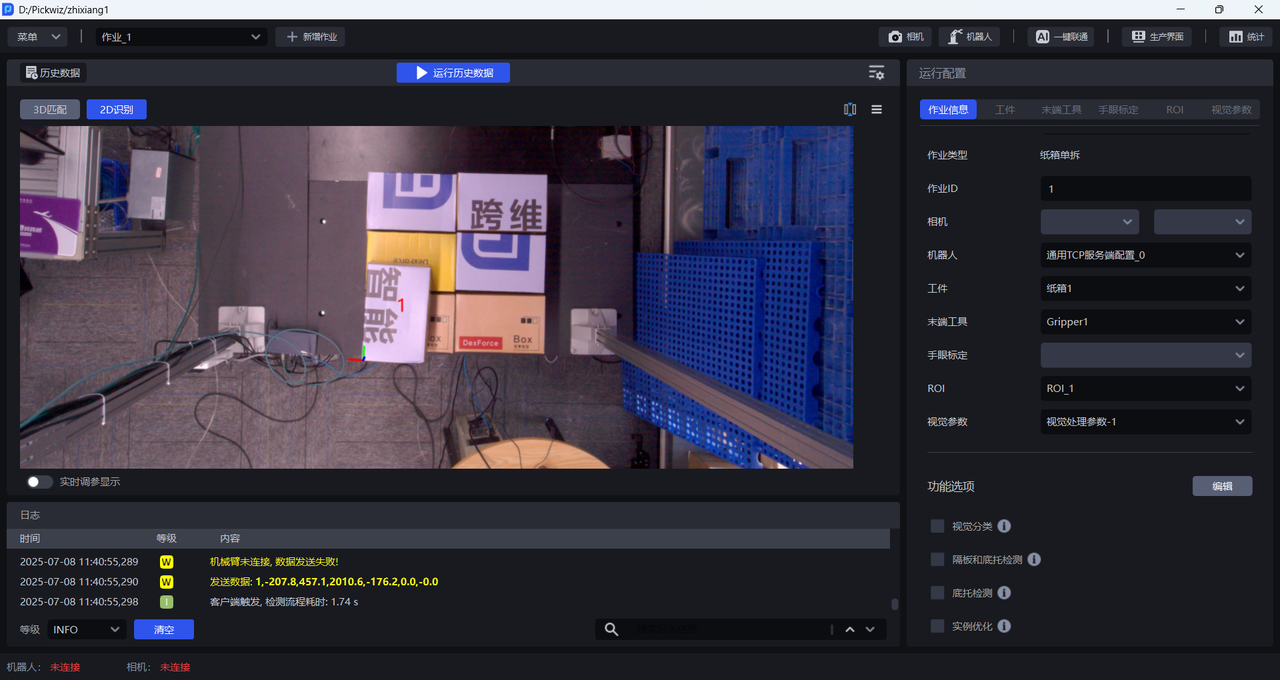
| Pick Point | Set the Pick Point position of the Robot to grab the carton. You can choose "Center of the Box", "Upper Left Corner of the Box", "Lower Left Corner of the Box", or "Upper Right Corner of the Box" |
| Select the vertex of the carton body | If checked, the vertex of the carton itself will be used as the origin of the coordinate system, and the left side of the long side will be the upper left; if not checked, the vertex of the box in the pixel coordinate system will be used as the origin of the coordinate system, and the corresponding corner point will be selected. |
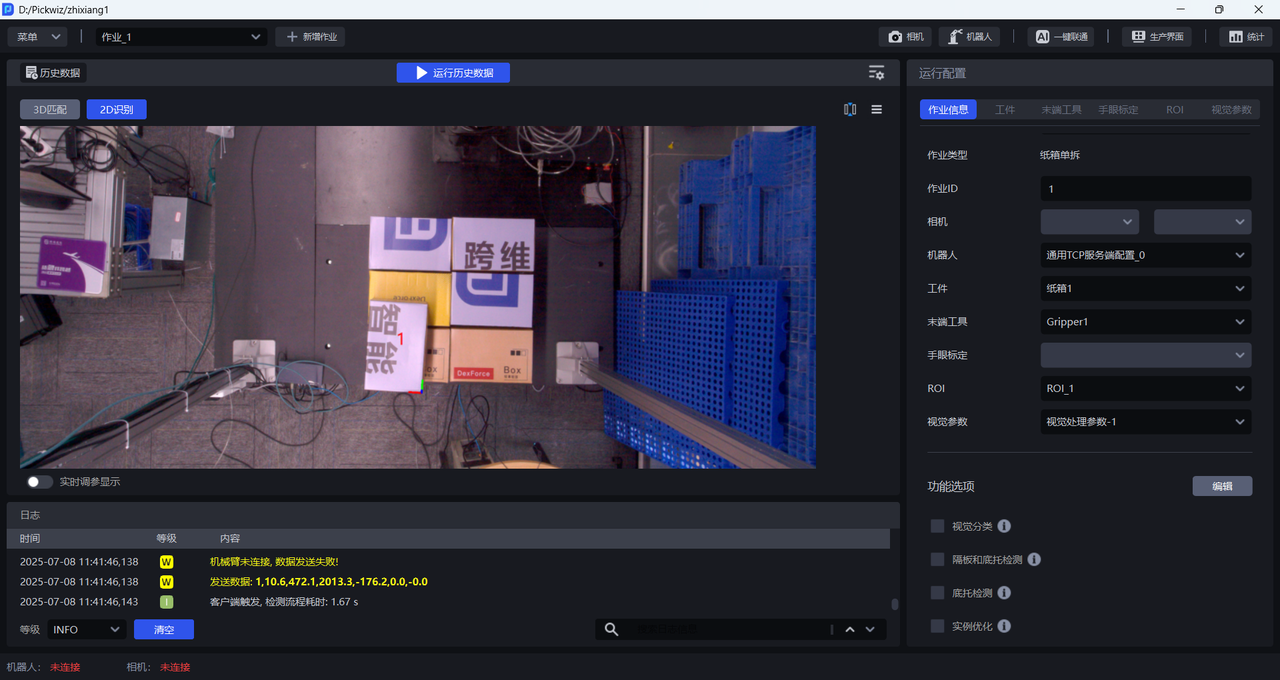
An example of carton Pick Point settings is shown in the figure below.
(3) Model training
| Mask Mode | Optionally, if the carton universal model does not perform well on the segmentation of the instance, you can apply Mask mode to optimize the segmentation effect of the Visual Model. Mask mode needs to input new textures and use synthetic data to train the model. For specific operations, please refer to [How to use Mask mode] (如何使用假面模式.md) |
| Shadow Mode | Optionally, if the carton universal model does not segment the instance well, you can apply shadow mode to optimize the segmentation effect of the Visual Model. Shadow mode needs to use real running data to train the model and optimize the segmentation effect of Visual Model. For specific operations, please refer to [How to use Target shadow mode] (如何使用工件影子模式.md) |
2.3 Select Target
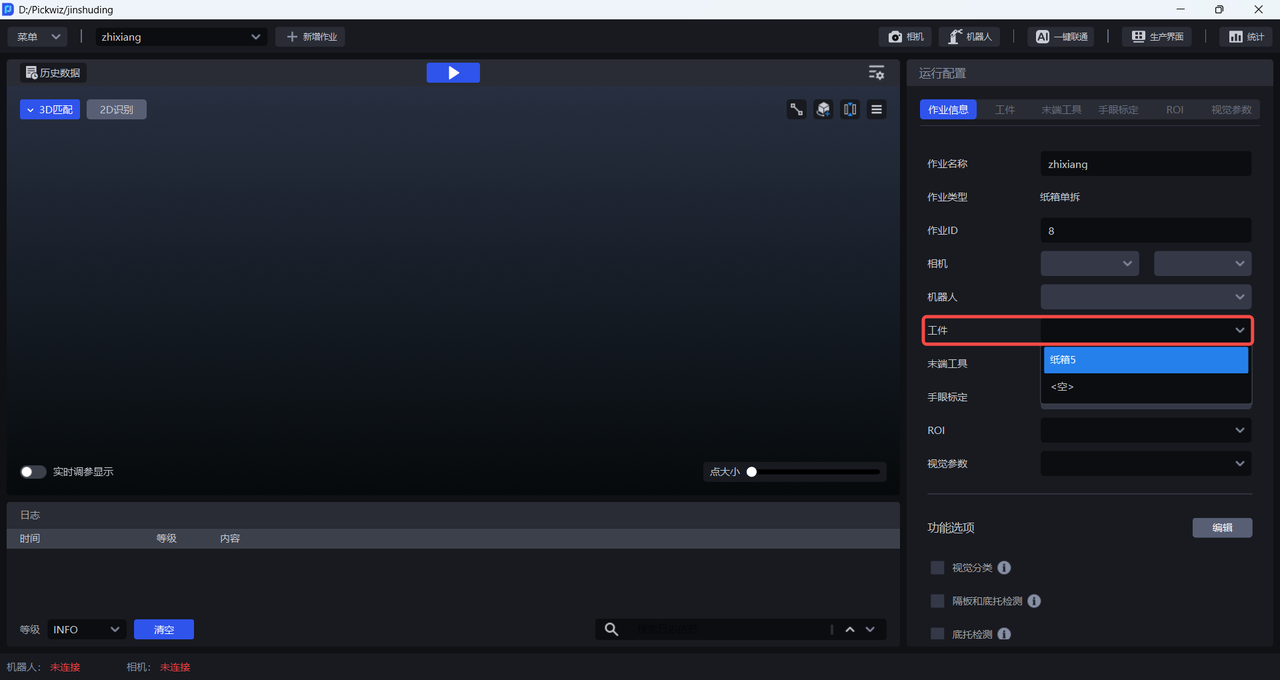
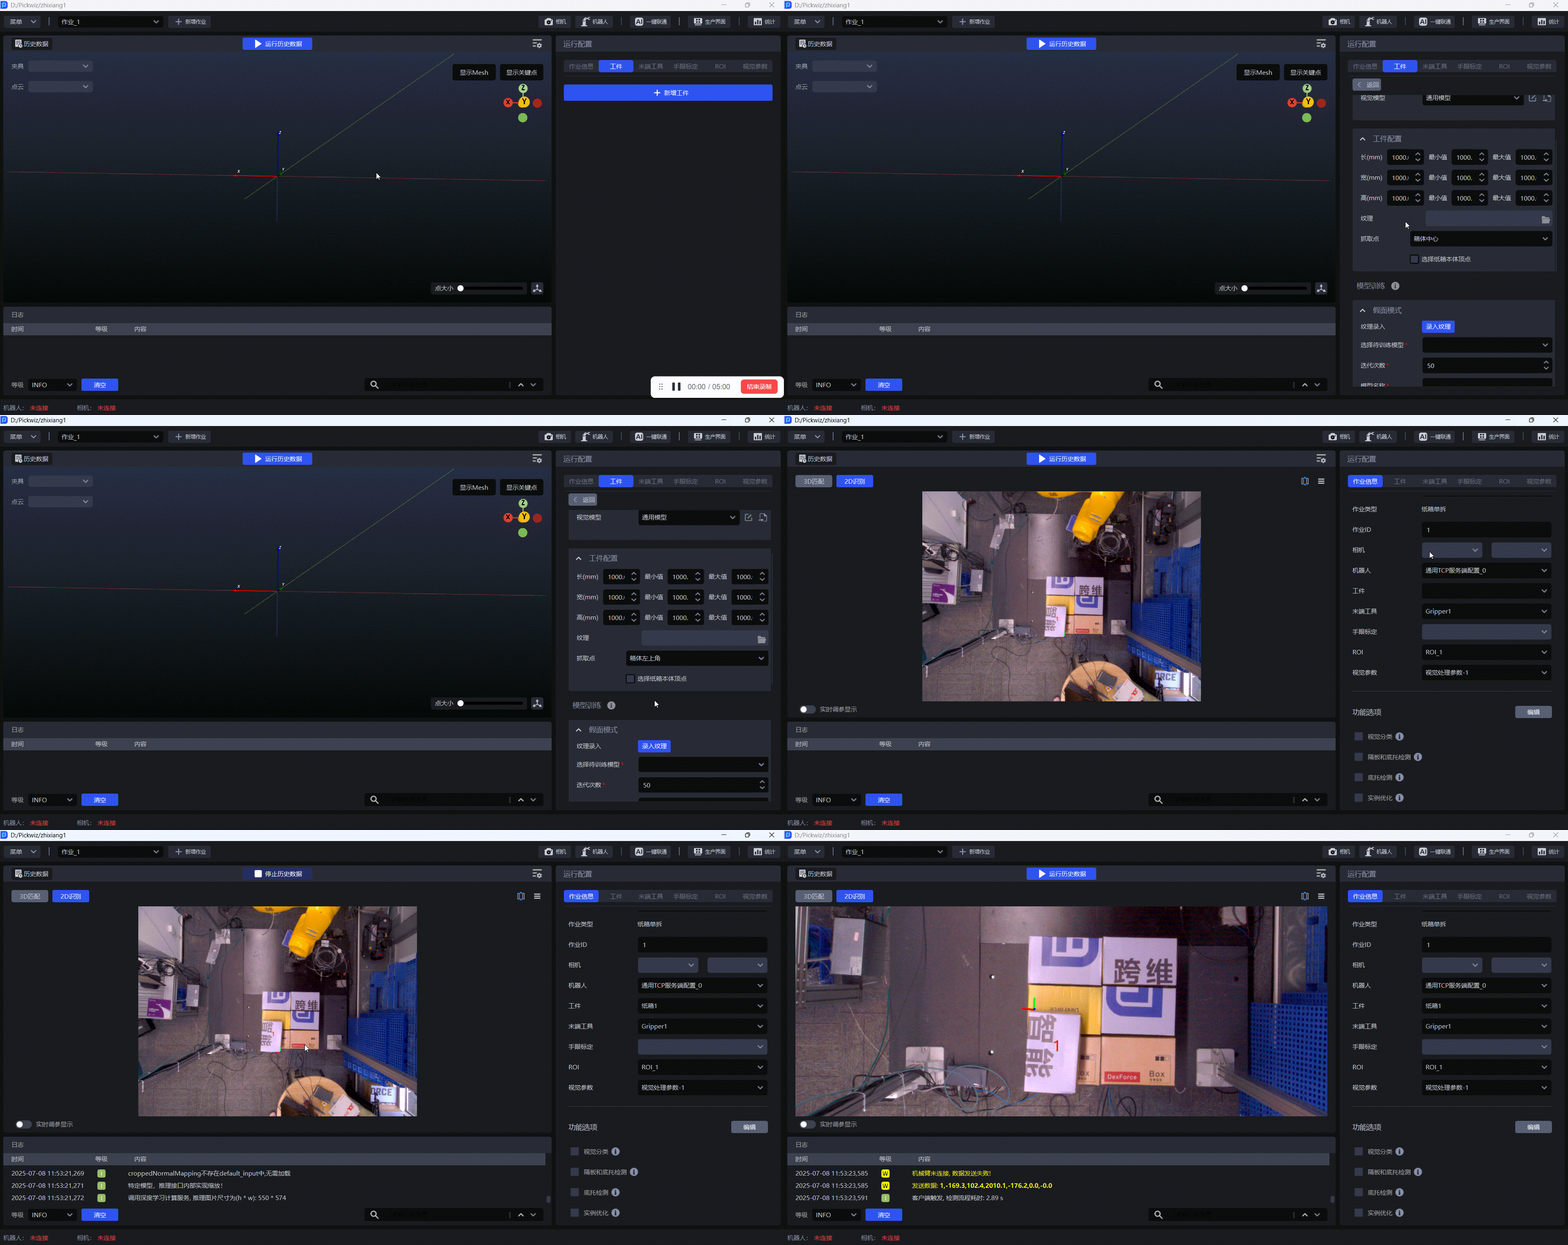
After configuring the carton, click Return to return to the main interface, and select the corresponding carton in Task Information-Target.
2.4 example
3. Universal Target
3.1 New Target
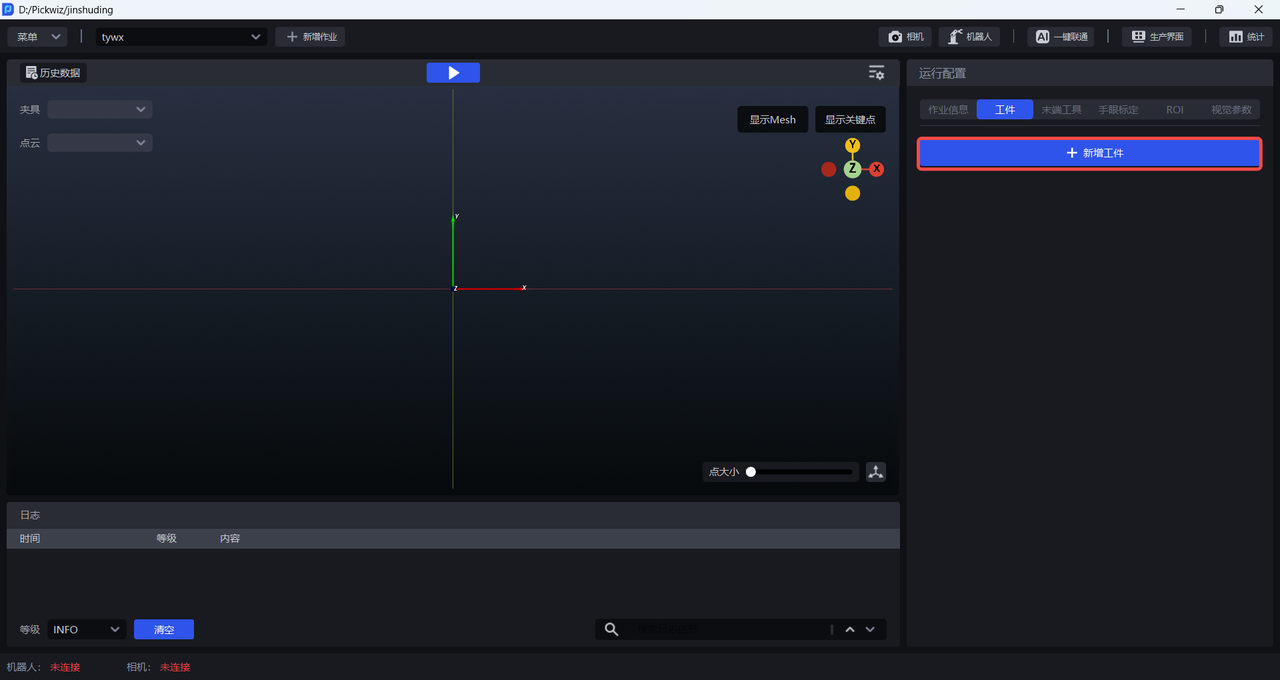
Click + Add Target in the Target column in Run Configuration to enter the Target interface.
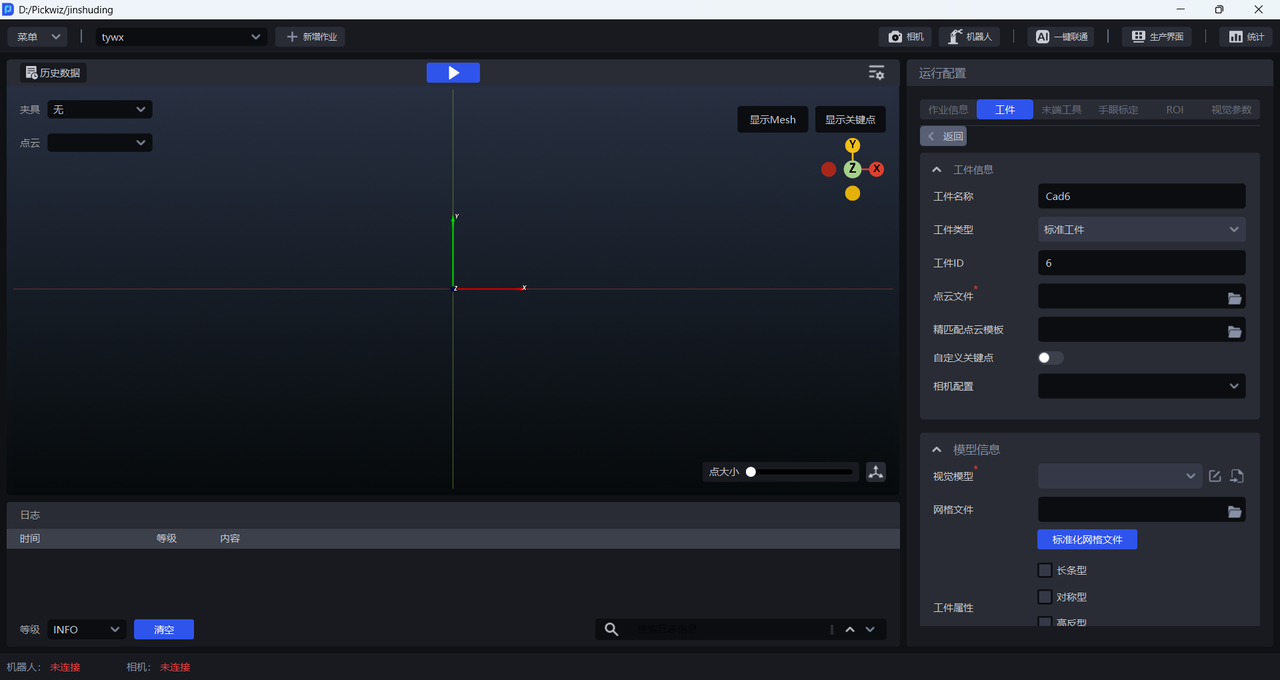
3.2 Configure Target
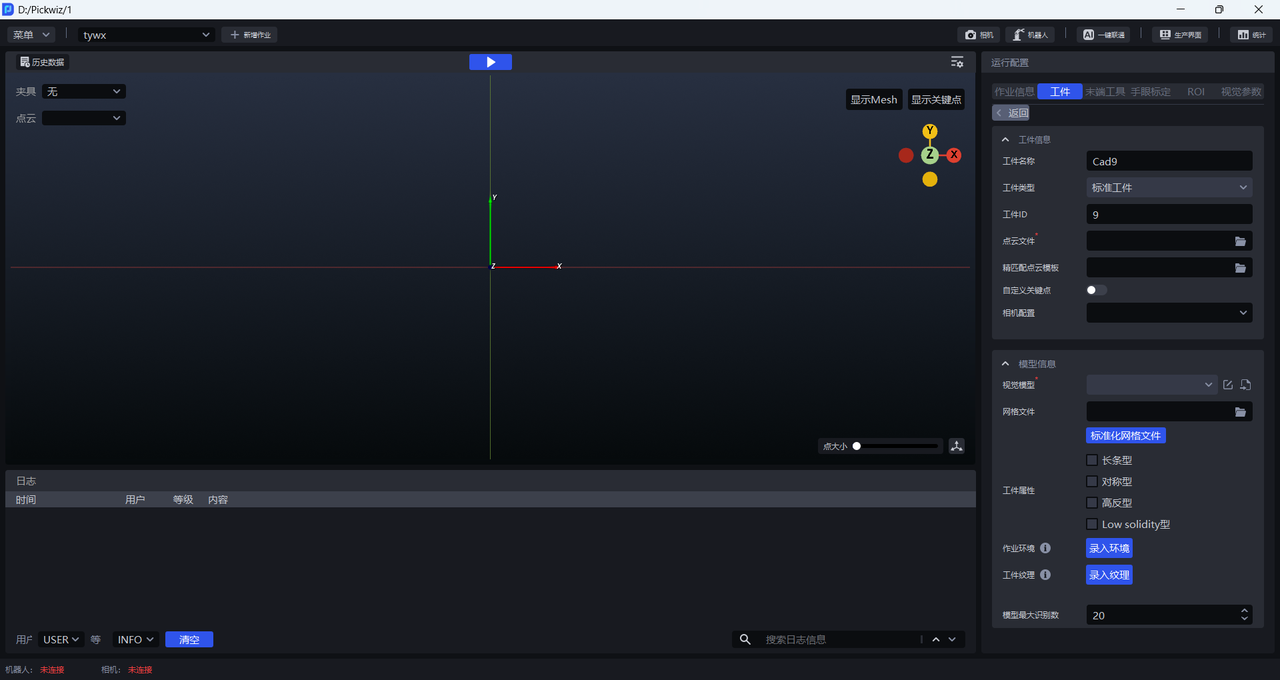
(1) Target information
| TargetID | TargetID, usually used when changing production, Robot uses TargetID to switch Target, | can be modified
| Target name | The default Target name ofgeneral target is "Cad&TargetID", which can be modified |
| Target type | The default Target type ofuniversal Target is standard Target and cannot be modified |
| PCD(Point Cloud Data) | Required fields, upload the Point Cloud template of the general Target, which is used for Coarse Matching with the actual Point Cloud collected by the Camera. You can refer to the [Point Cloud Template Production Guide] (点云模板制作指南.md) to make the Point Cloud template. |
| Fine matchingPoint Cloud template | It is not required. You can upload the full Point Cloud template of a general target for fine matching with the actual Point Cloud collected by the Camera to optimize the Target posture. You can refer to [Point Cloud Template Production Guide] (点云模板制作指南.md) to create the Fine matchingPoint Cloud template. |
| Custom key points | Required option, the general target should enable custom key points, upload the key points of the general target, and use them to match the key points predicted by the actual Point Cloud with the Visual Model, The key point file name is generally keypoint_128.ply. You can refer to [Point Cloud Template Production Guide] (点云模板制作指南.md) to create key point files. |
| Camera configuration | can choose Camera configuration, optional |
Note
Universal Target should be enabled Customize key points and upload the key point file of the general Target, The key point file name is generally keypoint_128.ply
(2) Model information
| Visual Model | Required field, deep learning model, used to segment instances from the Scene. The Visual Model of the Universal Target adopts the CAD-based synthetic data training (one-click connection) method. The Visual Models of different Universal Targets are also different, so the Visual Model of the Universal Target needs one-click connection training. For the specific process, please refer to One-click Connection Training Visual Model/一键联通训练成像模型. |
| grid file | Required, upload the CAD model of the general Target. The grid file should be a standardized CAD model to provide support for subsequent operations such as one-click training of the Visual Model, generation of Point Cloud templates, and Point Cloud alignment grids. Please refer to the [Point Cloud Template Production Guide] (点云模板制作指南.md) standardized grid file. |
| Pattern mask | There is only ordered loading and unloading Scene, which is used to simulate the form of input materials from Target under the Scene to support the use of one-click connection training model under the ordered Scene. Close fit: can help quickly set the number of Targets in a row/column, and is suitable for Scenes where the Targets are in order, have consistent postures, and have a small distance between Targets. If the number of Targets exceeds the maximum number of 40, one-click connection is not supported. It is necessary to ensure that the total number of Targets is less than 40, and the minimum common denominator can be kept unified (for example: the actual number of incoming material rows and rows is 12:6, and the ratio is 2:1 according to the convention, set to 6:3). There is no need to set according to the actual number, and training can be performed normally to improve model capabilities. Customized Pattern mask: You can fully configure the detailed Parameters of the Pattern mask, which is applicable to all types of Scenes. |
| Target attribute | Optional option, used for one-click connection training model, optional "long strip type", "symmetrical type", "high reflection type", "low solidity type"
|
| Task environment | Optional option, enter the Task environment for one-click connection training model. The default randomly transformed background when generating data in One-click connection will be replaced with the entered Task environment data, thereby improving the recognition effect. |
| Target texture | Optionally, enter the Target texture for one-click connection training model. During model training in one-click connection, the uploaded texture will be used for data enhancement, thereby improving the recognition effect. |
| Maximum number of model recognitions | Used for one-click connection to control the maximum number of instances that can be recognized during Visual ModelInference. Under the same conditions, the larger the recognition number, the more recognition results the model can return, but the longer the inference time of the model is. In orderly Scene, it is generally recommended to fill in the number of materials slightly larger than one layer. In unordered Scene, it needs to be set according to the actual Scene. |
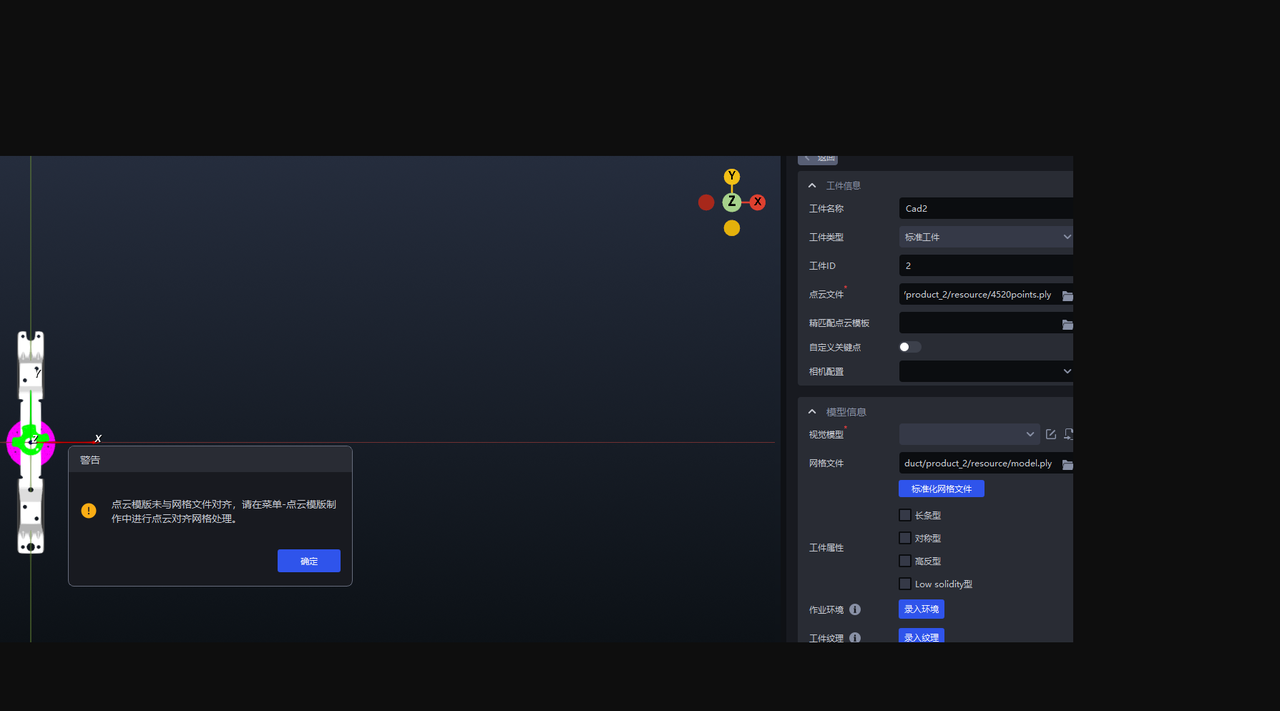
In the general TargetScene, when importing PCD (Point Cloud Data)/key point files, it is automatically verified whether it is aligned with the coordinate center of the grid file.
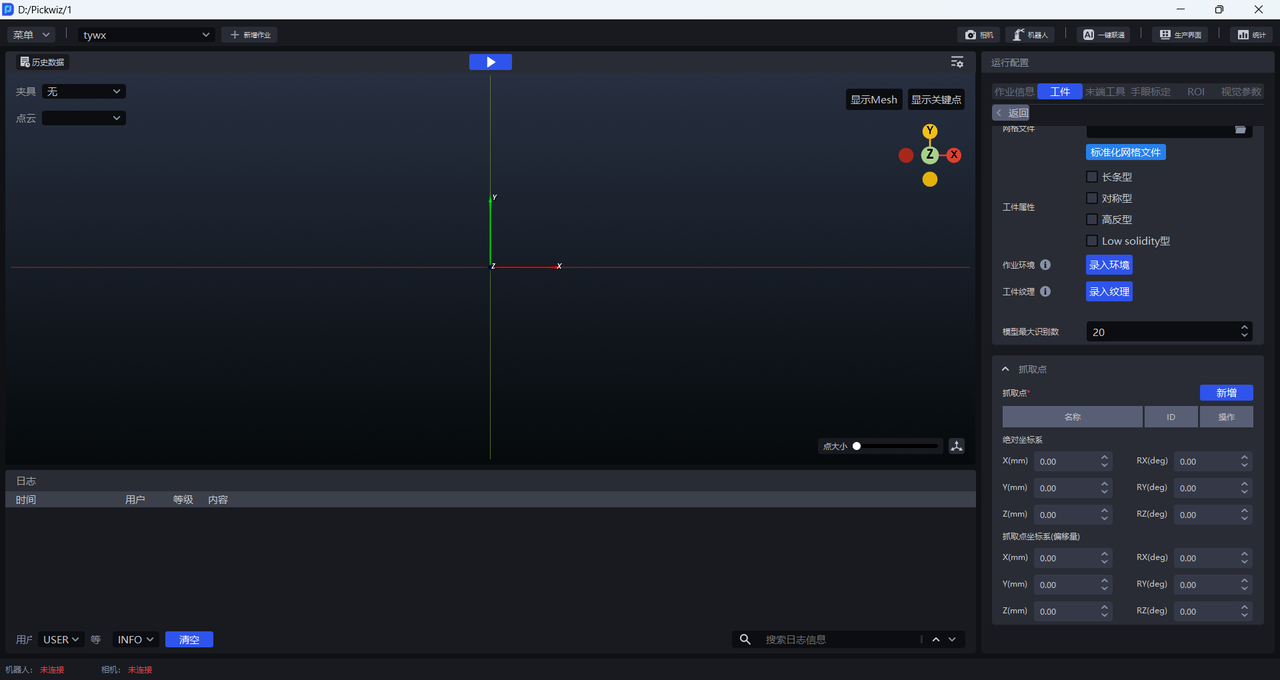
(3)Pick Point
When adding a Target configuration, there is no Pick Point by default and needs to be added manually. After adding a Pick Point, adjust the pose of the Pick Point based on the absolute coordinate system or the Pick Point coordinate system.
| absolute coordinate system | Pick Point for TargetCAD model |
| Pick Point coordinate system (offset) | Take the center of the Target as the origin, adjust the Pick Point |
3.3 Select Target
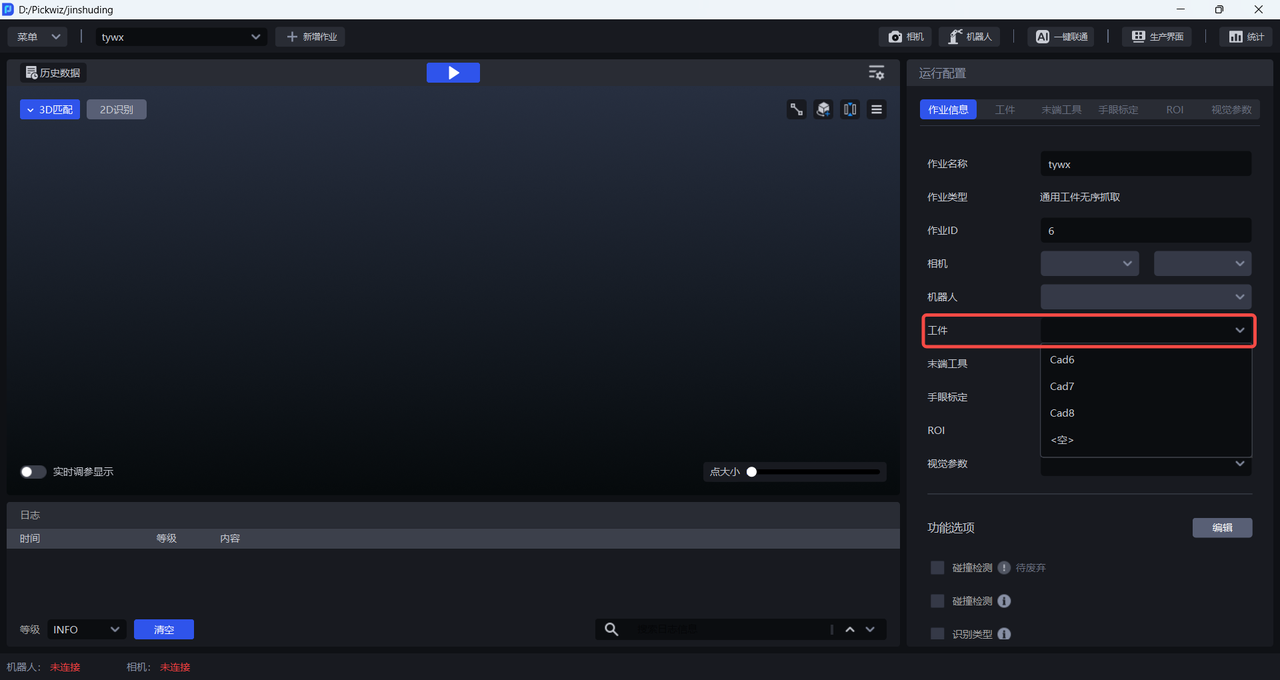
After configuring the universal Target, click Return to return to the main interface, and select the corresponding universal Target in Task Information-Target.
4. Face type Target
4.1 New Target
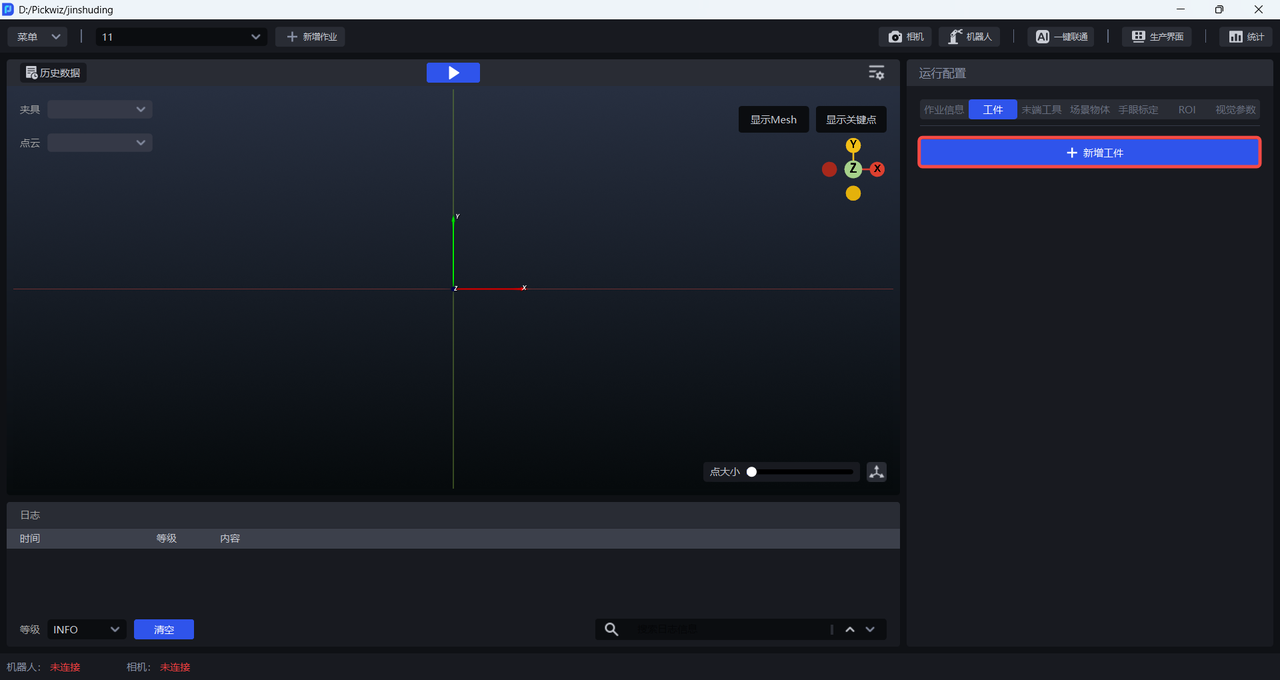
Click + Add Target in the Target column in Run Configuration to enter the Target interface.
4.2 Configure Target
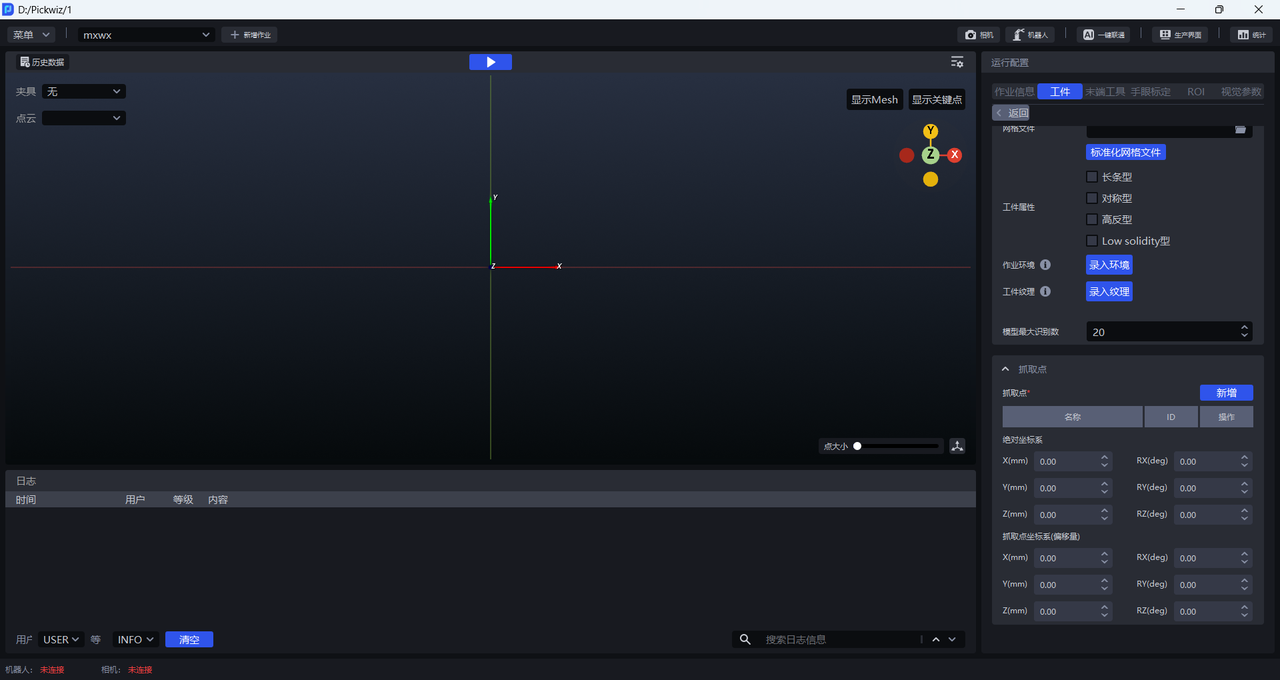
(1) Target information
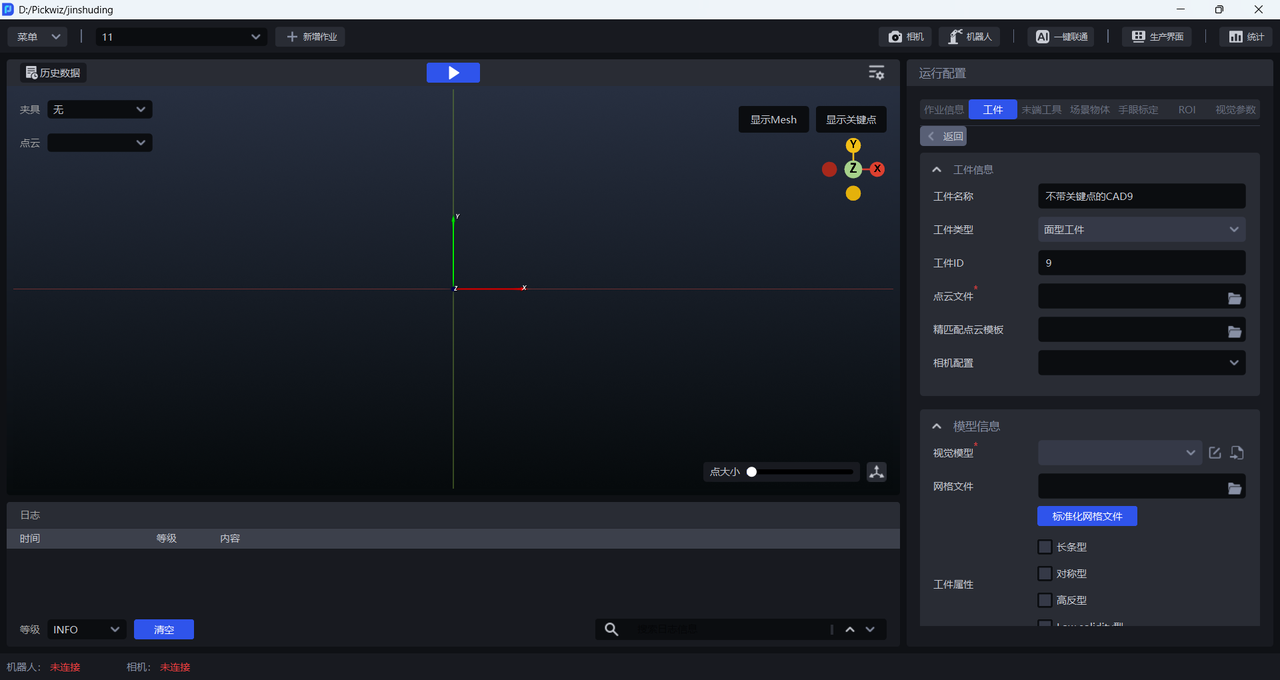
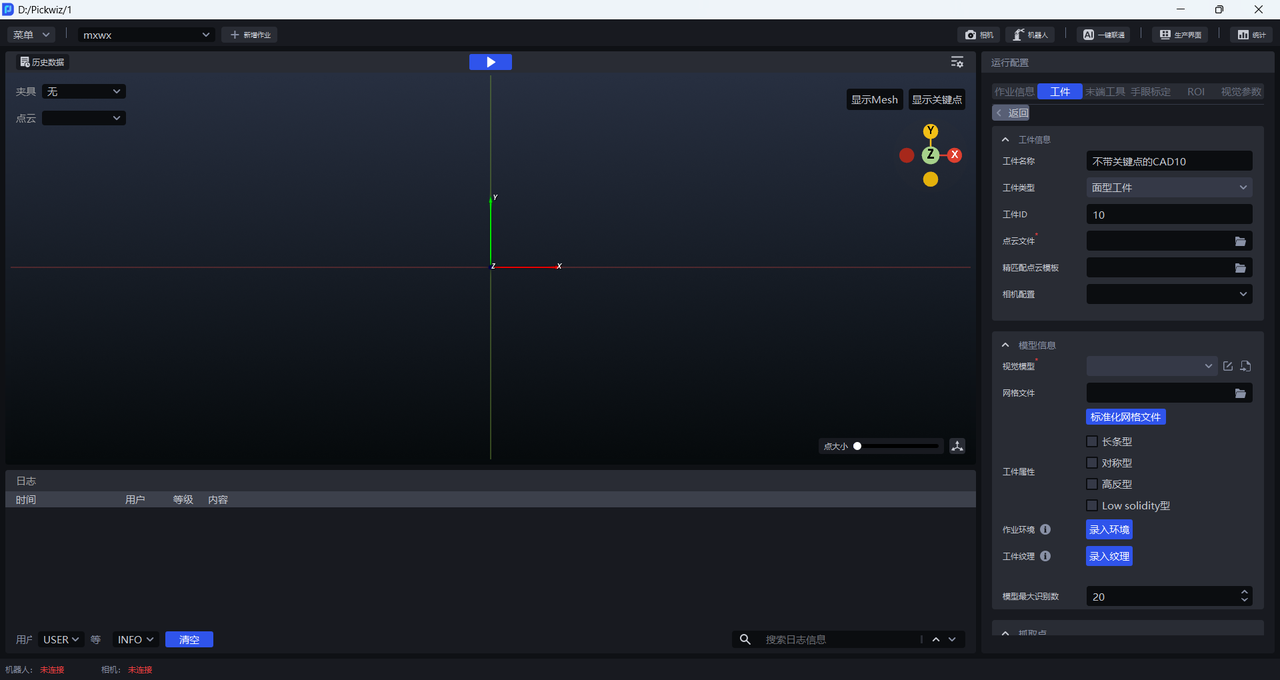
| TargetID | TargetID, usually used when changing production, Robot uses TargetID to switch Target, | can be modified
| Target name | The default Target name ofsurface type Target is "CADTargetID without key points", which can be modified to |
| Target type | The default Target type offace-shaped Target is face-shaped Target and cannot be modified |
| PCD(Point Cloud Data) | Required fields, upload the Point Cloud template of the surface type Target, which is used for Coarse Matching with the actual Point Cloud collected by the Camera. You can refer to the [Point Cloud Template Production Guide] (点云模板制作指南.md) to make the Point Cloud template. |
| Fine matchingPoint Cloud template | It is not required. You can upload the full Point Cloud template of the surface-type Target for fine matching with the actual Point Cloud collected by the Camera to optimize the Target posture. You can refer to [Point Cloud Template Production Guide] (点云模板制作指南.md) to create the Fine matchingPoint Cloud template. |
| Custom key points | is not required. There are no key points in the surface target, so there is no need to turn on custom key points. |
| Camera configuration | can choose Camera configuration, optional |
(2) Model information
| Visual Model | Required field, deep learning model, used to segment instances from the Scene. The Visual Model of the face-shaped Target adopts the CAD-based synthetic data training (one-click connection) method. The Visual Models of different face-shaped Targets are also different, so the Visual Model of the face-shaped Target needs to be trained with one-click connection. For the specific process, please refer to One-click connection training Visual Model/一键联通训练成像模型. Surface Target loading and unloading (materials are isolated from each other) Scene does not need to upload Visual Model |
| grid file | Required fields, upload the CAD model of the area Target. The grid file should be a standardized CAD model to provide support for subsequent operations such as one-click training of the Visual Model, generation of Point Cloud templates, and Point Cloud alignment grids. Please refer to the [Point Cloud Template Production Guide] (点云模板制作指南.md) standardized grid file. |
| Pattern mask | There is only ordered loading and unloading Scene, which is used to simulate the form of input materials from Target under the Scene to support the use of one-click connection training model under the ordered Scene. Close fit: can help quickly set the number of Targets in a row/column, and is suitable for Scenes where the Targets are in order, have consistent postures, and have a small distance between Targets. If the number of Targets exceeds the maximum number of 40, one-click connection is not supported. It is necessary to ensure that the total number of Targets is less than 40, and the minimum common denominator can be kept unified (for example: the actual number of incoming material rows and rows is 12:6, and the ratio is 2:1 according to the convention, set to 6:3). There is no need to set according to the actual number, and training can be performed normally to improve model capabilities. Customized Pattern mask: You can fully configure the detailed Parameters of the Pattern mask, which is applicable to all types of Scenes. |
| Target attribute | Optional option, used for one-click connection training model, optional "long strip type", "symmetrical type", "high reflection type", "low solidity type"
|
| Task environment | Optional option, enter the Task environment for one-click connection training model. The default randomly transformed background when generating data in One-click connection will be replaced with the entered Task environment data, thereby improving the recognition effect. |
| Target texture | Optionally, enter the Target texture for one-click connection training model. During model training in one-click connection, the uploaded texture will be used for data enhancement, thereby improving the recognition effect. |
| Maximum number of model recognitions | Used for one-click connection to control the maximum number of instances that can be recognized during Visual ModelInference. Under the same conditions, the larger the recognition number, the more recognition results the model can return, but the longer the inference time of the model is. In orderly Scene, it is generally recommended to fill in the number of materials slightly larger than one layer. In unordered Scene, it needs to be set according to the actual Scene. |
(3)Pick Point
When adding a Target configuration, there is no Pick Point by default and needs to be added manually. After adding a Pick Point, adjust the pose of the Pick Point based on the absolute coordinate system or the Pick Point coordinate system.
| absolute coordinate system | Pick Point for TargetCAD model |
| Pick Point coordinate system (offset) | Take the center of the Target as the origin, adjust the Pick Point |
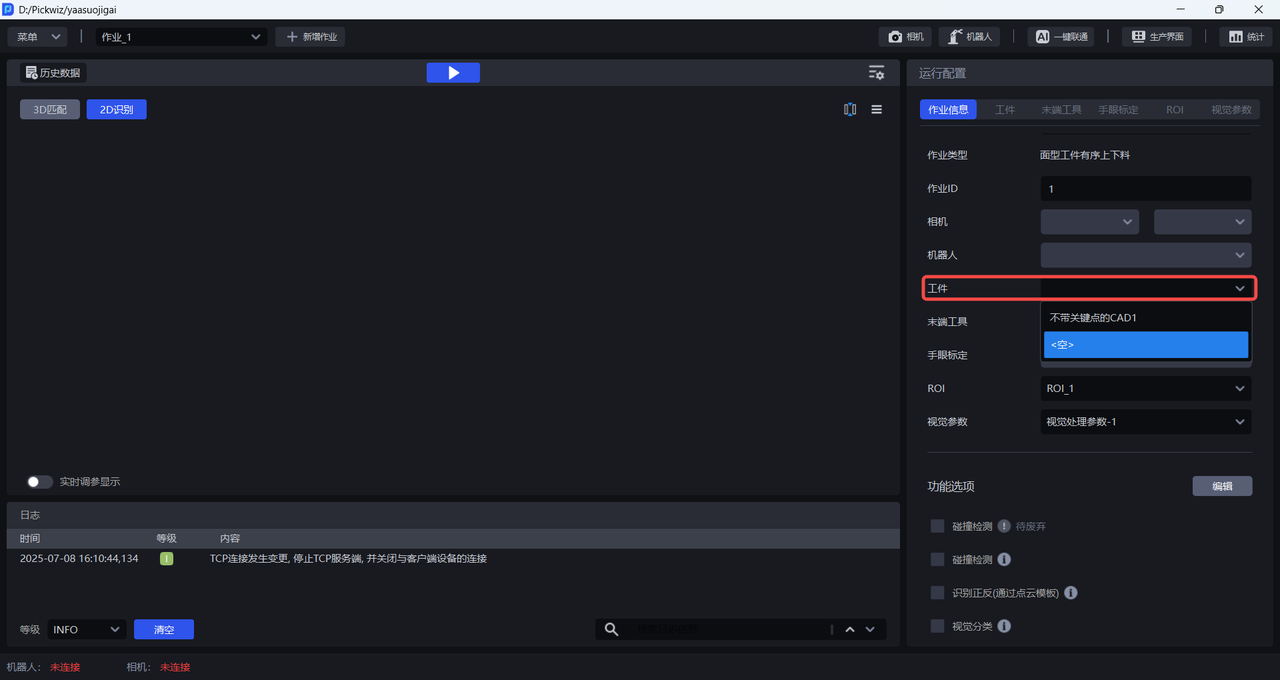
4.3 Select Target
5. Round noodles
5.1 New Target
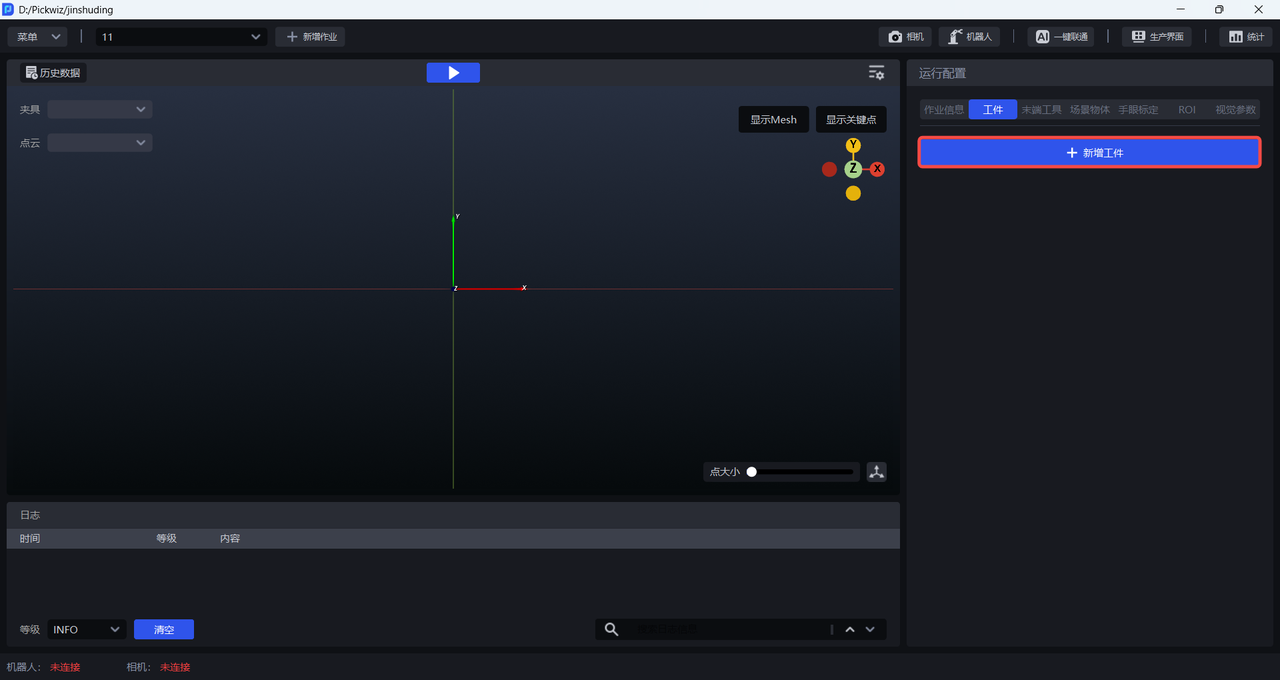
Click + Add Target in the Target column in Run Configuration to enter the Target interface.
5.2 Configure Target
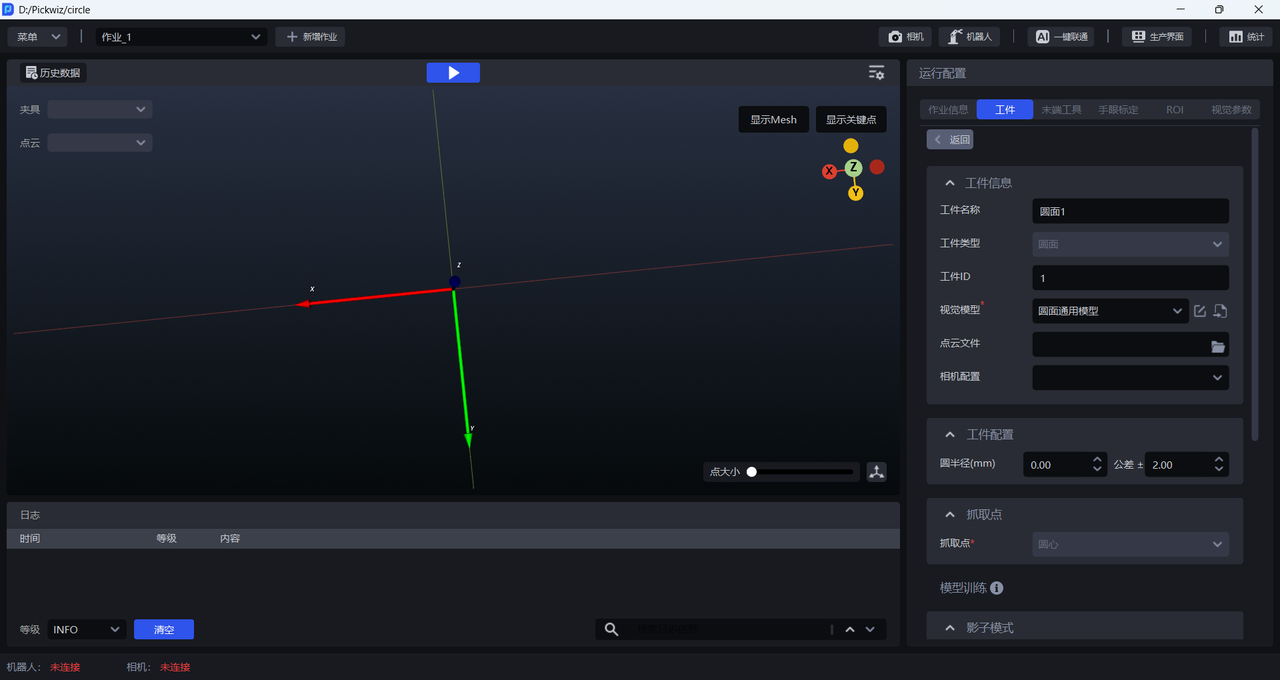
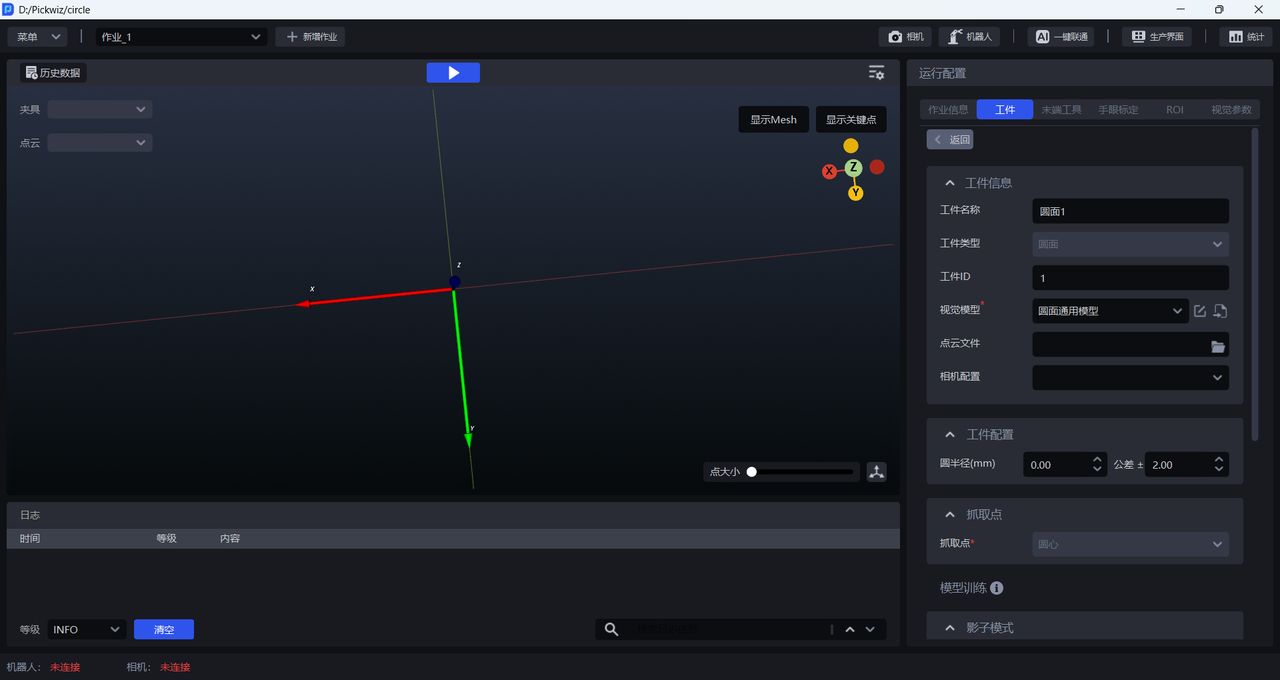
(1) Target information
| TargetID | TargetID, usually used when changing production, Robot uses TargetID to switch Target, | can be modified
|---|---|
| Target name | Round Target The default Target name is "Round Face&TargetID", which can be modified |
| Target type | The default Target type ofround target is round and cannot be modified |
| Visual Model | Thedeep learning model is used to segment instances from the Scene. The default Visual Model of the circular surface is the circular surface general model. If the circular surface general model does not perform well on instance segmentation, the shadow mode can be used to optimize the Visual Model. |
| PCD(Point Cloud Data) | is not required. When on-site accuracy requirements are high, Point Cloud edge conditions are poor, and circle fitting errors are large, you can check Visual Parameter - Object Attitude Correction and upload the Point Cloud template to correct the attitude of the circular surface. You can select the \Builder\pose\output\inverse-pcd file in the historical data as the Point Cloud template. |
| Camera configuration | can choose Camera configuration, optional |
(2) Target configuration
| circle radius (mm) | is not required. When the Pick Point of the circular surface deviates from the center of the circle, the radius of the circular surface is pre-configured as the prior data for circular surface fitting. |
|---|
(3)Pick Point
| Pick Point | The Pick Point ofcircular surface is at the center of the circle by default |
|---|
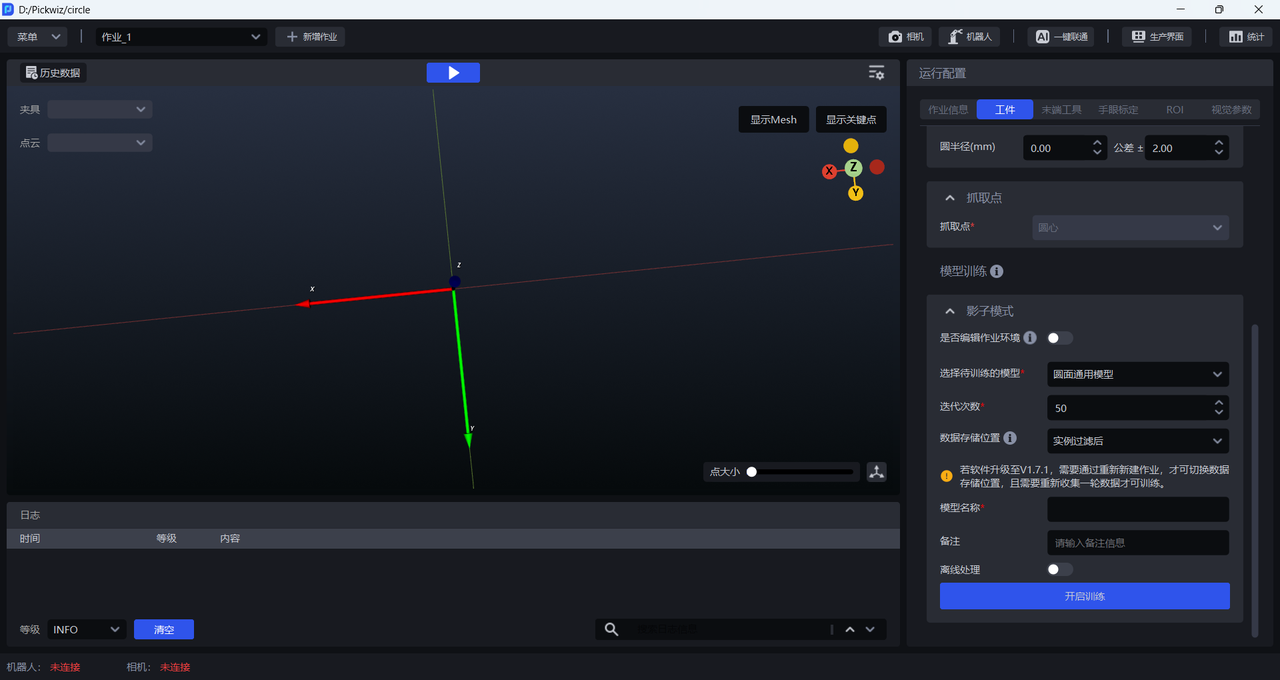
(4) Model training
| Shadow Mode | Optionally, if the circular surface general model does not perform well on instances, you can apply shadow mode to optimize the visual model's segmentation effect. Shadow mode needs to use real running data to train the model and optimize the segmentation effect of Visual Model. For specific operations, please refer to [How to use Target shadow mode] (如何使用工件影子模式.md) |
|---|
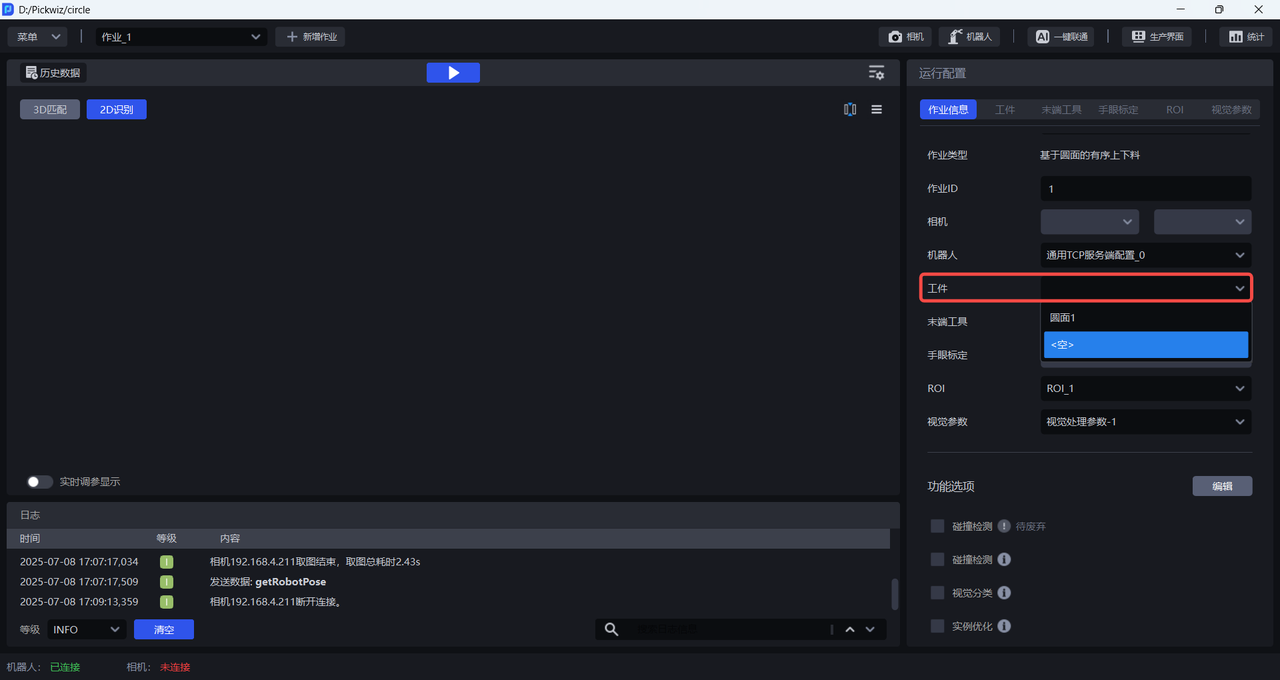
5.3 Select Target
6. Cylinder
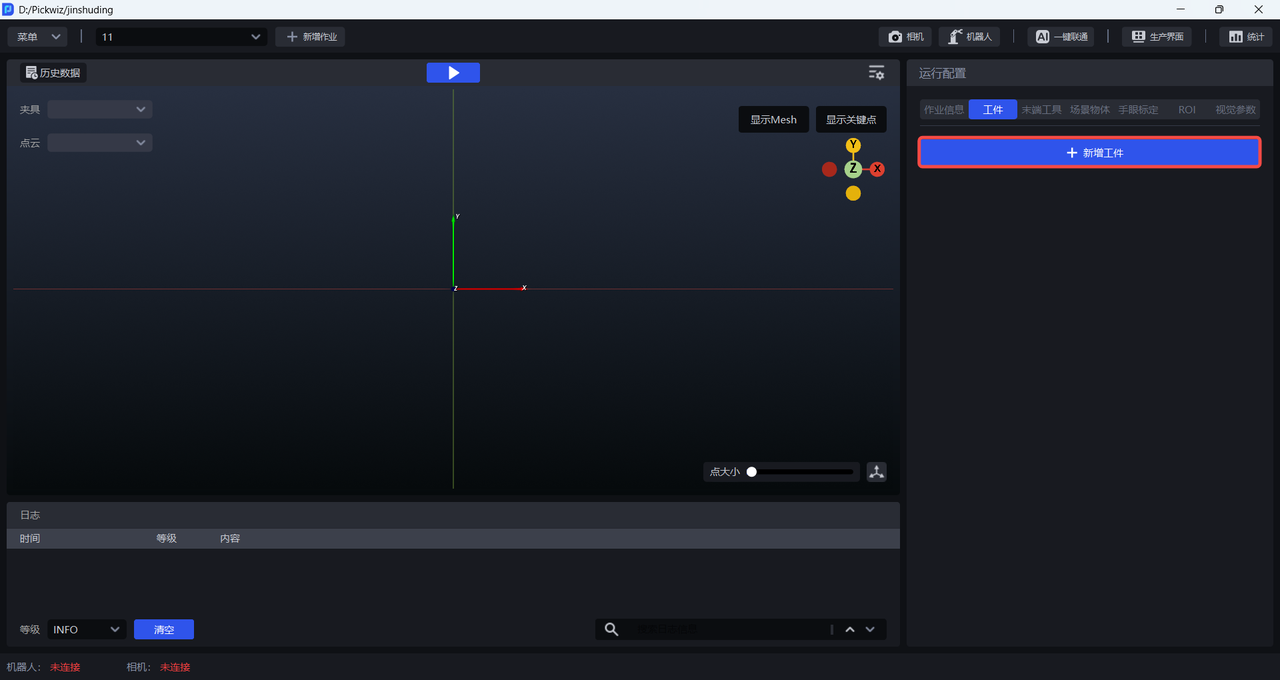
6.1 New Target
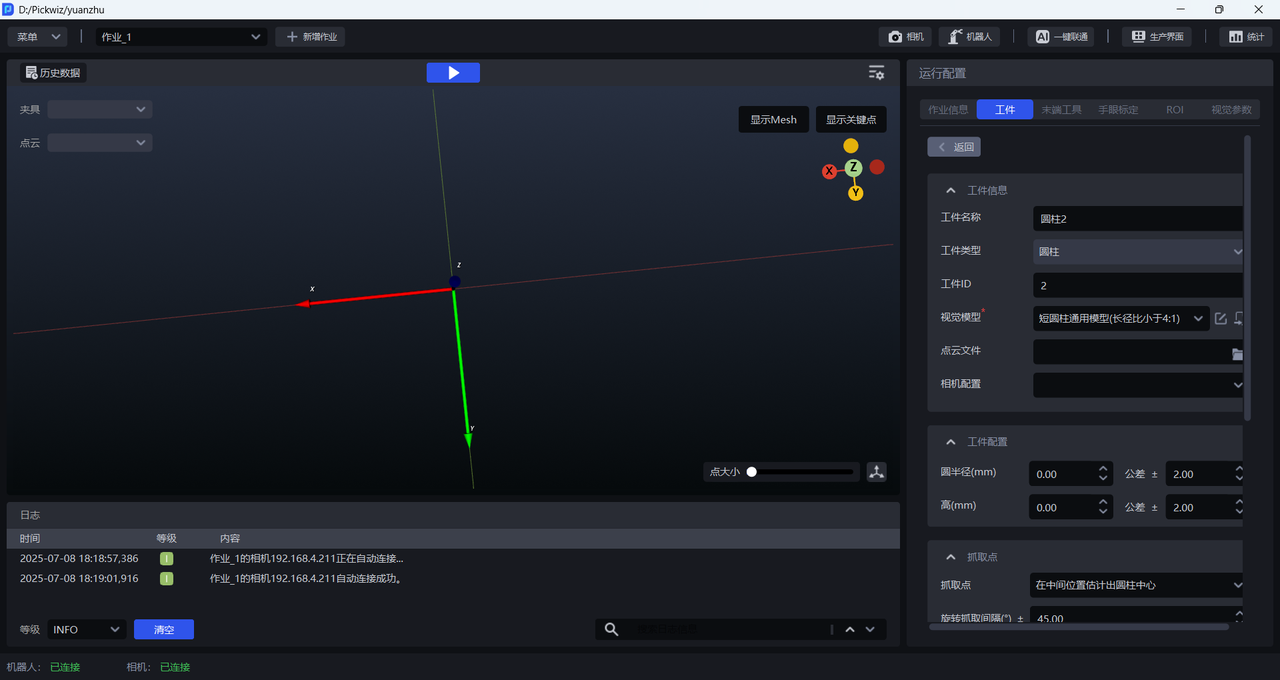
6.2 Configure Target
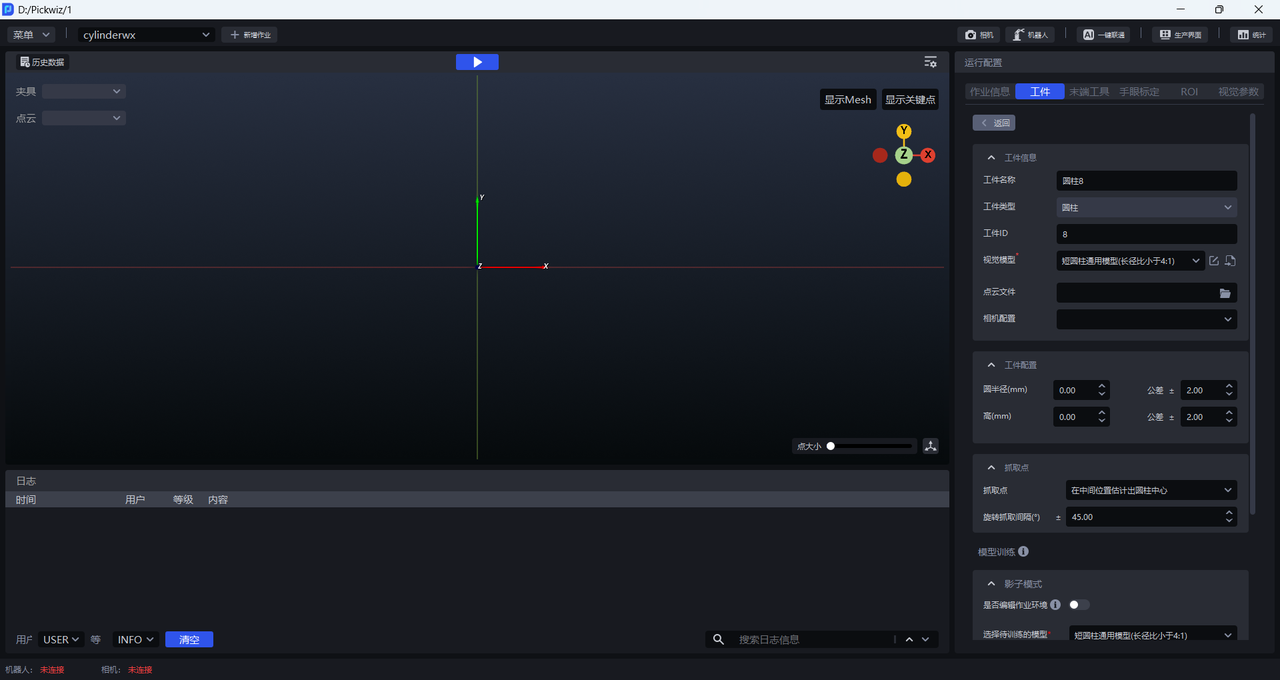
(1) Target information
| TargetID | TargetID, usually used when changing production, Robot uses TargetID to switch Target, | can be modified
|---|---|
| Target name | Cylindrical Target The default Target name is "Cylindrical TargetID", which can be modified |
| Target type | The default Target type ofcylindrical Target is cylindrical and cannot be modified |
| Visual Model | Thedeep learning model is used to segment instances from the Scene. There are two types of cylindrical Visual Models: short cylindrical general model and long cylindrical general model. If the cylindrical general model does not perform well on instance segmentation, shadow mode can be used to optimize the Visual Model. |
| PCD(Point Cloud Data) | is not required. When on-site accuracy requirements are high, Point Cloud edge conditions are poor, and cylinder fitting errors are large, you can check Visual Parameter - Object Attitude Correction and upload the Point Cloud template to correct the cylinder's attitude. You can select the \Builder\pose\output\inverse-pcd file in the historical data as the Point Cloud template. |
| Camera configuration | can choose Camera configuration, optional |
- Visual Model
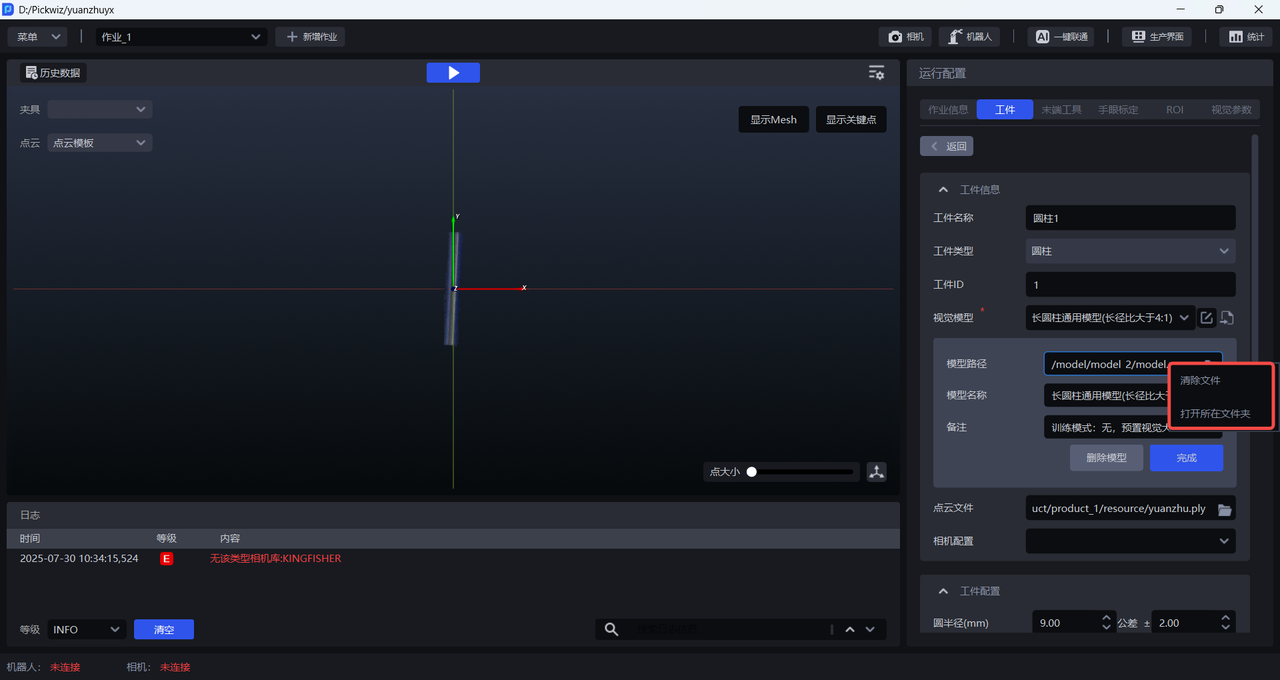
Click the Edit button to modify the Visual Model
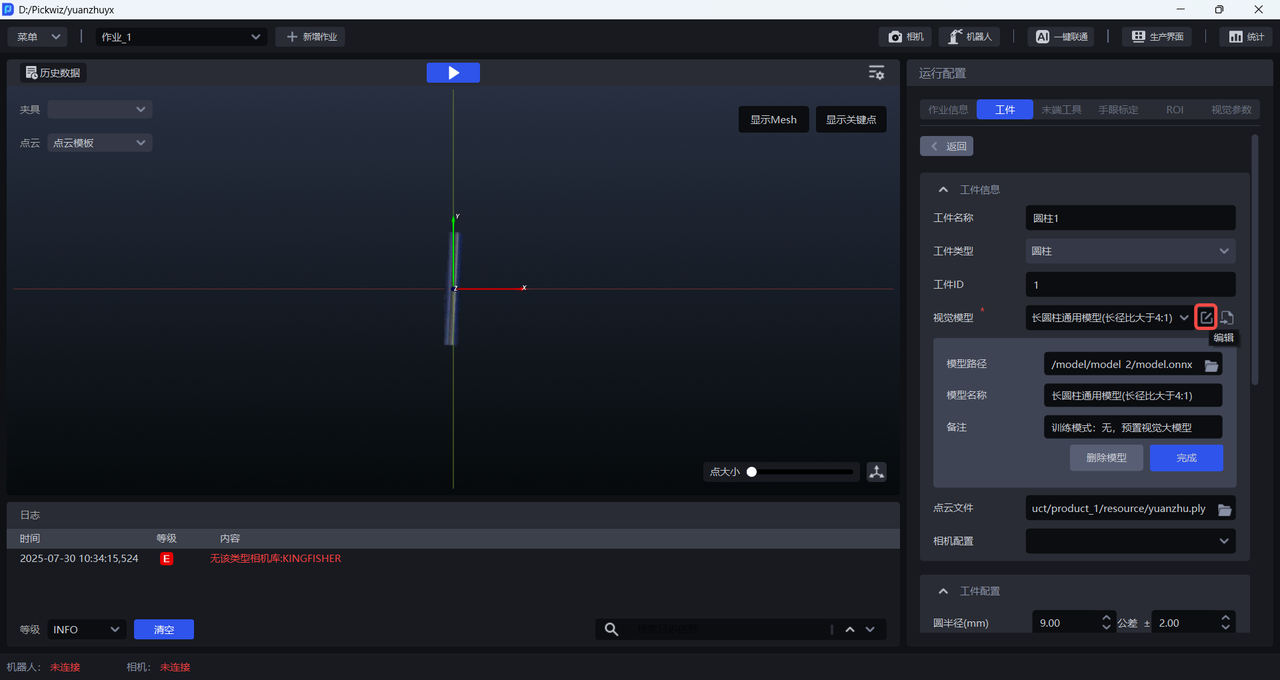
Right-click the Model Path text box, select Clear File, and then select a new path; you can select Open Folder to open the folder where the Visual Model is located.
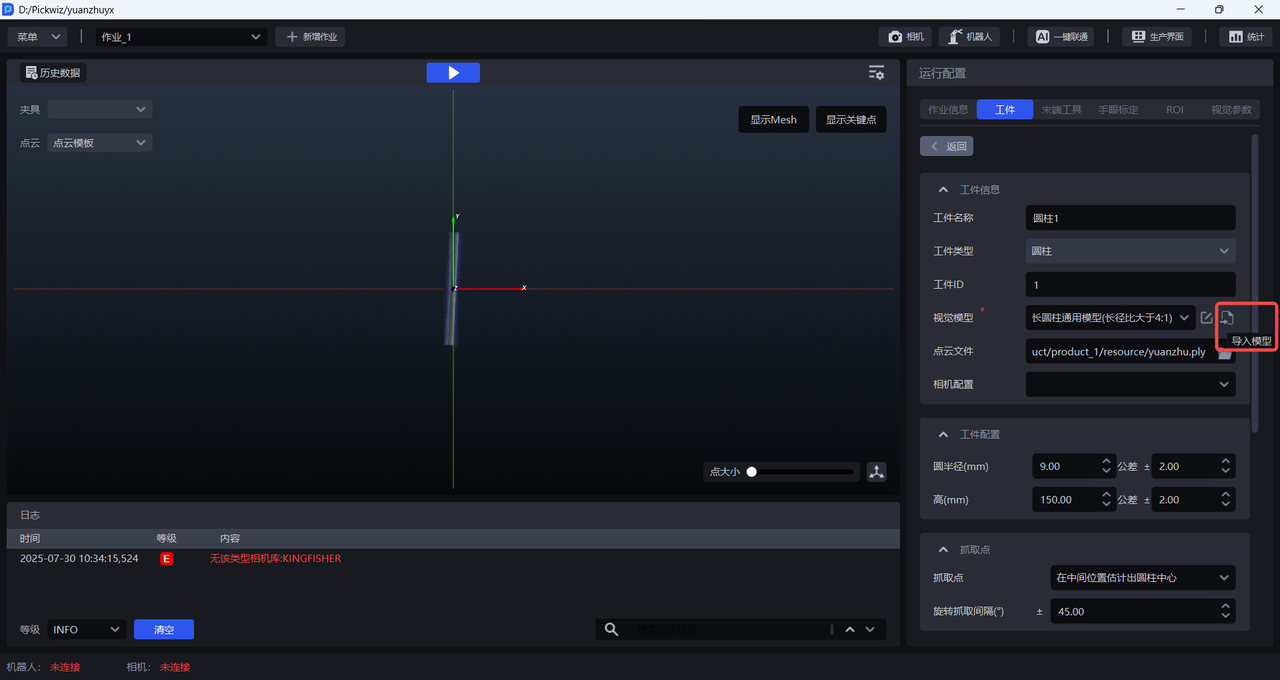
Click the Import Model button to upload the Visual Model.
- PCD(Point Cloud Data)
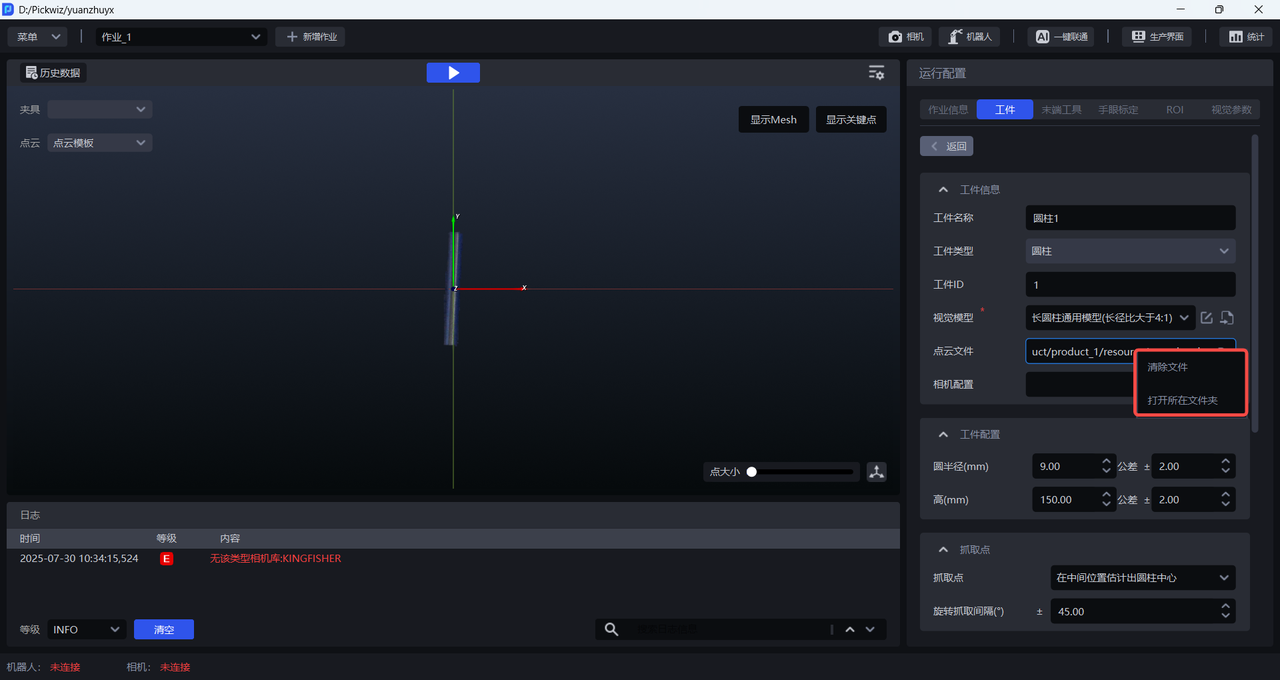
Right-click on the text box of PCD (Point Cloud Data), you can select Clear File, and then upload a new file; you can select Open Folder to open the folder where the Point Cloud template is located, as shown below
(2) Target configuration
| circle radius (mm) | is not required. When the cylinder cannot be fitted or the cylinder fitting error is large, the radius of the circular surface of the cylinder is pre-configured as the prior data for cylinder fitting. |
| height (mm) | is not required. When the cylinder cannot be fitted or the cylinder fitting error is large, the height of the cylinder is pre-configured as the prior data for cylinder fitting. |
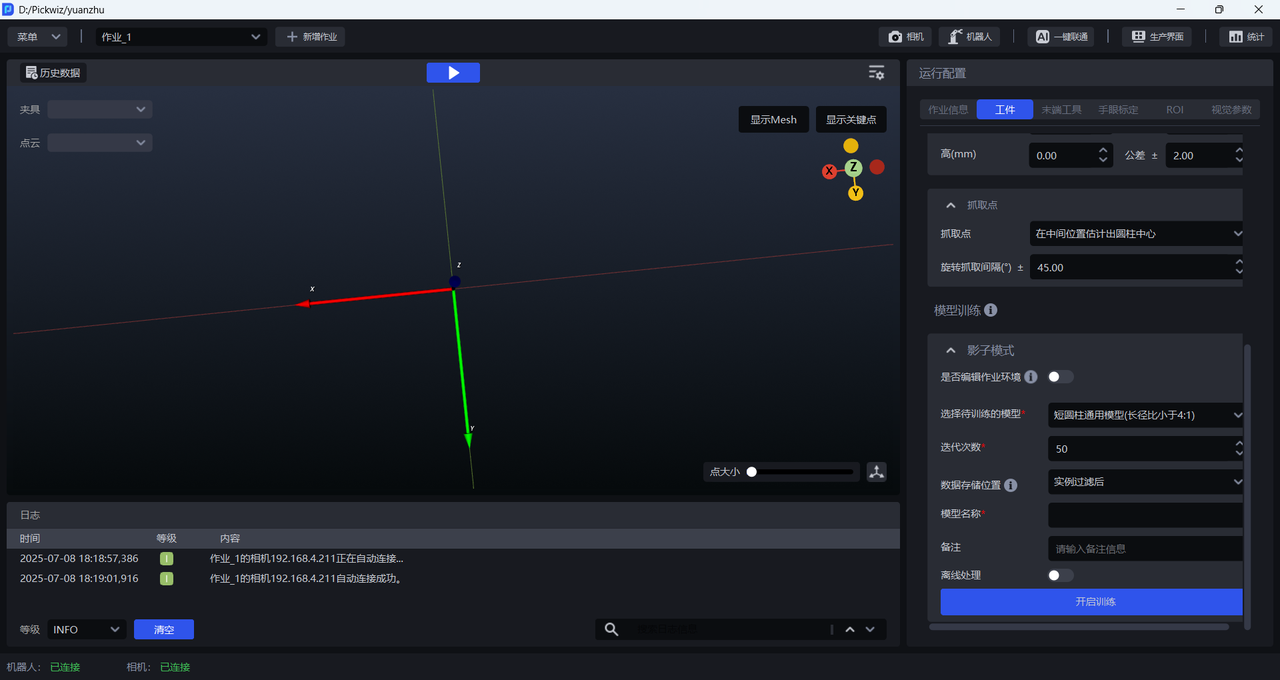
(3)Pick Point
| Pick Point | estimates the cylinder center at the middle position starting from the endpoint, and estimates the cylinder center | based on the prior size
| rotation grabbing interval (°) | Within thecrawling range, a Pick Point is generated at every interval. Default is 45°. |
- Pick Point
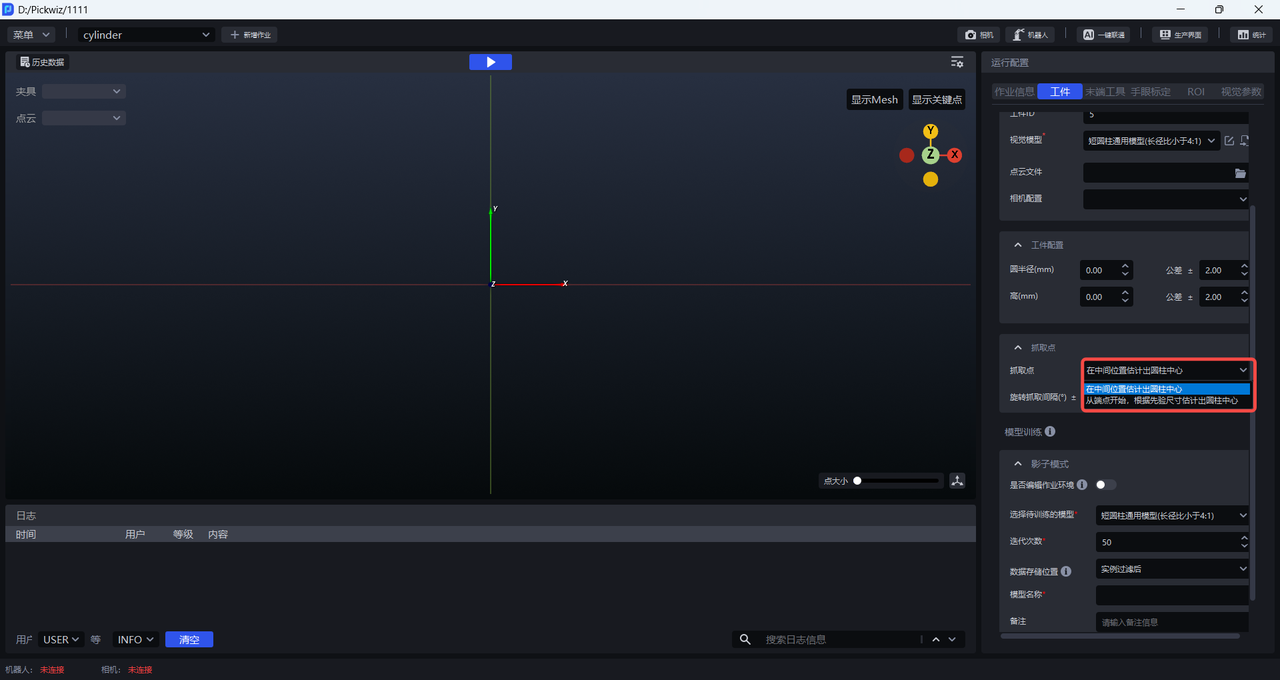
Reference Case Description
For the figure below, if the cylinder center is estimated at the middle position by default, the Pick Point will be generated at the wrong position.
Therefore, it is necessary to choose to start from the endpoint and estimate the center of the cylinder based on the prior size, so that the above situation can be reasonably avoided.
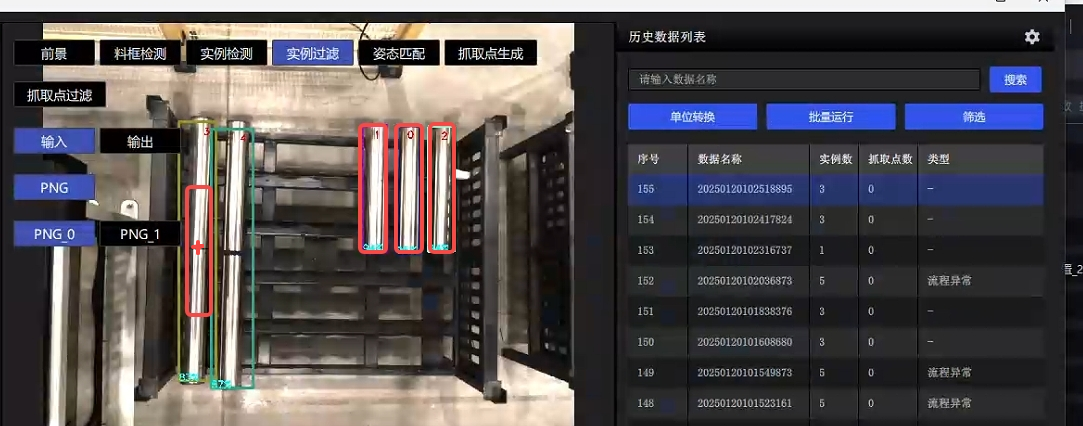
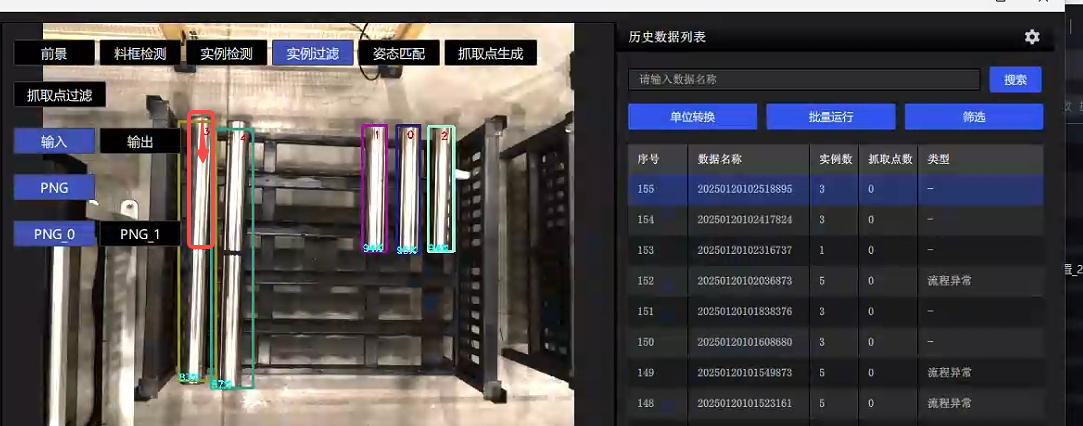
Notice
During Robot communication, this configuration can take effect when the prior size of the target is passed in or the value of the prior size set by the software is not 0; conversely, when the value is 0, the system defaults to estimating the center of the cylinder at the middle position of the target.
- Rotation grab interval (°)
Within the pickup range of the cylinder, a Pick Point is generated every few degrees. The default is 180°.
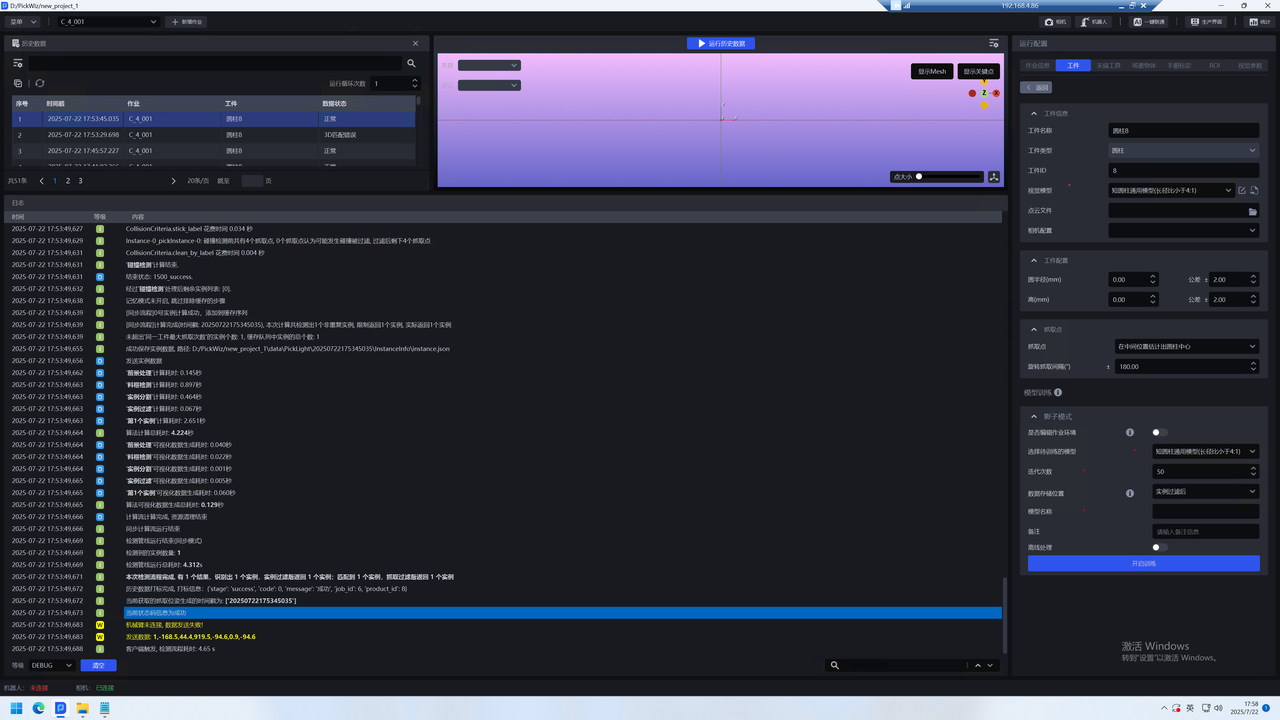
(4) Model training
| Shadow Mode | Optionally, if the segmentation effect of the cylindrical general model on the instance is not good, you can apply shadow mode to optimize the segmentation effect of the Visual Model. Shadow mode needs to use real running data to train the model and optimize the segmentation effect of Visual Model. For specific operations, please refer to [How to use Target shadow mode] (如何使用工件影子模式.md) |
6.3 Select Target
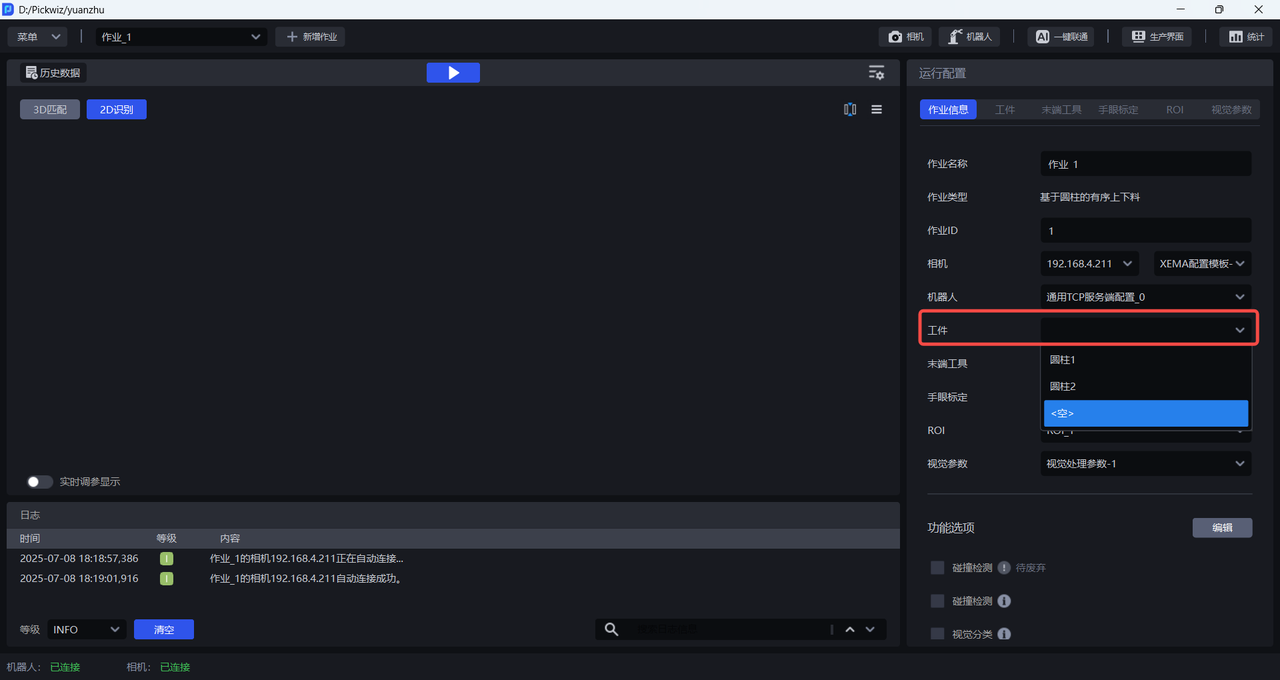
7. Quadrilateral
7.1 New Target
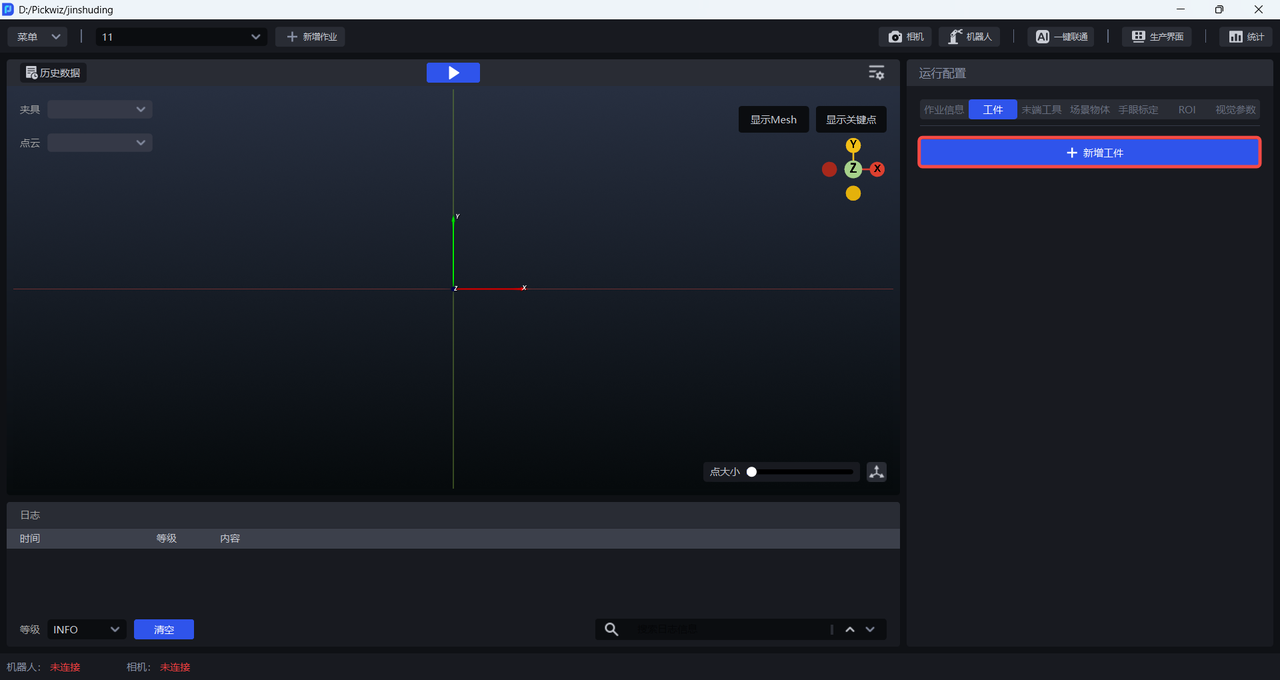
7.2 Configure Target
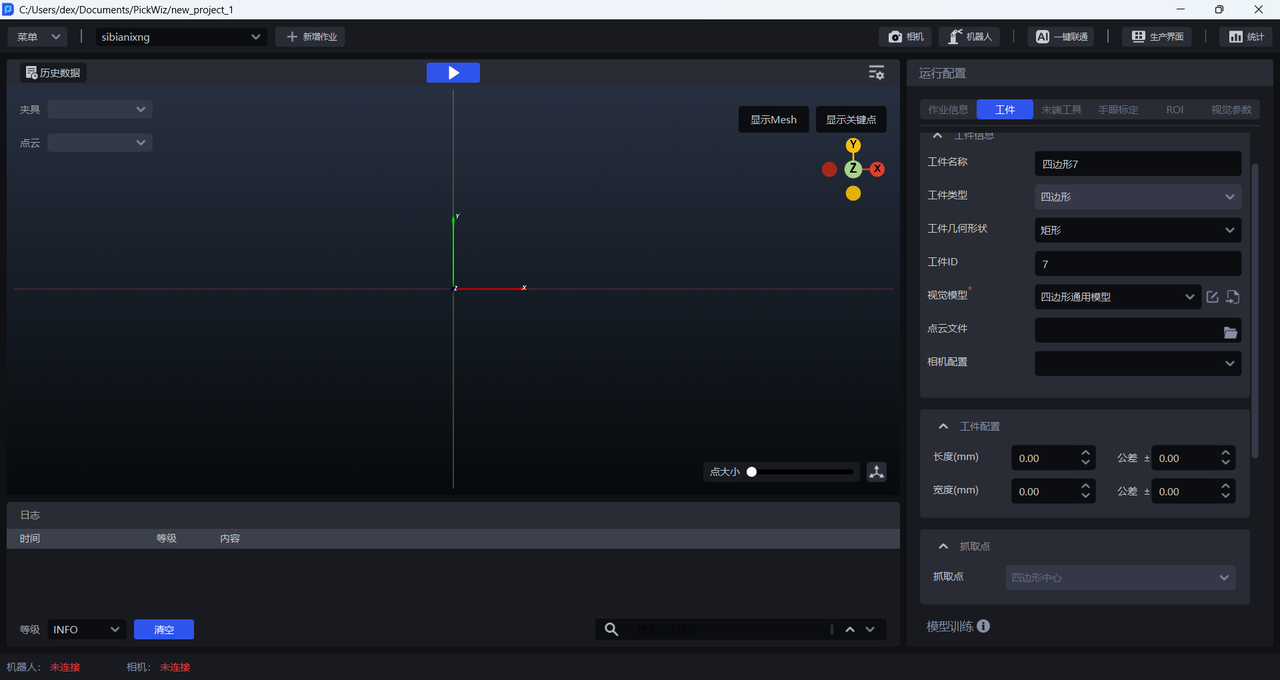
(1) Target information
| TargetID | TargetID, usually used for Robot to switch Target when changing production, | can be modified
|---|---|
| Target name | The default Target name is quadrilateral&TargetID |
| Target type | Default quadrilateral |
| Target geometry | The quadrilateral Target needs to be rectangular or non-rectangular. Switch the Target shape to switch the visual algorithm to better adapt to different shapes of quadrilateral Target |
| Visual Model | is used to segment instances from the Scene. The quadrilateral Target uses the quadrilateral universal model to segment the instances. If the quadrilateral universal model does not perform well on instances, the shadow mode can be used to optimize the Visual Model. |
| PCD(Point Cloud Data) | is not required. When on-site accuracy requirements are high, Point Cloud edge conditions are poor, and quadrilateral fitting errors are large, you can check Visual Parameter - Object Attitude Correction, and upload the Point Cloud template to correct the quadrilateral attitude. You can select the \Builder\pose\output\inverse-pcd file in the historical data as the Point Cloud template. |
| Camera configuration | can choose Camera configuration, different imaging |
(2) Target configuration
| length (mm) | is not required. When the Pick Point of the quadrilateral is offset from the center, the length and width of the quadrilateral are pre-configured as prior data for quadrilateral fitting, which helps the quadrilateral fitting to be more precise. |
| Width (mm) | is not required. When the Pick Point of the quadrilateral is offset from the center, the length and width of the quadrilateral are pre-configured as prior data for quadrilateral fitting, which helps the quadrilateral fitting to be more precise. |
(3)Pick Point
| Pick Point | The Pick Point ofquadrilateral Target is set to the quadrilateral center by default |
(4) Model training
| Shadow Mode | Optionally, if the quadrilateral general model does not segment the instance well, you can apply shadow mode to optimize the segmentation effect of the Visual Model. Shadow mode needs to use real running data to train the model and optimize the segmentation effect of Visual Model. For specific operations, please refer to How to use Target shadow mode |