
Eye-to-hand Calibration
This guide covers the eye-to-hand calibration procedures for three-axis, four-axis, and six-axis robots. The camera is fixed outside the robot. During sampling, move the Calibration Board or needle-tip tool according to the calibration method.
1. Common Preparation
- Complete the Pre-calibration Checks
- Confirm that the camera and bracket are securely fixed and will not move during sampling
- Confirm that the robot type, camera model, and Calibration Board type are configured correctly
- Select a calibration method based on the robot type
| Robot type | Recommended method | Number of valid samples for random pose sampling |
|---|---|---|
| Three-axis | Needle-tip tool point probing | Not applicable |
| Four-axis | Needle-tip tool point probing is preferred; random pose sampling can also be used | At least 5 |
| Six-axis | Random pose sampling or needle-tip tool point probing | At least 10 |
2. Configure Calibration Information
Open the Eye-hand Calibration page and click “Add Eye-hand Calibration”.
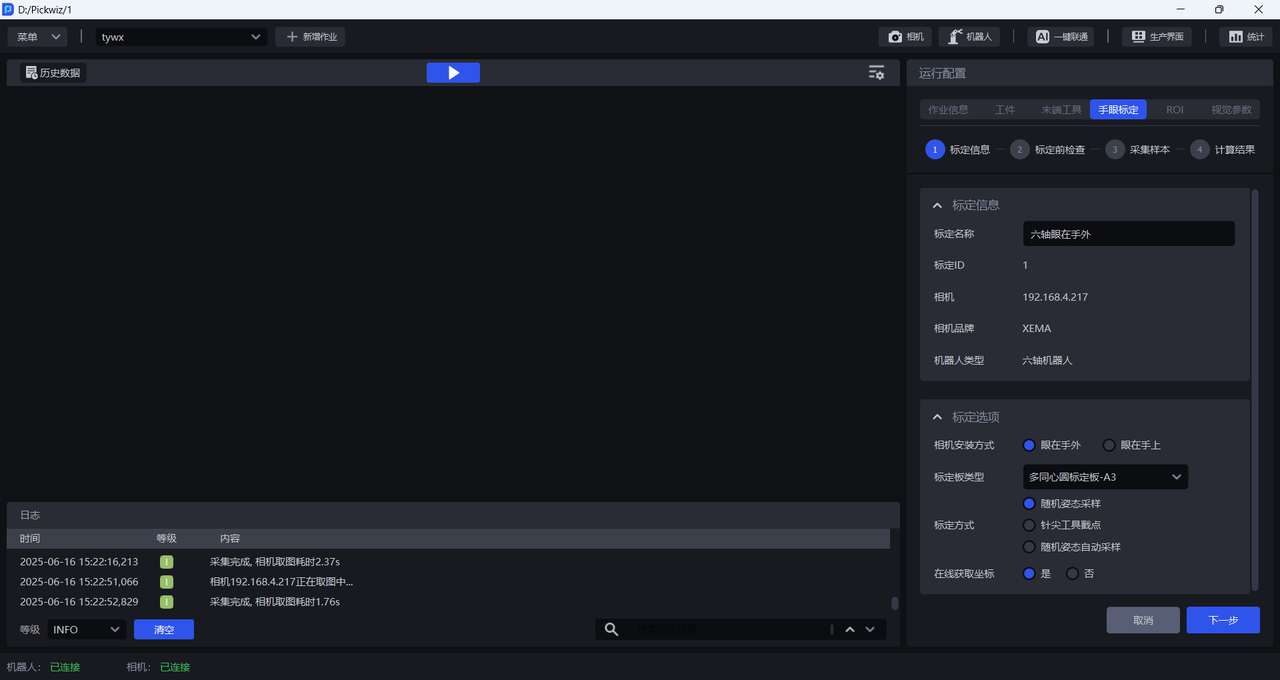
- Camera mounting method: Select “Eye to hand”
- Robot type: Keep it consistent with the robot configuration
- Calibration method: Select one based on the table above
- Obtain coordinates online: Select “Yes” if the corresponding robot calibration program is available; otherwise, select “No” and enter the poses manually
- Calibration Board type: Select based on the mounting height and robot type
3. Random Pose Sampling Calibration
Random pose sampling applies to four-axis and six-axis robots.
3.1 Mounting and Initial Position
- Securely mount the Calibration Board on the robot end-effector
- Move the robot so that the Calibration Board is centered in the camera’s field of view and roughly faces the camera
- Click “Start Sampling” and confirm that both camera detection and robot detection pass
3.2 Collect Samples
- Click “Add Sample” to save the current valid sample
- Move the robot so that the Calibration Board covers different areas, including the center and four corners of the field of view
- Vary the orientation within the robot’s capabilities; for six-axis robots, a difference of more than 10° in the rotation angles around the X, Y, and Z axes is recommended
- Repeat detection and add samples until the minimum sample count is met
- Click “Complete Collection”, then click “Calculate Results”
During sampling, ensure that the entire Calibration Board is visible and the image is clear, and avoid poses that are too similar. If the system reports that samples are too close, adjust the position or orientation and collect the sample again.
4. Needle-Tip Tool Point Probing Calibration
Needle-tip tool point probing applies to three-axis, four-axis, and six-axis robots.
4.1 Mounting and Checks
- Mount the needle-tip tool on the robot end-effector and confirm that the tool coordinate system is set correctly
- Place the Calibration Board horizontally and securely on the work platform
- For a four-axis robot, verify the TCP first; if the calibration page shows a six-axis robot, return to the robot configuration and correct the type
- Ensure that the needle tip and Calibration Board are within the camera’s field of view and the robot’s reachable range
4.2 Collect Contact Points
- Select “Needle-Tip Tool Point Probing Calibration” and start sampling
- Control the robot so that the needle tip touches the centers of the concentric circles on the Calibration Board in sequence
- Add a sample after each contact position is stable
- Collect 3–6 valid contact points; if needed, use “Add Position” to collect additional samples in different areas
- Finish collection and calculate the calibration result
The needle tip must accurately touch the circle center, and the camera, Calibration Board, and tool mounting must not loosen during sampling.
5. Check and Apply the Result
- Open Checking and Analyzing Calibration Results and check the error chart, scene view, and Point Cloud overlap
- If the error is abnormal, delete samples with poor quality or unsuitable distribution and recalculate; collect new samples if necessary
- After the calibration passes, select this configuration under “Run Configuration → Task Information → Eye-hand Calibration”
For automated sampling, see Automatic Random Pose Sampling; for other issues, see Common Issues and FAQ.