
One-Click Connection User Guide
1. One-Click Connection Overview
1.1 Visual Model
A Visual Model is a deep learning model that segments instances from a Scene. The Visual Models for sacks, cartons, circles, cylinders, and quadrilaterals are general models. The Visual Models for general Targets and plane type Targets are trained from CAD through One-Click Connection. This guide explains how to obtain Visual Models for general Targets and plane type Targets using One-Click Connection.
1.2 Imaging Model
An Imaging Model is a deep learning model. It takes the 2D images captured by the left and right cameras of a stereo KINGFISHER Camera, together with the Camera Intrinsic Parameters, as input. The Imaging Model analyzes the disparity between the two 2D images and uses triangulation and deep learning to predict the depth of each pixel in the Scene. It then outputs a depth image and Point Cloud data for the Scene.
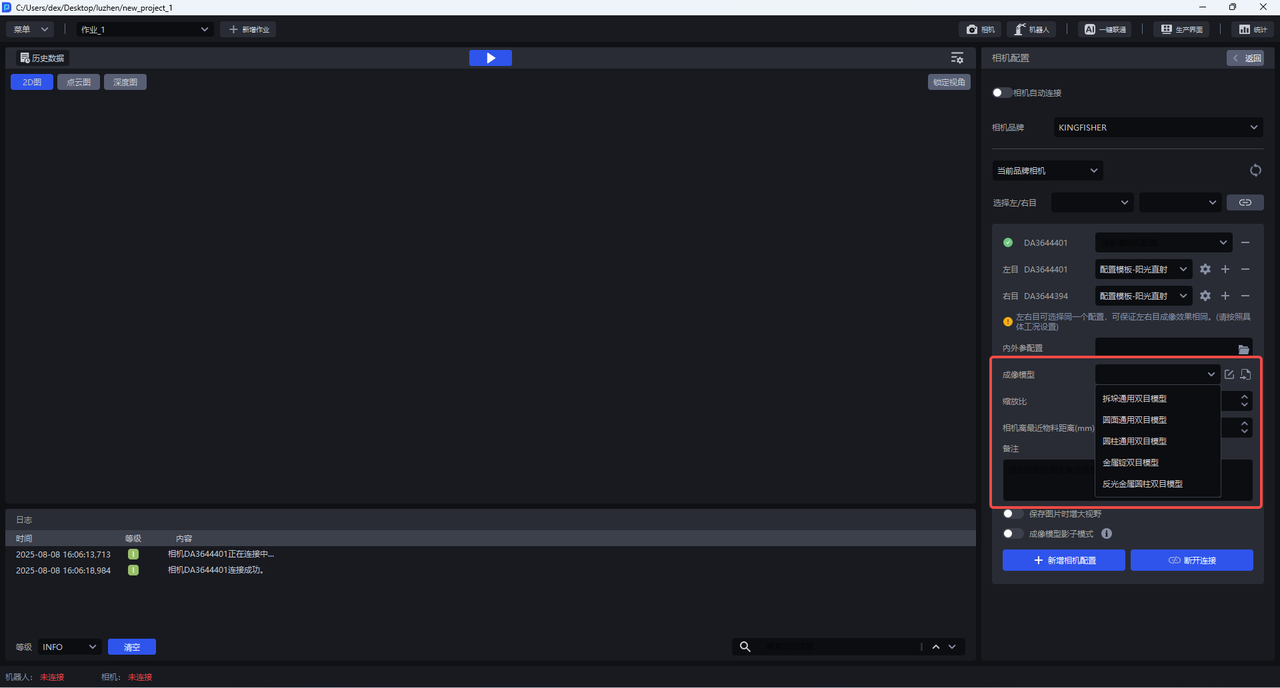
The stereo KINGFISHER Camera includes five general Imaging Models: a general stereo depalletizing model, a general stereo circle model, a general stereo cylinder model, a stereo metal ingot model, and a stereo reflective metal cylinder model. If these five general models do not meet the Scene requirements, train and import an Imaging Model specifically for the Scene.
If a general model or a specially trained Imaging Model for the stereo Camera produces issues such as Point Cloud collapse at the actual site, use One-Click Connection to further train and optimize the Imaging Model.
1.3 System Components
One-Click Connection primarily involves two systems:
PickWiz: Desktop client software running on the user's industrial PC. It automatically calls the DexVerse backend API to create a new training task.
DexVerse: A platform that automatically triggers, manages, schedules, and monitors deep learning training tasks.
2. Pre-training Configuration
Visual Models and Imaging Models share the following configuration. Parameters that differ are explained separately where applicable.
2.1 Select a Task Scene
Visual Model
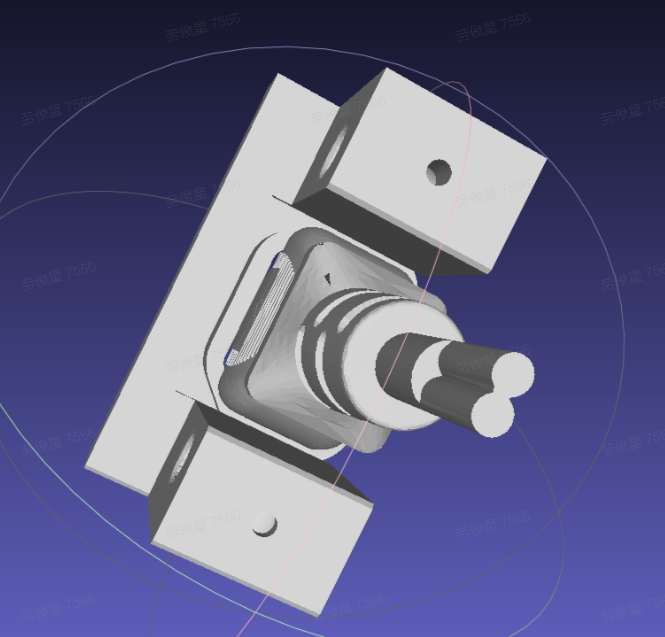
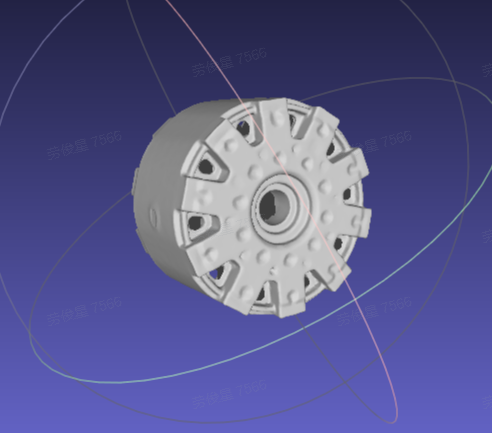
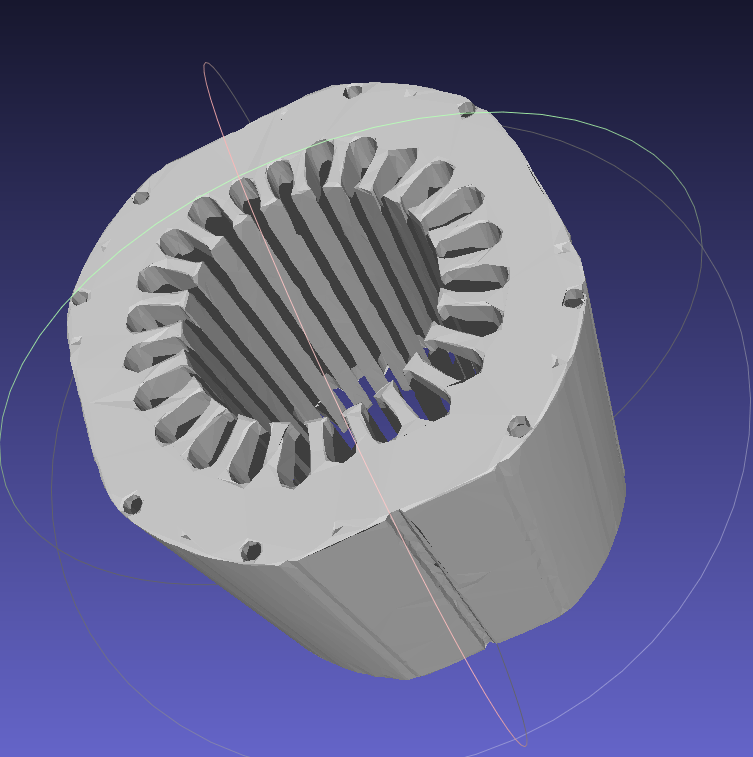
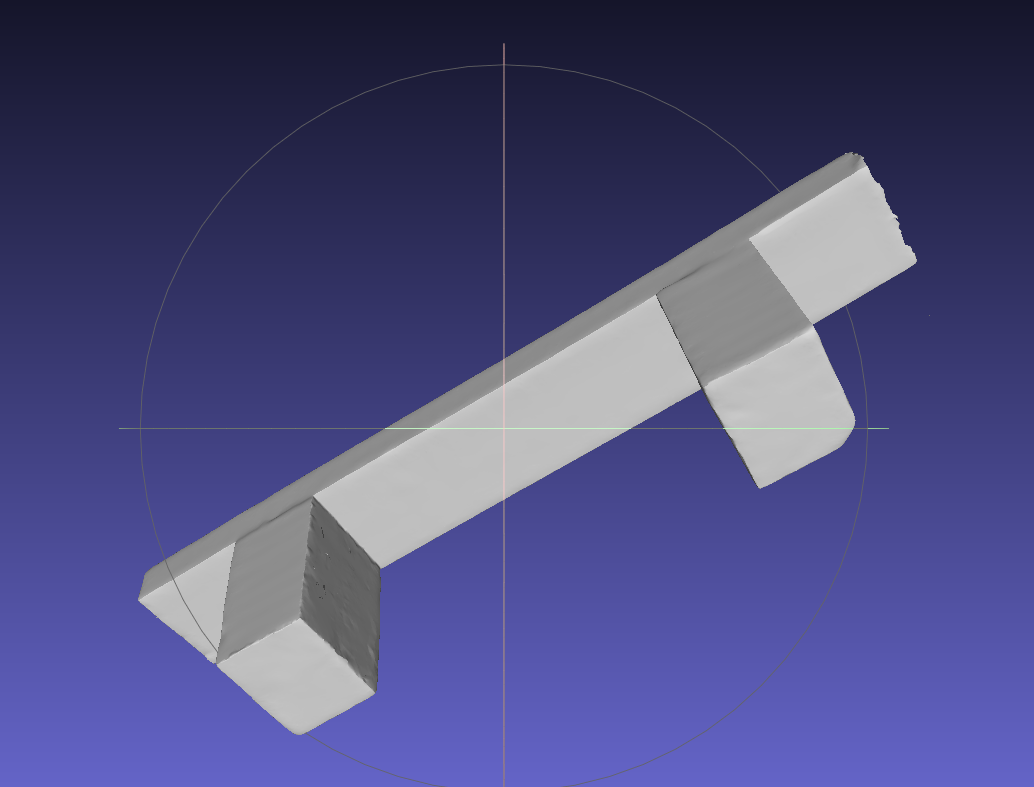
If the Target is not a sack, carton, circle, cylinder, or quadrilateral, and its front and back differ significantly, select the general Target neatly arranged loading and unloading, randomly arranged picking, or positioned assembly Scene.
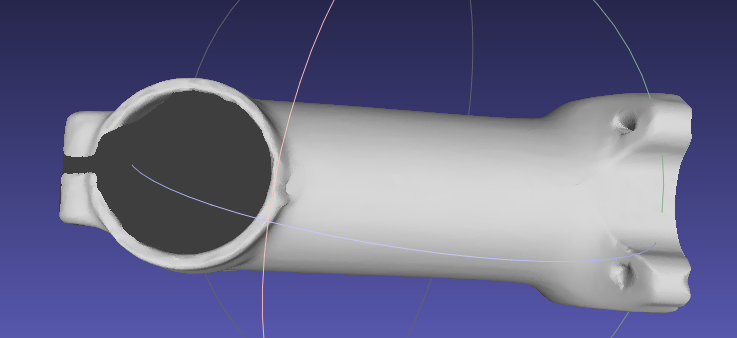
If the Target is not a sack, carton, circle, cylinder, or quadrilateral, and its front and back differ only slightly, select the plane type Target neatly arranged loading and unloading, randomly arranged picking, or positioned assembly Scene.
Imaging Model
The stereo KINGFISHER Camera currently supports training Imaging Models with One-Click Connection in neatly arranged and randomly arranged Scenes. Training with multiple Target types is supported through Function Options–Type Identification.
2.2 Configure the Target
On the Target screen, click + Add Target.
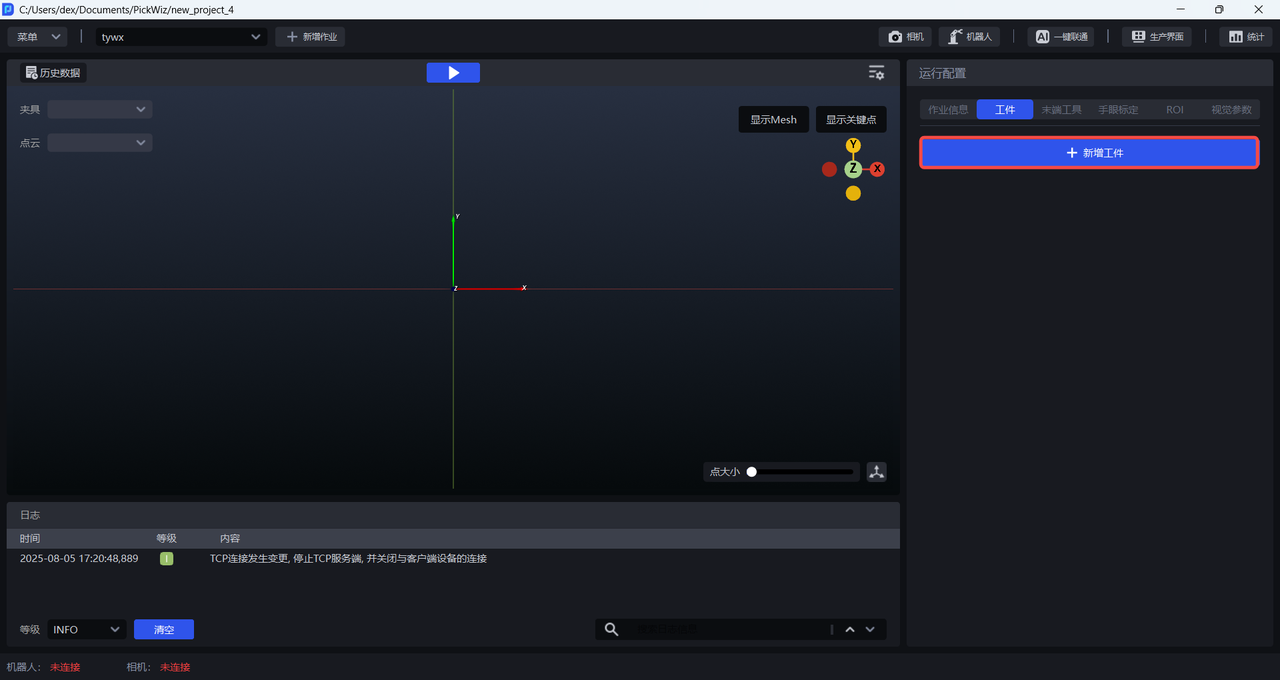
2.2.1 Mesh File
When training a Visual Model, general Targets and plane type Targets use a Mesh file to render many synthetic images from different viewpoints and under different lighting conditions. This expands the training data and improves the Visual Model's ability to generalize. If a plane type Target is relatively simple and has few features, the Mesh file can be omitted.
When training an Imaging Model, general Targets, plane type Targets, circle Targets, cylinder Targets, and quadrilateral Targets use a Mesh file to render synthetic images from different viewpoints and under different lighting conditions. This expands the training data and improves the Imaging Model's ability to generalize.
Upload the Mesh file and select Mesh File Size Unit: meters (m) or millimeters (mm). If you do not know the Mesh file's unit, leave it unselected; the system will determine the unit from the uploaded file and convert it automatically. After making your selection, click Standardize Mesh File. Currently, only Mesh files in ply format are supported.
Tips
Standardize Mesh File performs the following four functions:
Automatically aligns the Mesh file with the coordinate center.
Simplifies the Mesh faces.
Adjusts the Target to correct misalignment between the Target and the coordinate system.
Converts the Mesh file's dimensions to meters (m).
Warning
Each time you click Standardize Mesh File, the file is standardized again based on the result of the previous operation.
In the Point Cloud template creation module, select Mesh file processing.
You can adjust the Mesh pose as needed and sync it to the Target in the current Task when exporting.
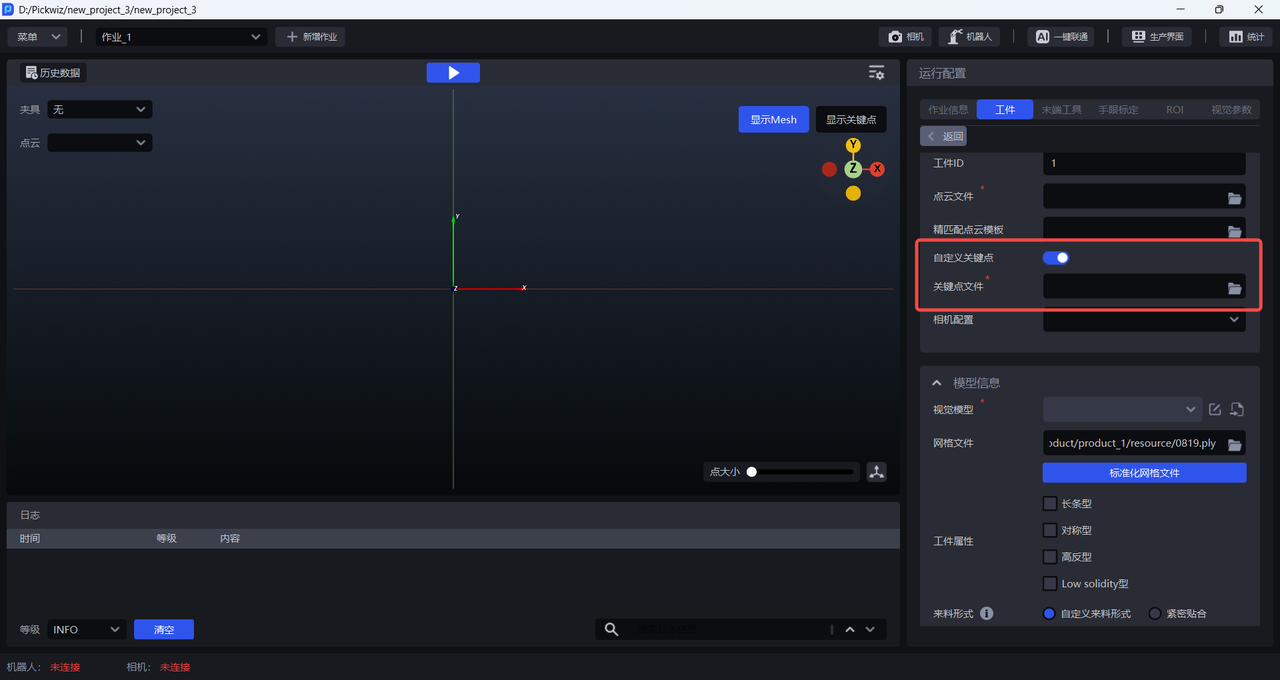
2.2.2 Keypoint File
During One-Click Connection training, the front and back of a general Target differ significantly, so a keypoint file must be uploaded for Front-Back Identification. The front and back of a plane type Target differ only slightly, so a keypoint file is not required. See the Point Cloud Template Creation Guide to create keypoints for a general Target.
2.2.3 Target Properties
When training a model for a general Target or plane type Target, you can select Target Properties. One-Click Connection generates training data that better reflects the specified Target properties. The resulting model can identify Targets with those properties more accurately and robustly.
If you do not select Target Properties, the generated training data will not specifically account for properties such as symmetry or highly reflective material. As a result, the trained model's identification performance may be less than ideal.
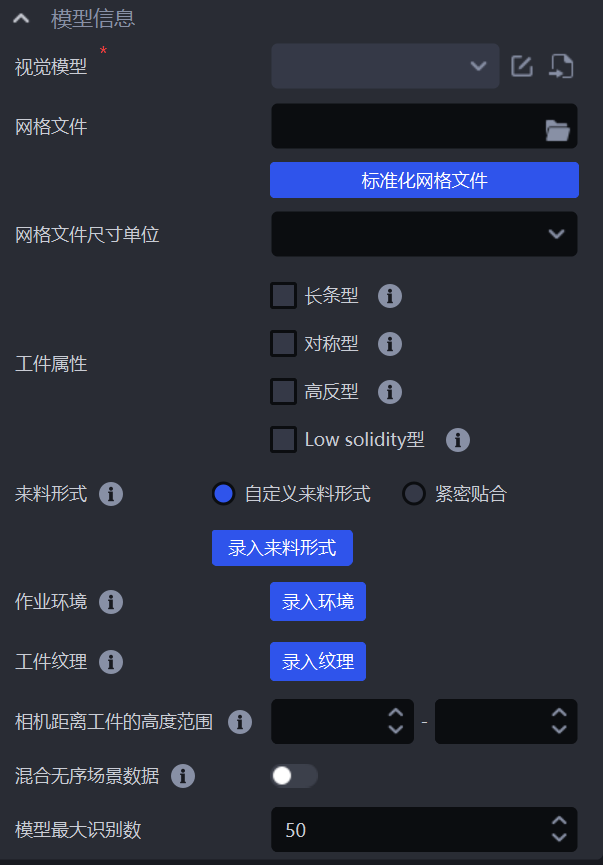
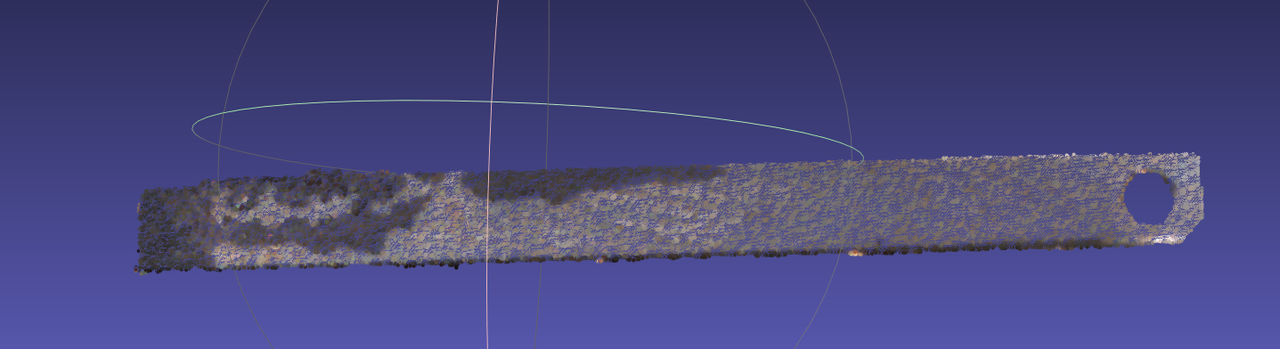
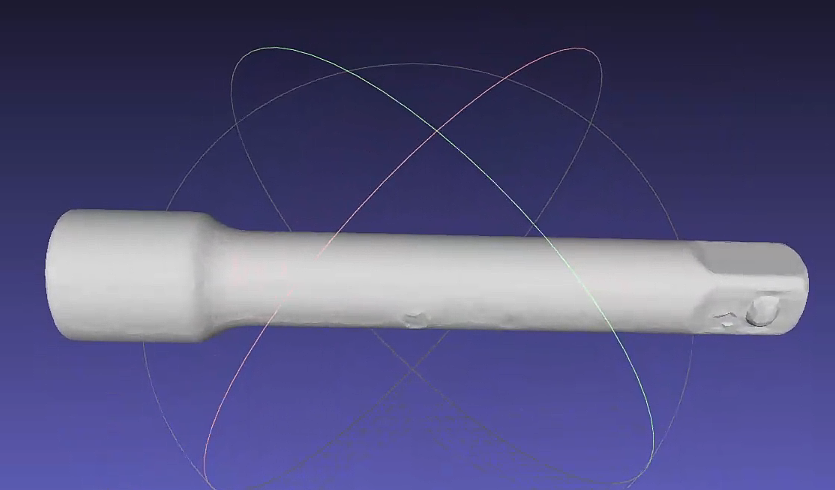
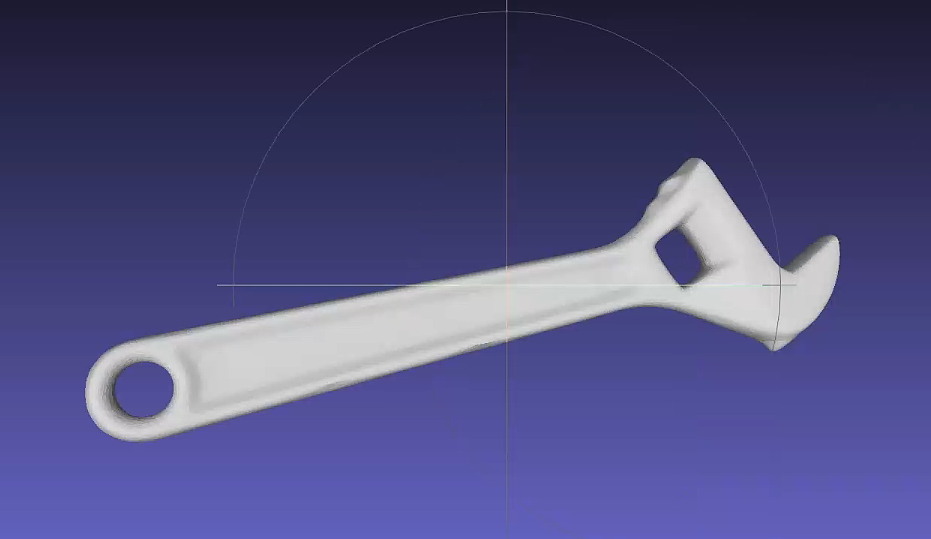
If the Target is elongated, with a length-to-width ratio greater than 3:1, such as a long rod, select Elongated under Target Properties.
 |  |
 |  |
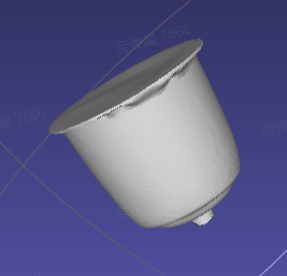
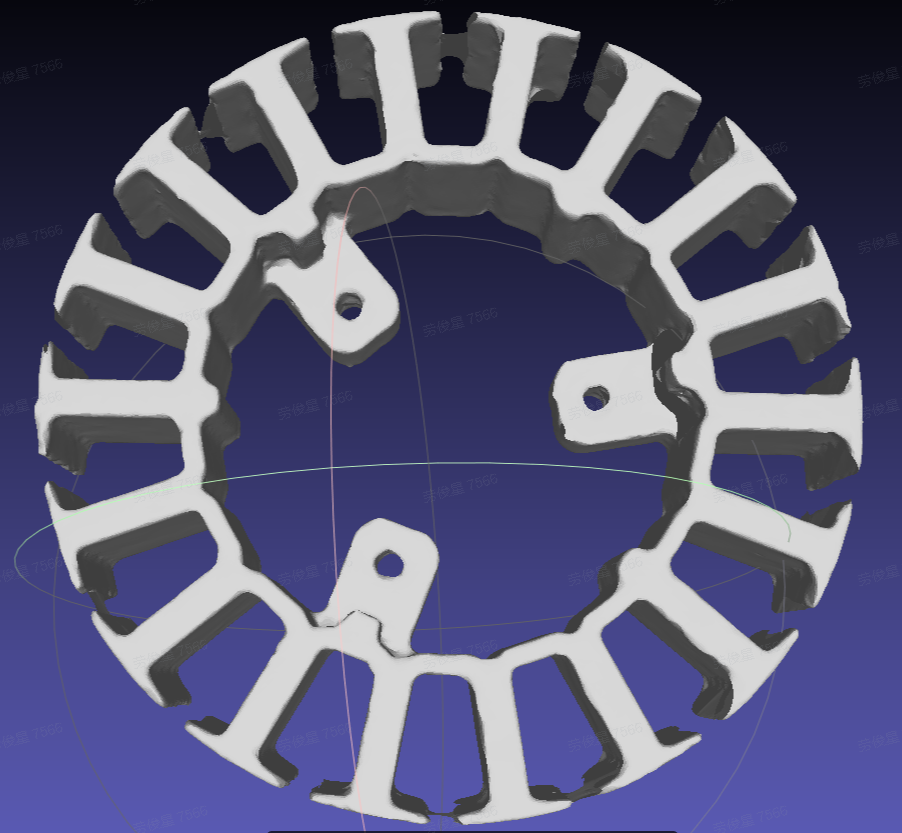
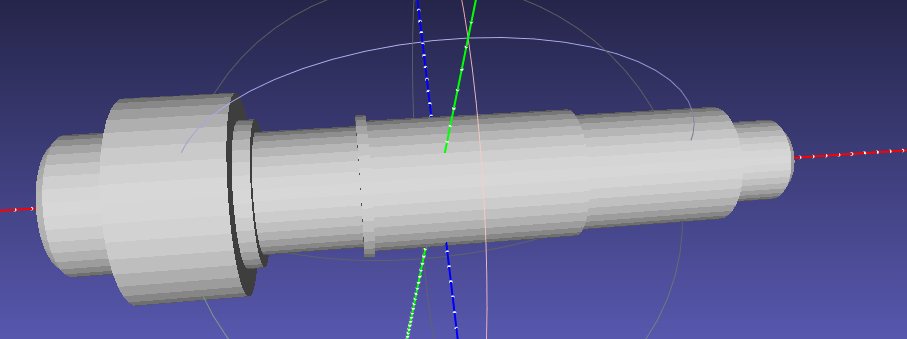
If the Target is symmetrical, select Symmetrical under Target Properties. Currently, only rotationally symmetrical Targets are supported: Targets that coincide exactly with themselves after rotation by a certain angle.
 |  |
 |  |
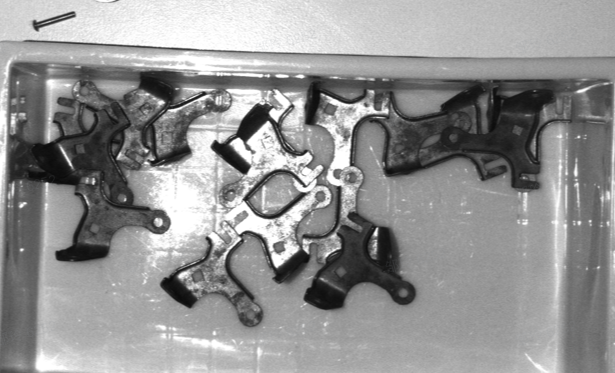
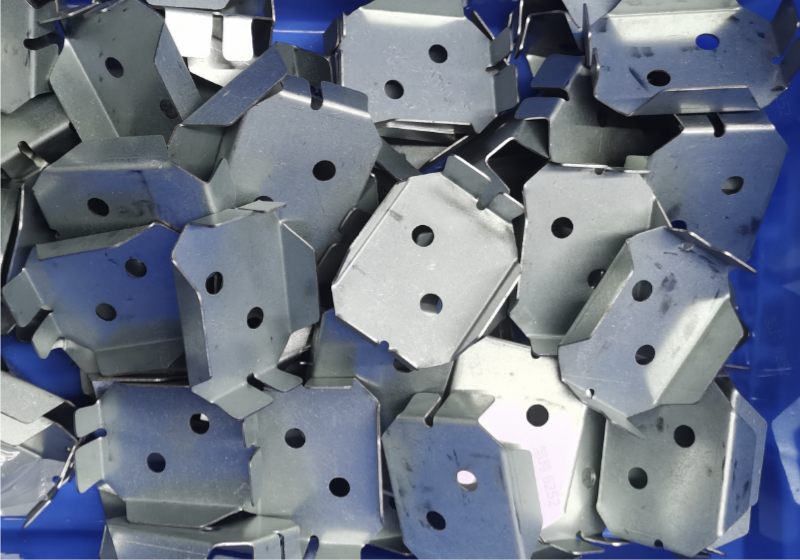
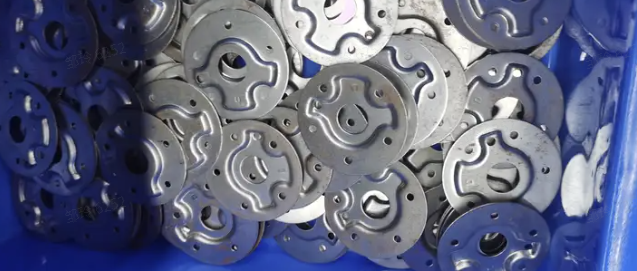
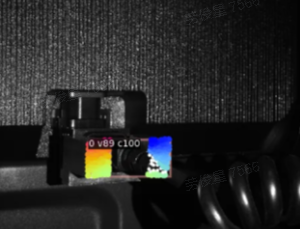
If the Target is highly reflective, with a very glossy surface that readily produces highlights and reflections, such as a metal Target, select Highly Reflective under Target Properties.
 |  |
 | 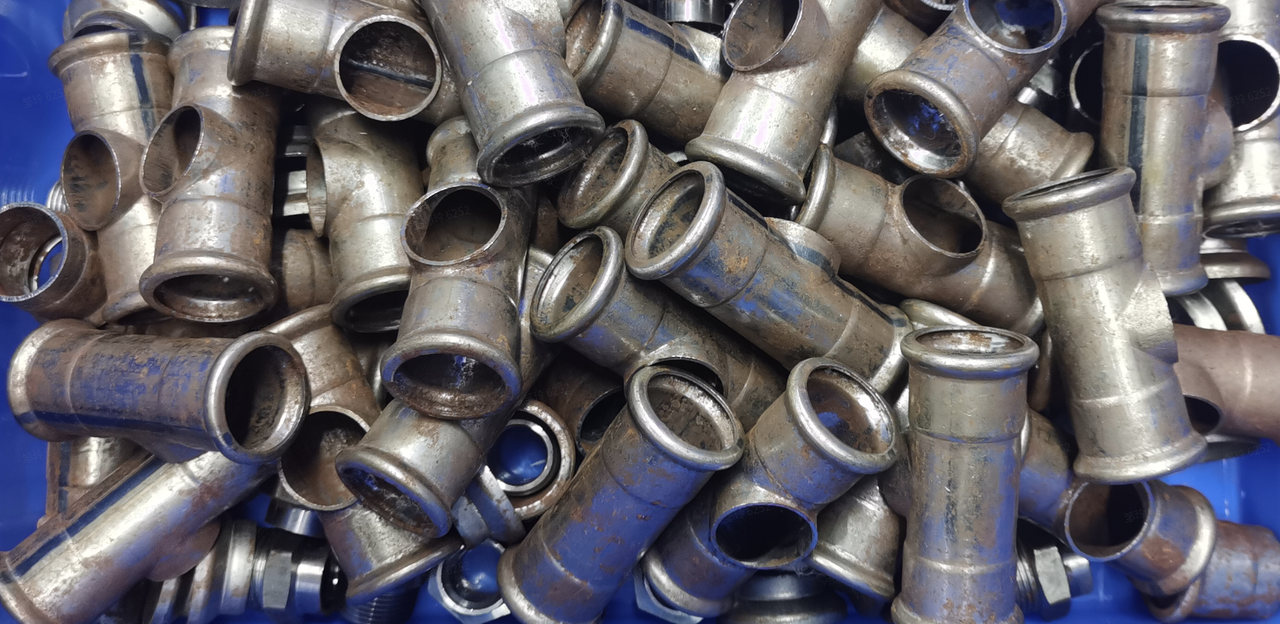 |
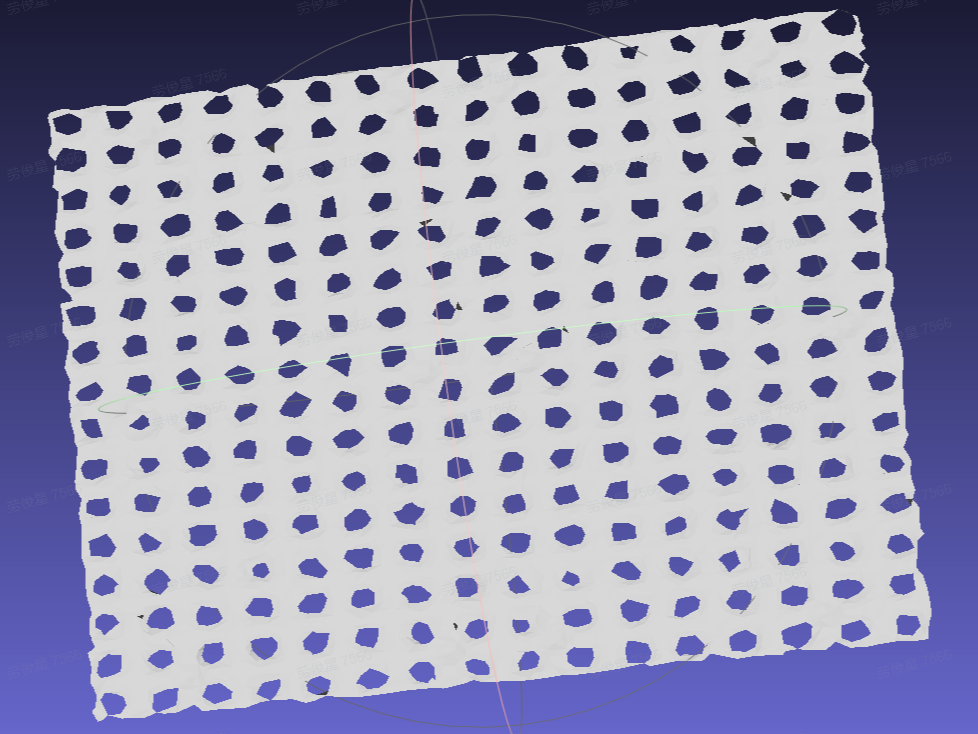
If the Target has low solidity, with large open areas or solid parts that occupy only a small portion of its surface area, such as a wire harness, select Low solidity under Target Properties. In V1.9.0, this property is supported only by the Local Identification plugin; selecting it in other scenes may cause training-data rendering to fail because the local Mesh file is missing.
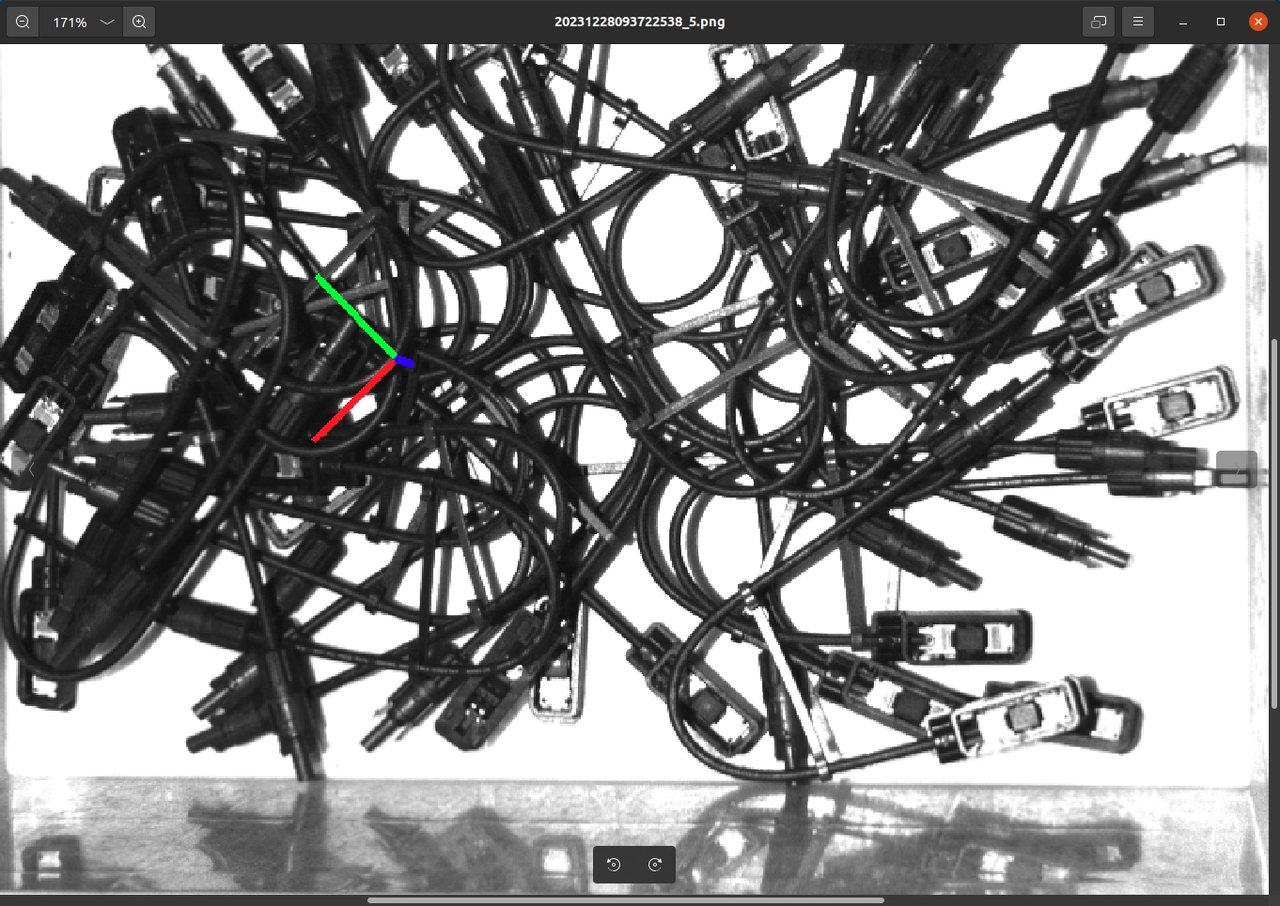 | 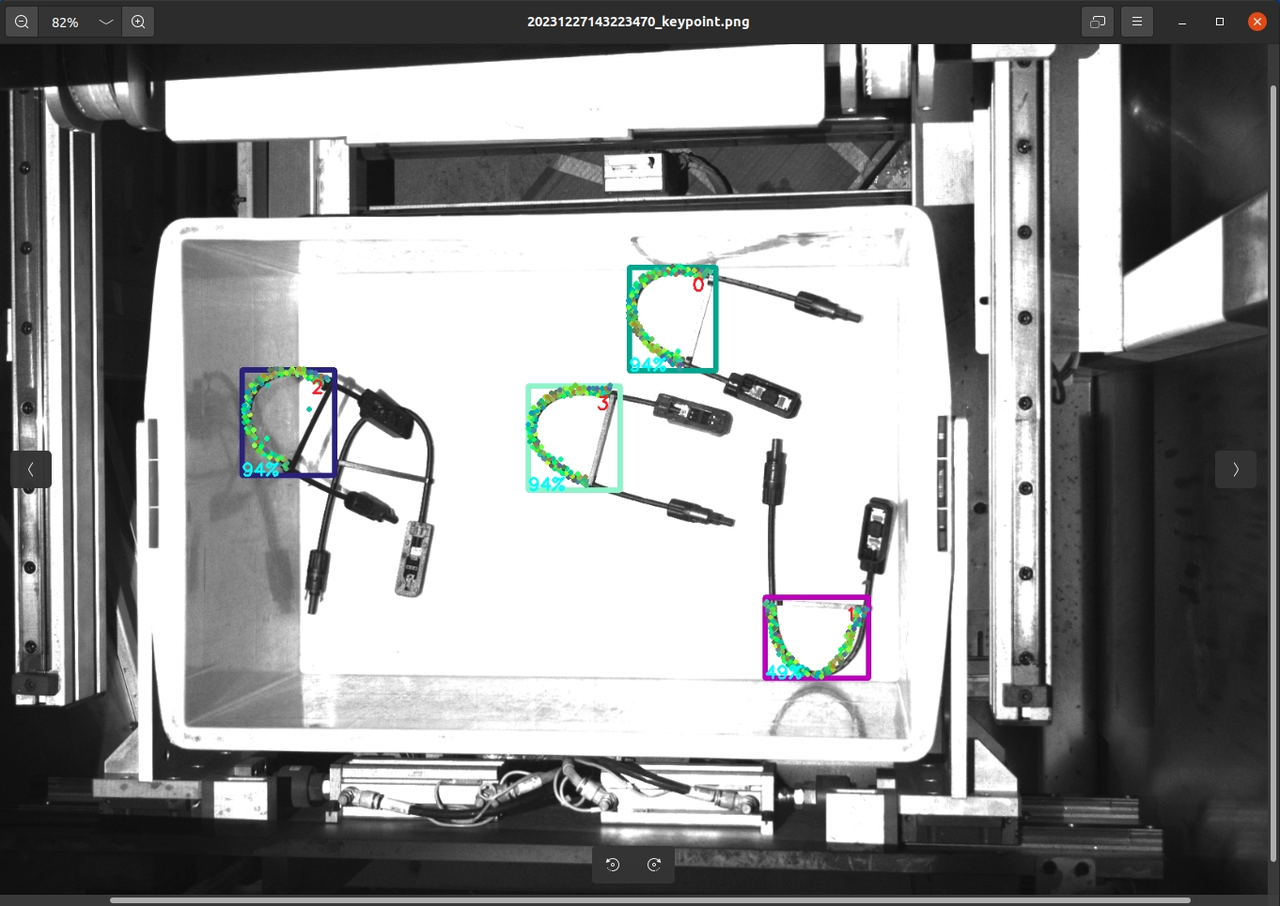 |
2.2.4 Pattern Mask
For neatly arranged loading and unloading Scenes involving general or plane type Targets, enter the Pattern mask during One-Click Connection training to simulate how Targets arrive in the actual Scene. This improves the trained model's identification performance and robustness in the actual Scene.
There are two Pattern mask options: “Tightly Packed” and “Custom Pattern Mask.” “Tightly Packed” applies when Targets arrive in an orderly arrangement, have consistent poses, and are closely spaced. “Custom Pattern Mask” applies to all Scenes with neatly arranged incoming Targets.
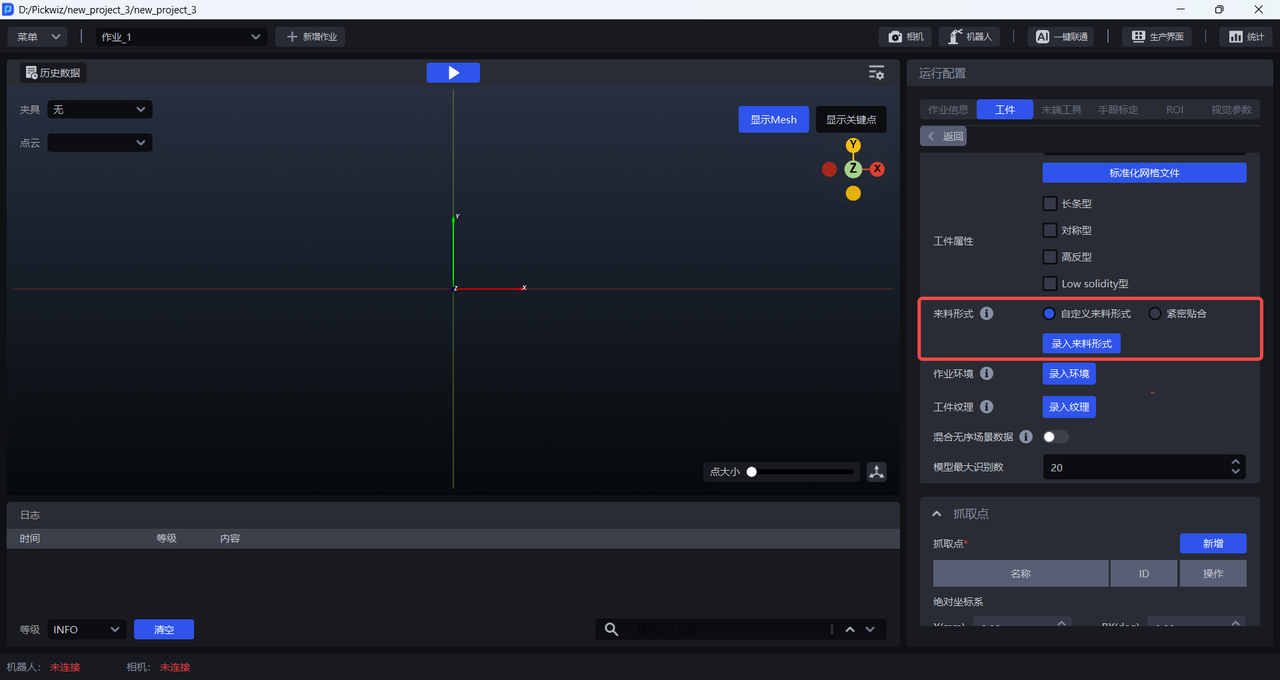
Tightly Packed
If Targets arrive in an orderly arrangement with consistent poses and small gaps, click Tightly Packed and set the number of Targets in each row and column. The total number of Targets must be less than 40. If the actual number of Targets exceeds 40, the configured ratio of Targets per row to Targets per column must be equivalent to the actual ratio. For example, if the actual Pattern mask has 12 Targets per row and 8 per column, the ratio is 12:8, which reduces to 3:2. You can therefore set 3 per row and 2 per column, or 6 per row and 4 per column, but not 9 per row and 6 per column because that exceeds 40 Targets.
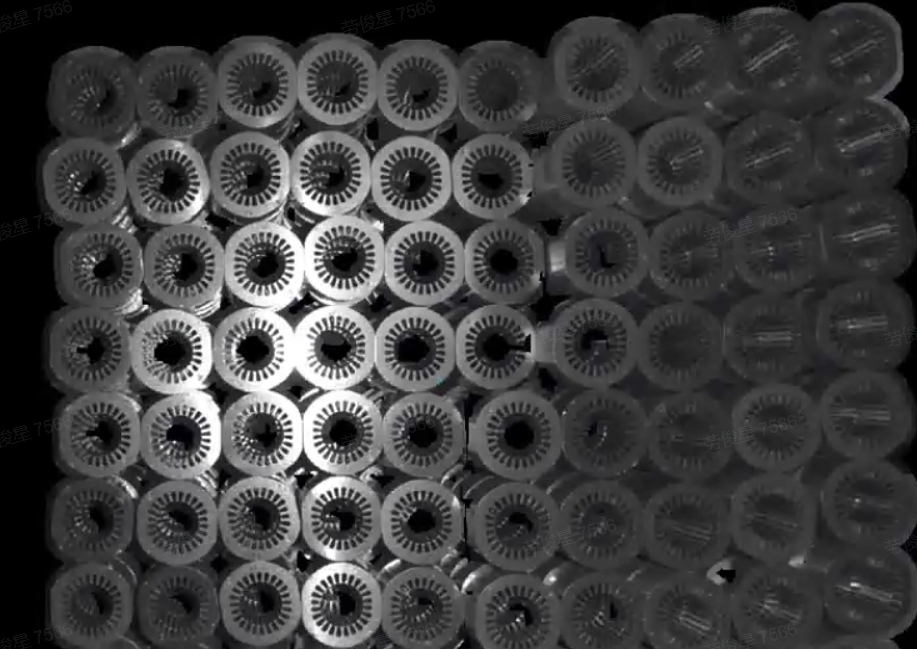
Example:
The Pattern mask has 6 Targets per row and 3 per column, for a total of 18 Targets. You can therefore set the range of Targets per row directly to [6,6] and the range of Targets per column to [3,3].
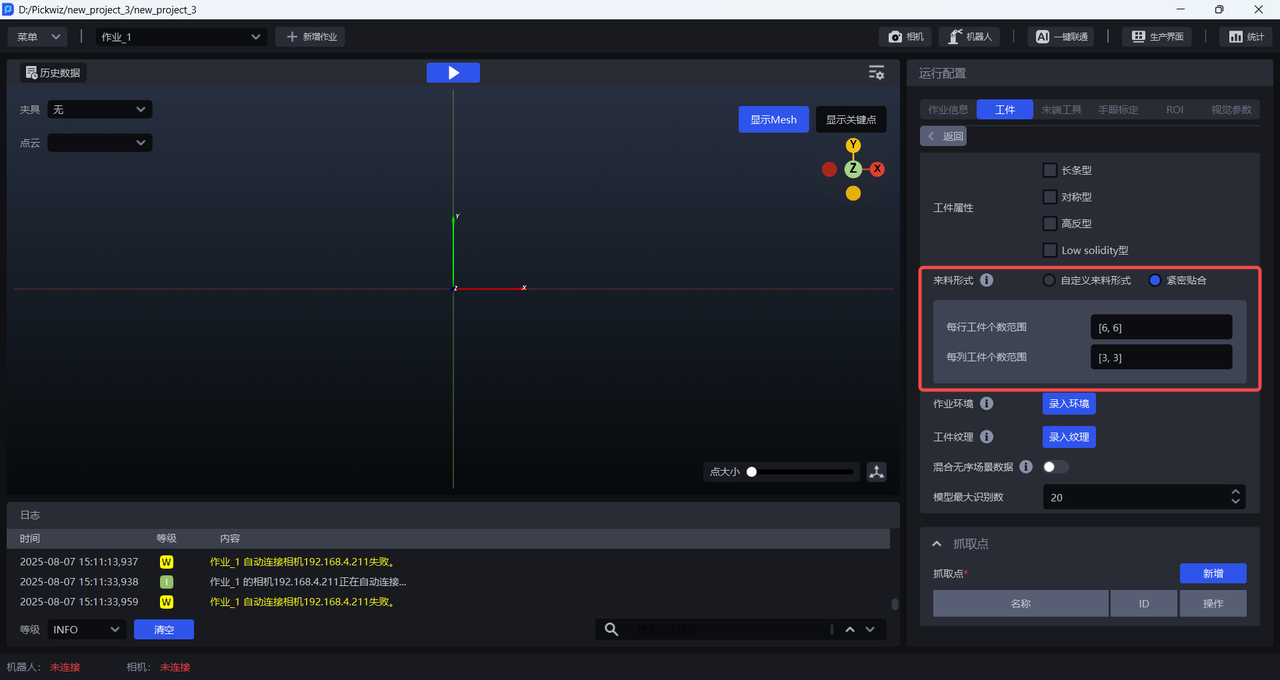
Custom Pattern Mask
You can customize the Pattern mask for any Scene with neatly arranged incoming Targets. Follow these steps:
- Click
Record Pattern Maskto open thePattern Mask Recorder.
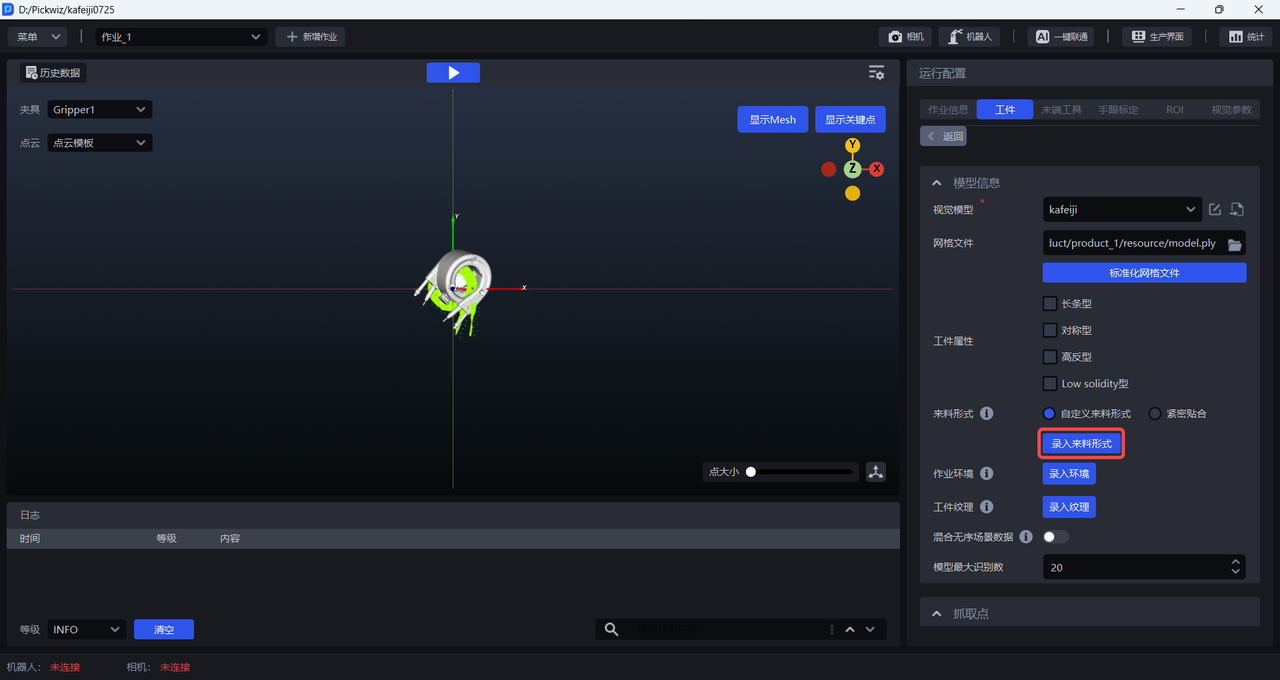
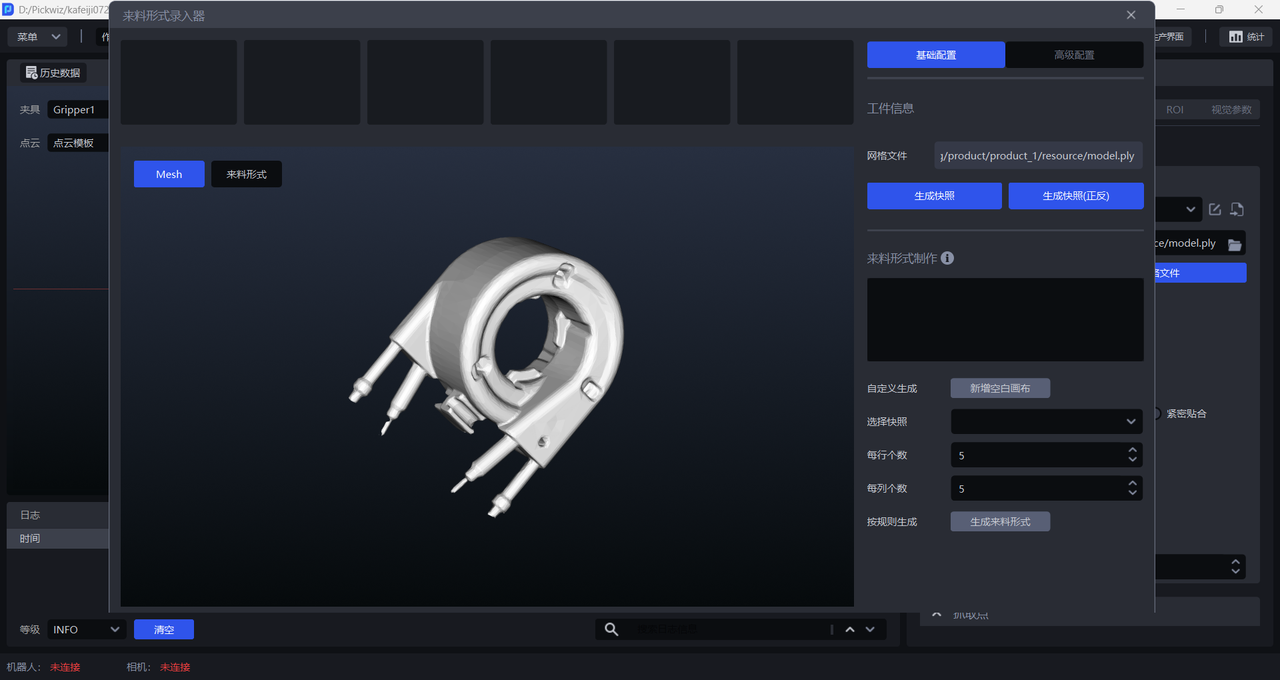
- Rotate the Mesh model to the appropriate pose—the Target pose from the Camera's viewpoint. Click
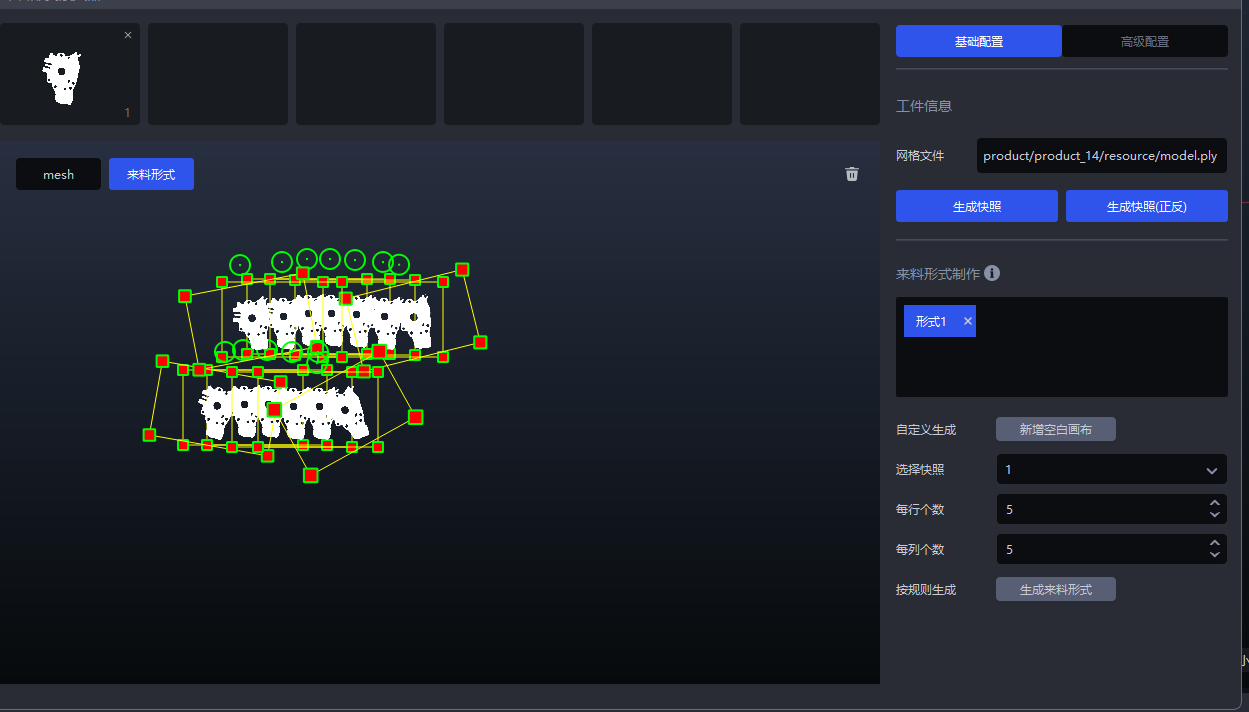
Generate SnapshotorGenerate Snapshot (Front and Back)to generate a snapshot of the Target in that pose.Generate Snapshot (Front and Back)generates snapshots from both front and back viewpoints, as shown below.
- After generating a snapshot, click
Add Blank Canvasand drag the snapshot onto the canvas to create a Target Pattern mask that matches the actual Scene, as shown below.
You can also select a snapshot, set the number of Targets per row and column, and click Generate Pattern Mask. The system generates the Pattern mask directly on the canvas using the selected snapshot and the specified row and column counts, as shown below.
- After recording the Pattern mask and configuring the remaining items, trigger One-Click Connection. Training for the neatly arranged Scene generates training data based on the recorded Pattern mask, as shown below.
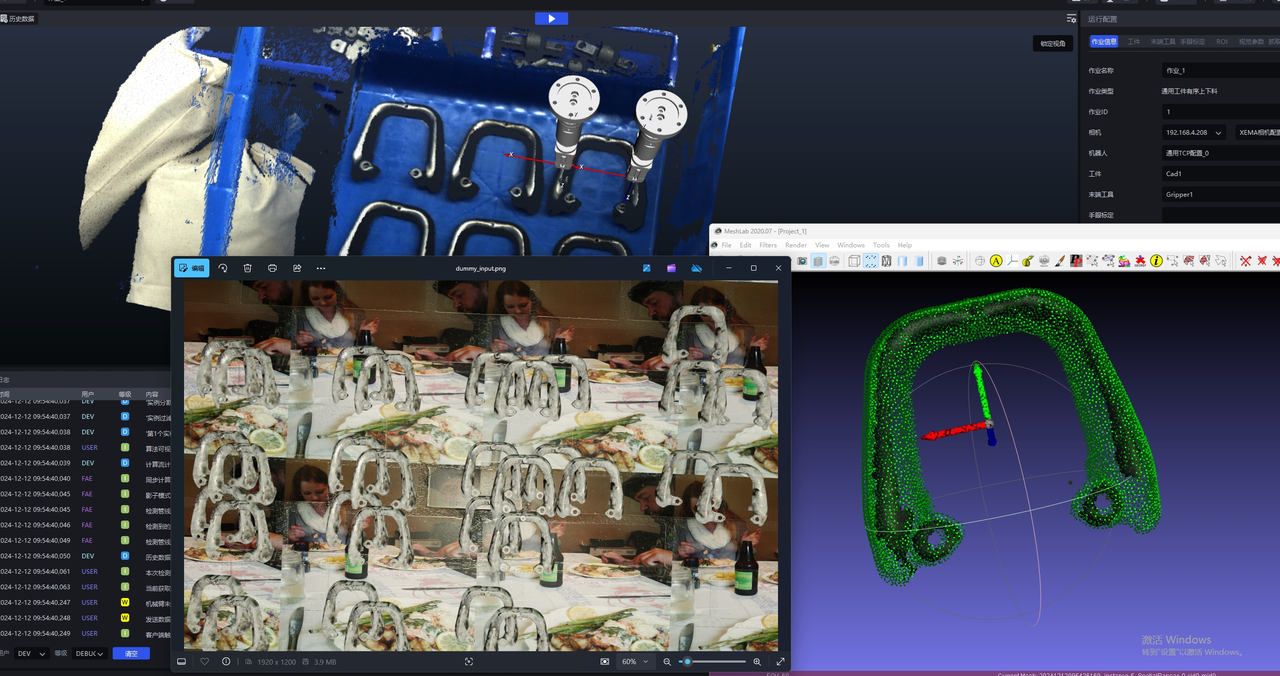
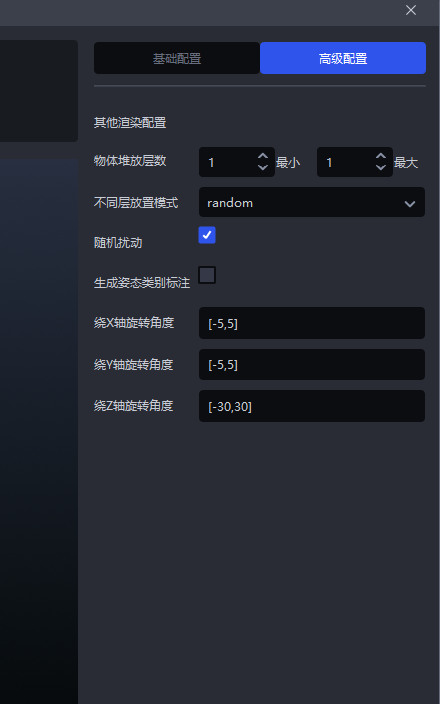
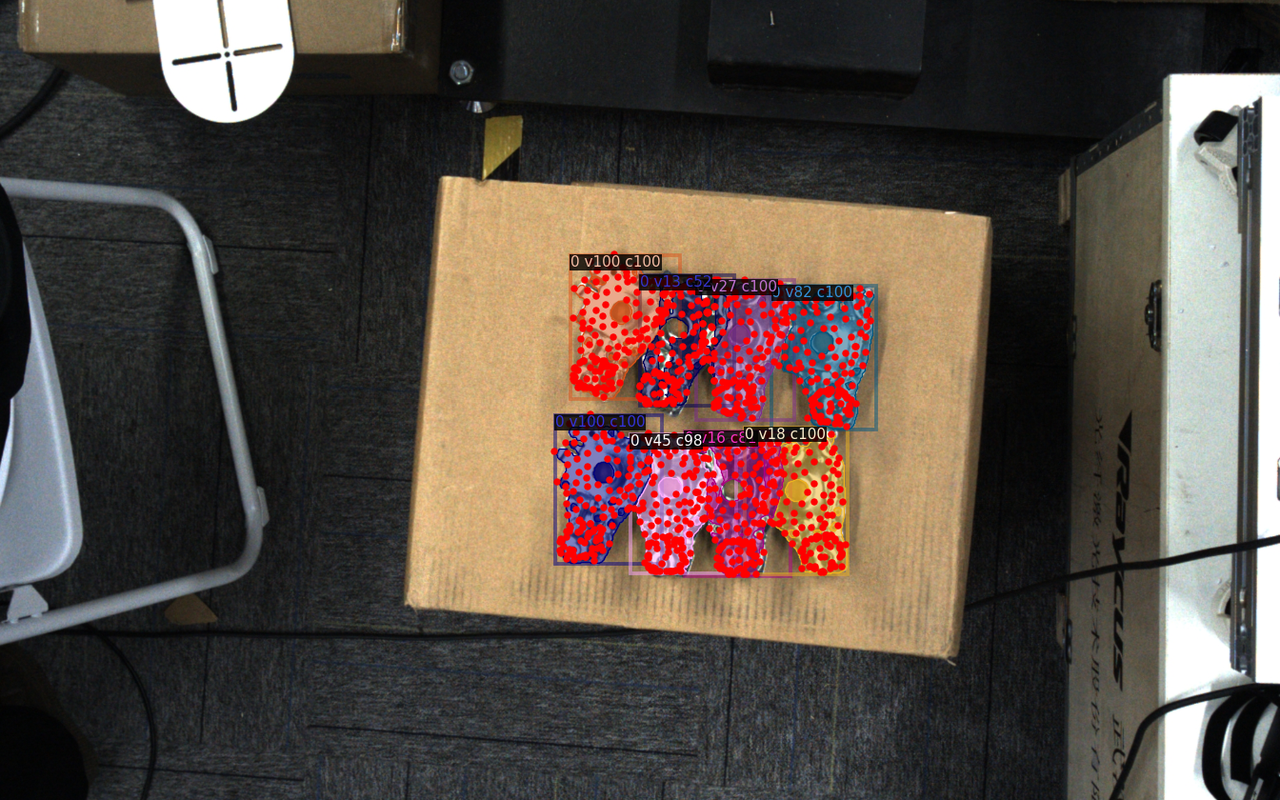
If Targets are stacked in the actual Scene, click
Advanced Configurationto configure the stacking. Set the rotation angle according to the Target pose.
Example: The Target poses in the Scene rotate around the Z-axis, so set the rotation angle to [-30,30].
 | |
 |  |
2.2.5 Task Environment
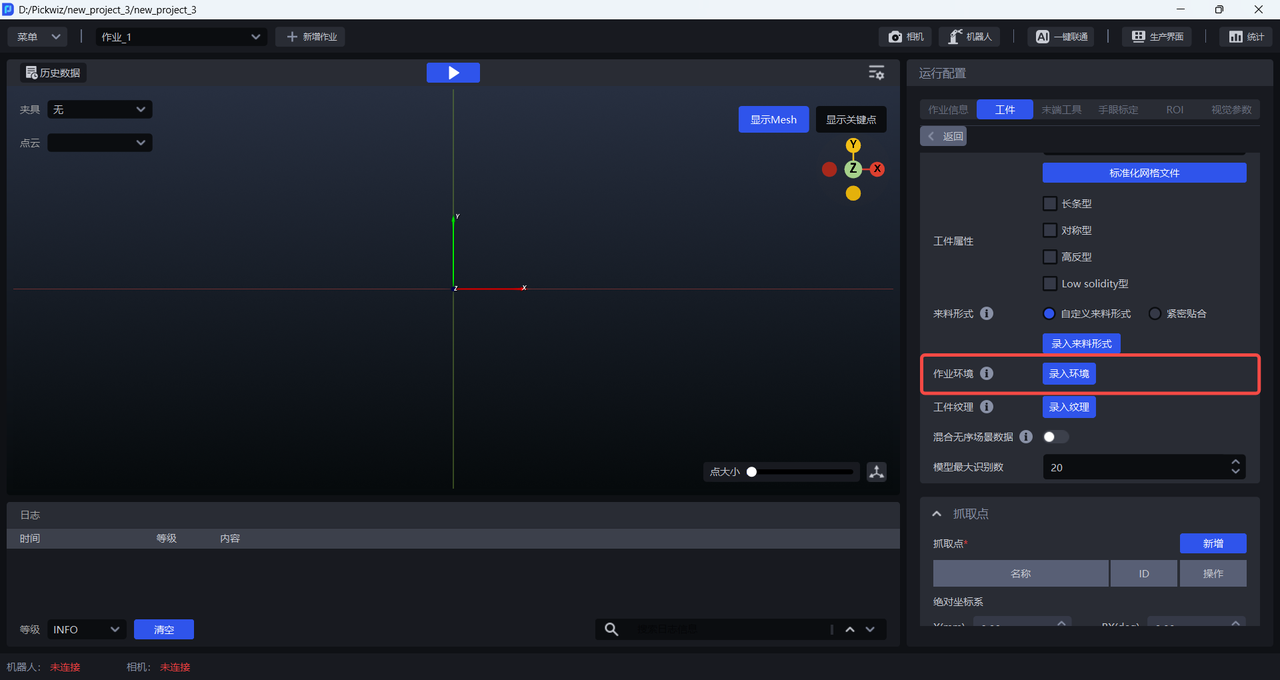
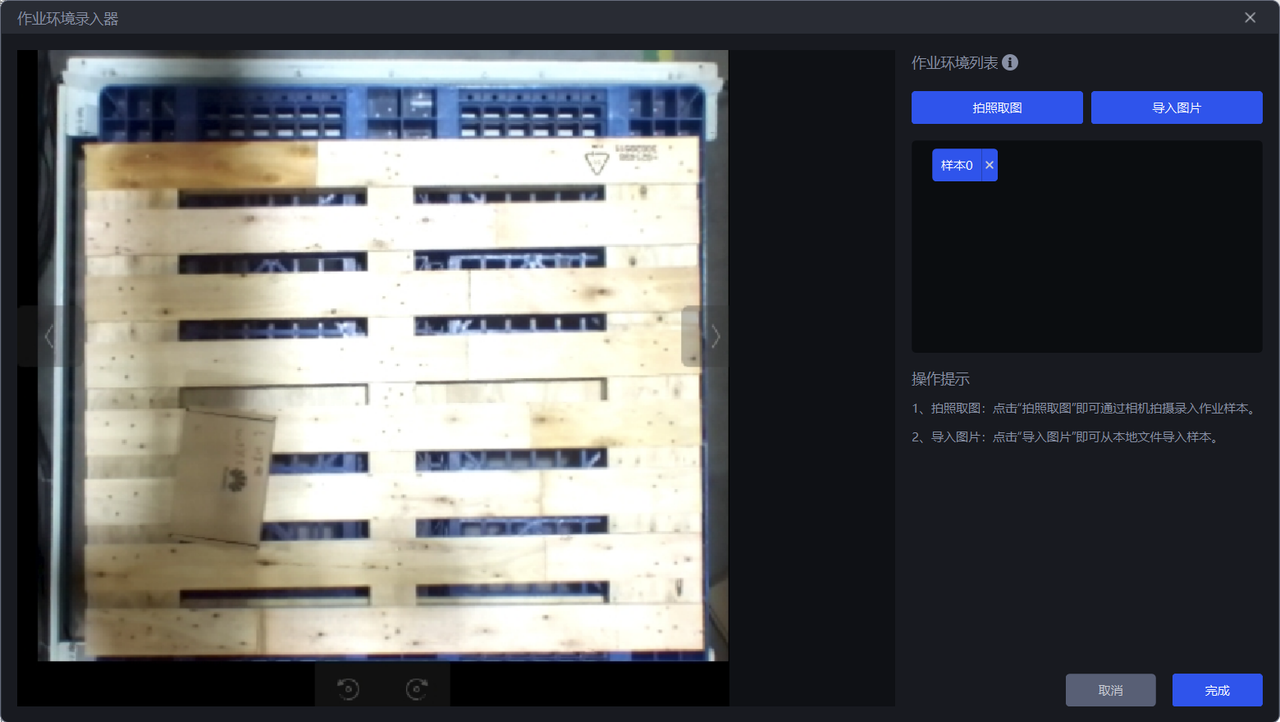
When training a model for a general or plane type Target, you can record the Task environment. This field is intended to replace randomly varied backgrounds with the recorded image when One-Click Connection generates training data. A known issue in V1.9.0 can prevent the recorded Task environment from taking effect, so recording it does not guarantee that the training data uses that background.
Follow these steps:
- Click
Record Environmentto open theTask Environment Recorder.
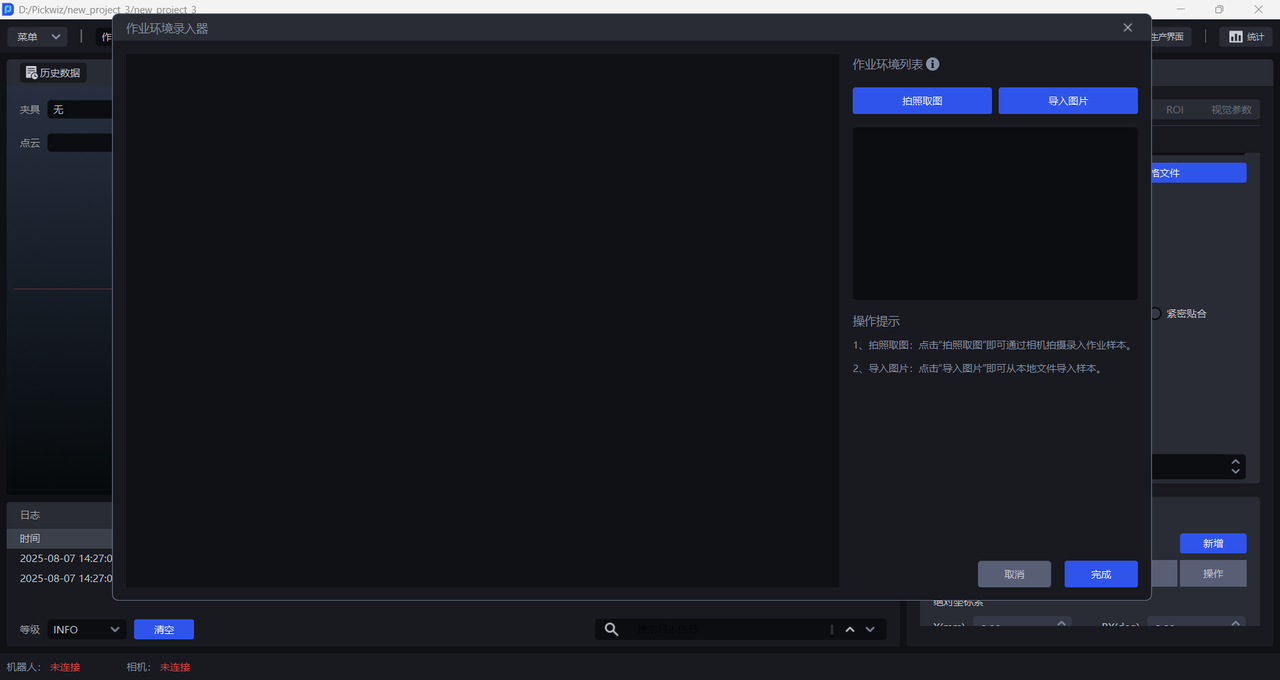
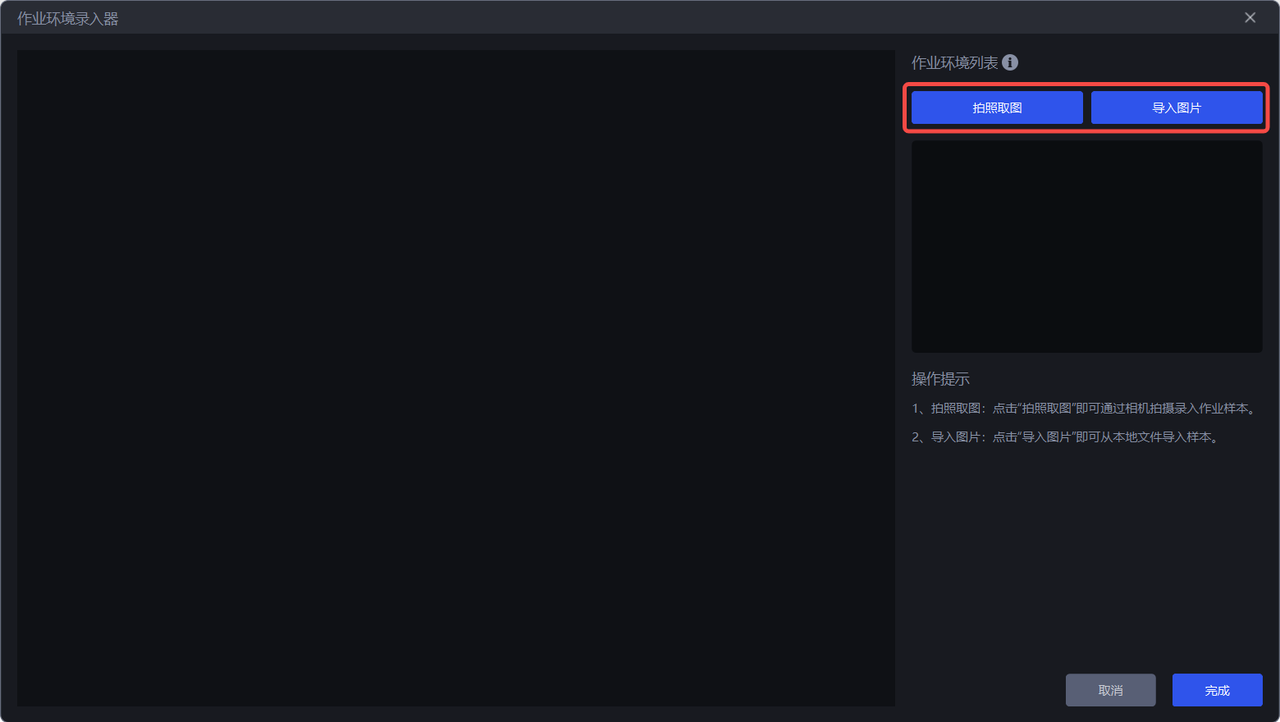
- There are two ways to obtain a Task environment image: use
Capture Imageto capture the Task environment within the Camera's field of view, or useImport Imageto import an image directly. The Task environment image must not contain Targets or a bin. It may contain a pallet or bottom support.
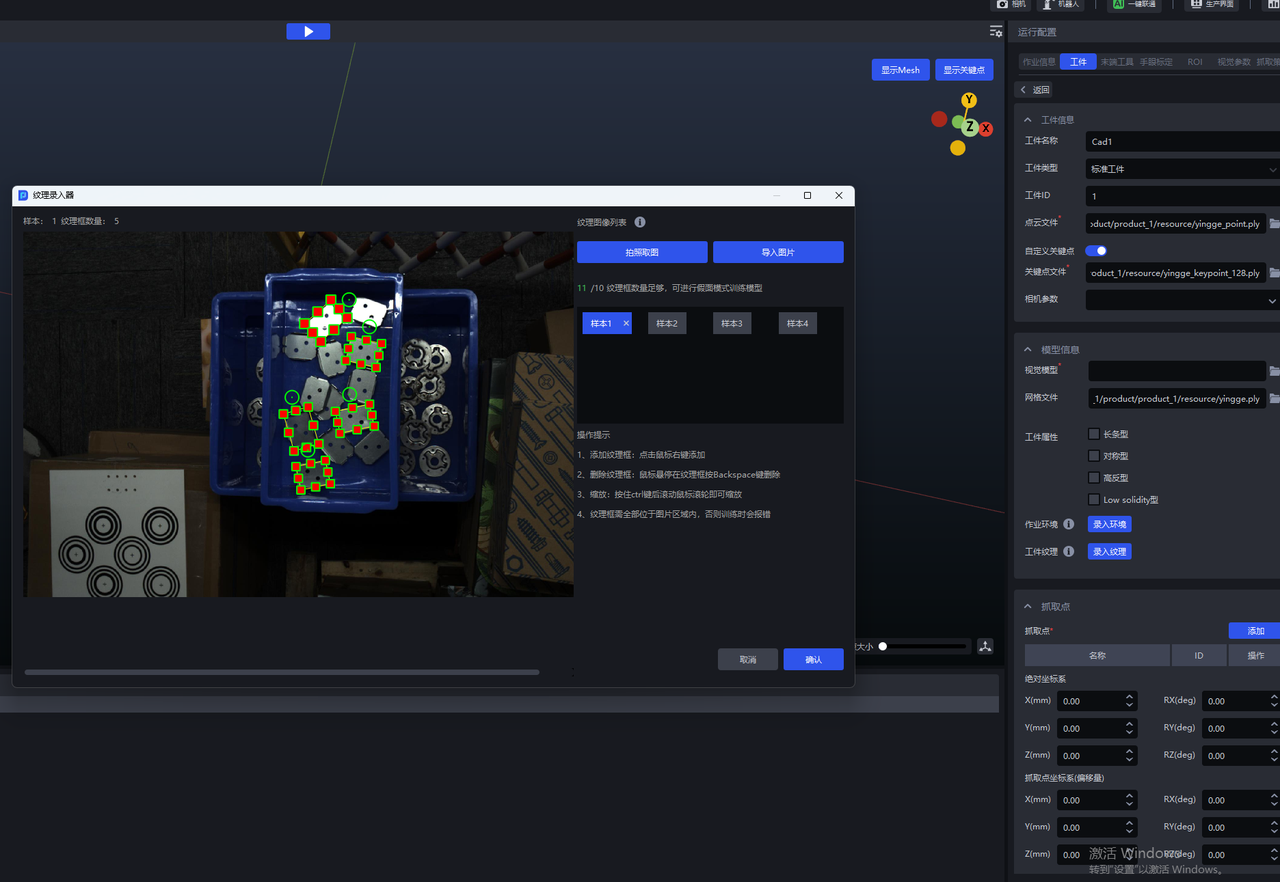
2.2.6 Target Texture
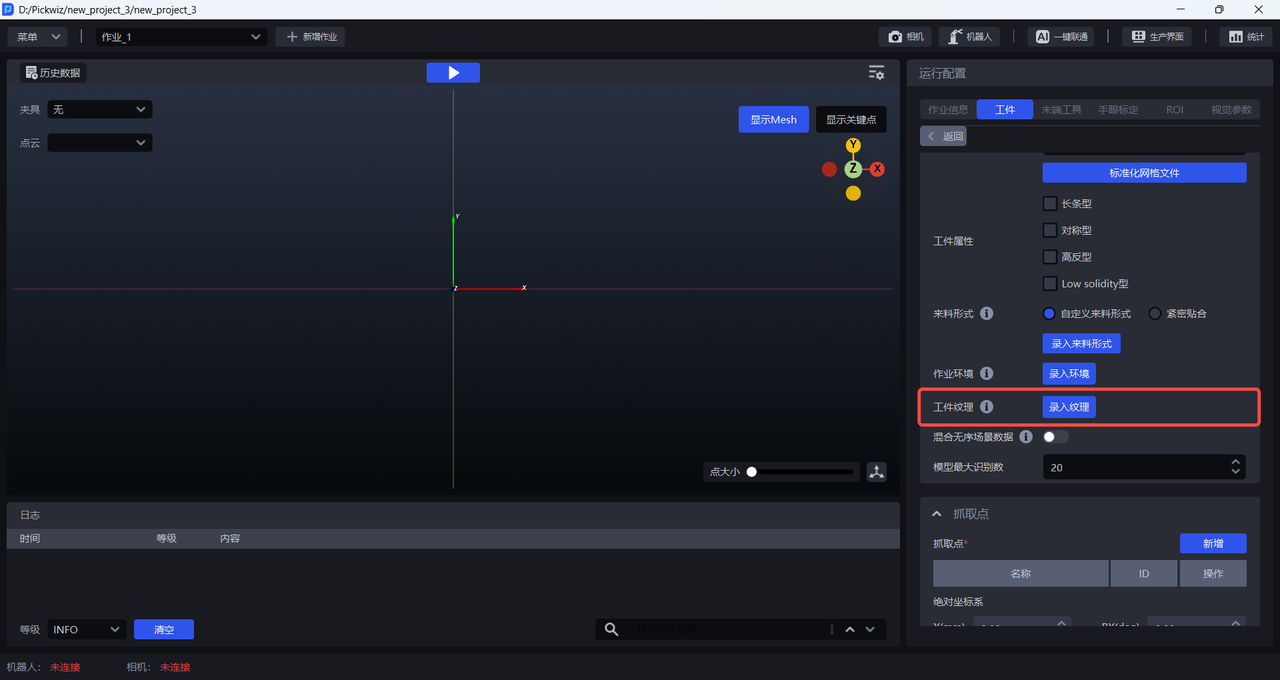
When training a model for a general or plane type Target, you can record the Target texture. One-Click Connection uses the uploaded Target texture to generate training data, improving the trained model's Target identification performance and robustness.
Follow these steps:
- Click
Record Textureto open theTexture Recorder.
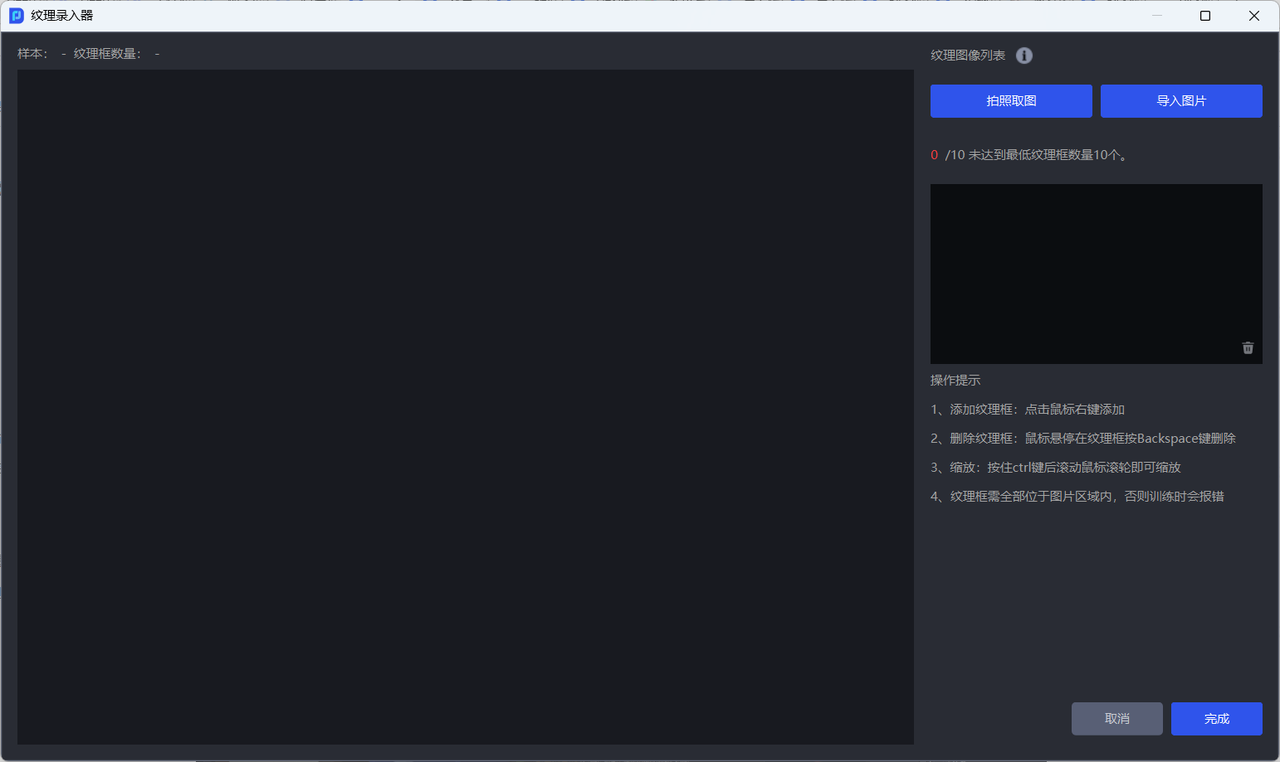
- There are two ways to obtain a Target texture image: use
Capture Imageto capture the Target texture within the Camera's field of view, or useImport Imageto import an image directly.
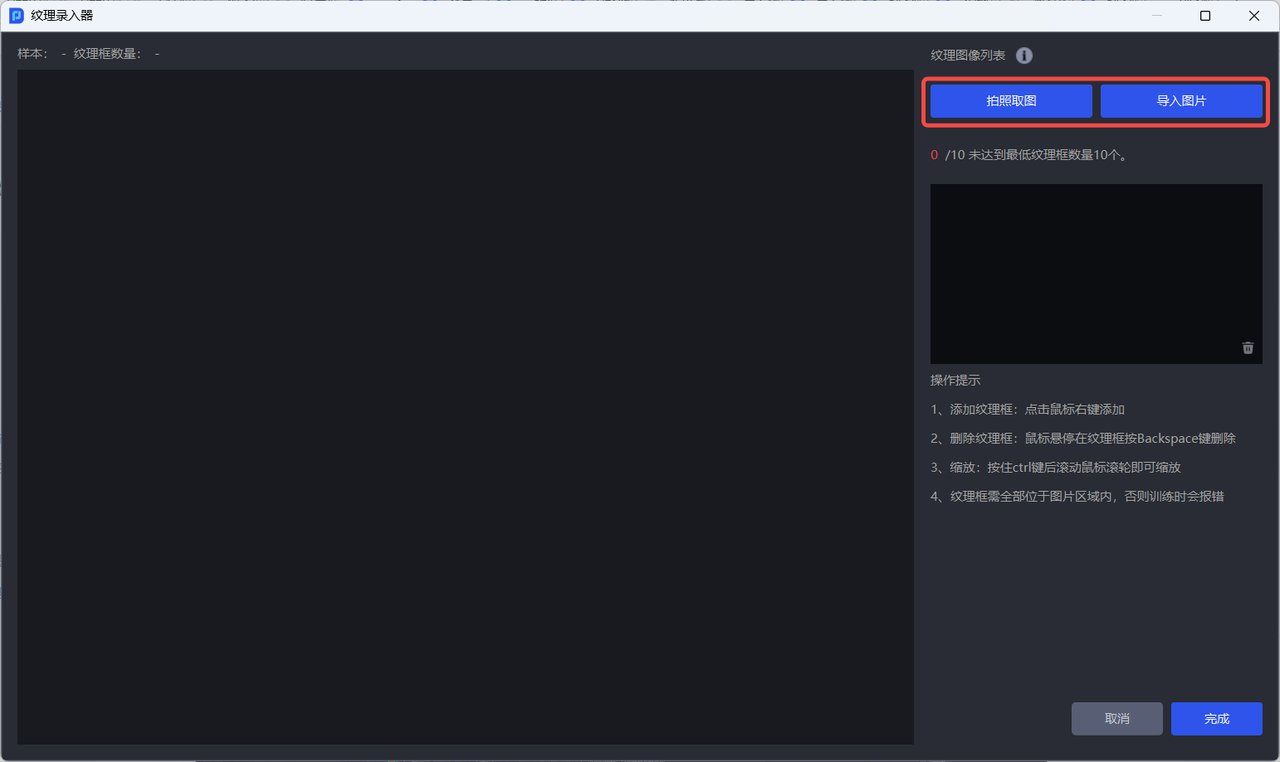
- After obtaining the Target texture image, right-click the image to add a texture box. Hold
Ctrlwhile scrolling the mouse wheel to resize the texture box. Hover over a texture box and pressBackSpaceto delete it.
Note:
A texture box should enclose the entire Target and closely follow its edges; otherwise, Visual Model identification performance will be affected.
Every texture box must lie entirely within the image area; otherwise, an error will occur during model training.
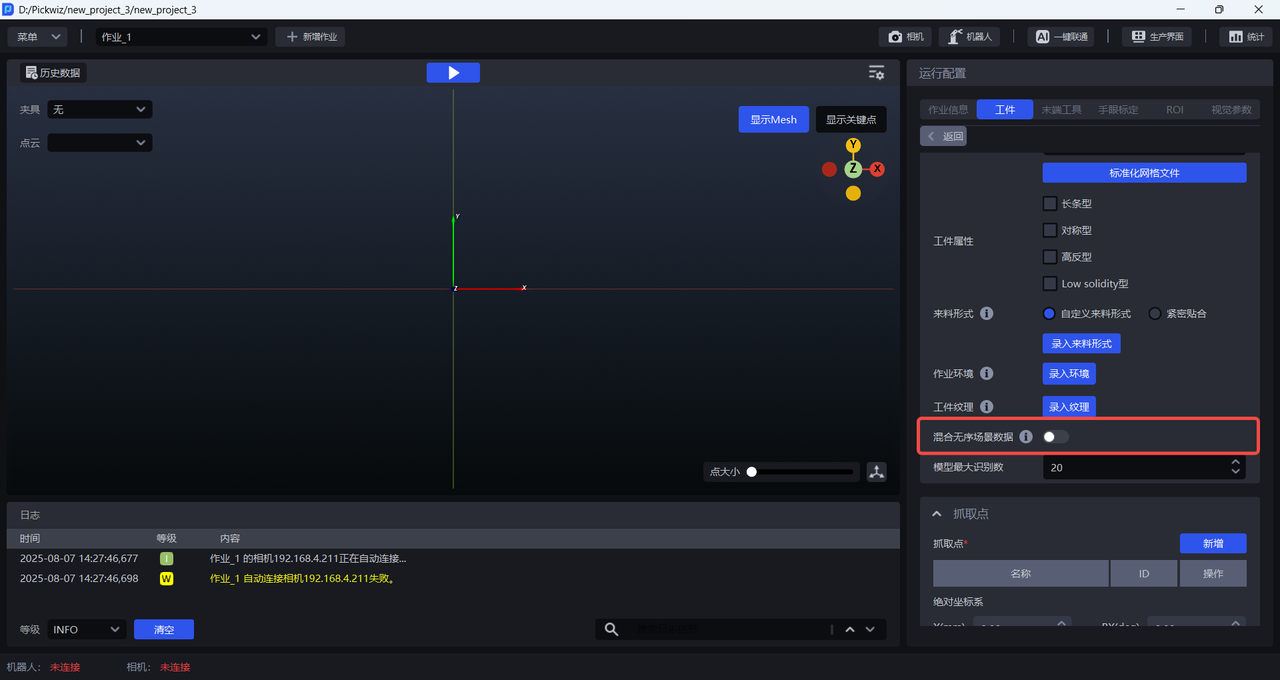
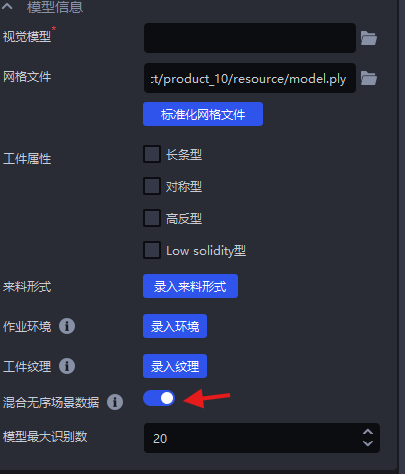
2.2.7 Mix Randomly Arranged Scene Data
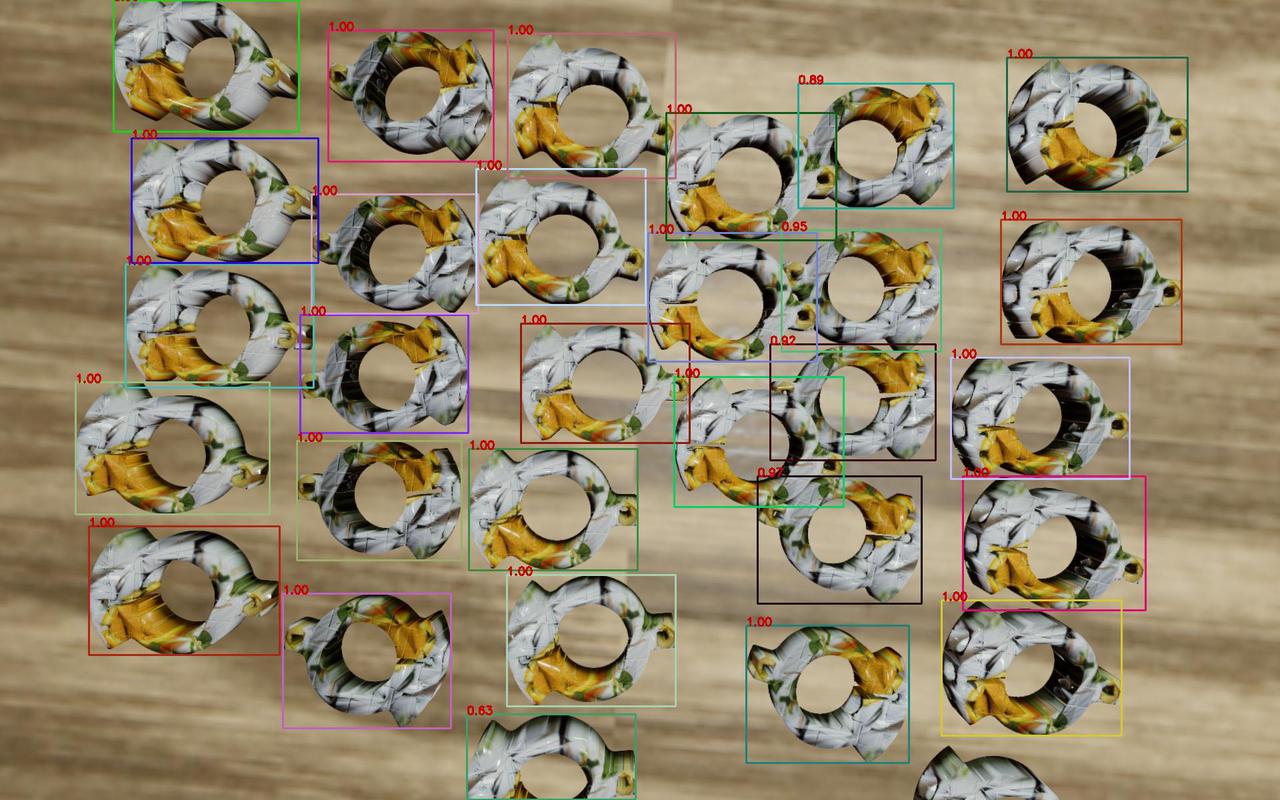
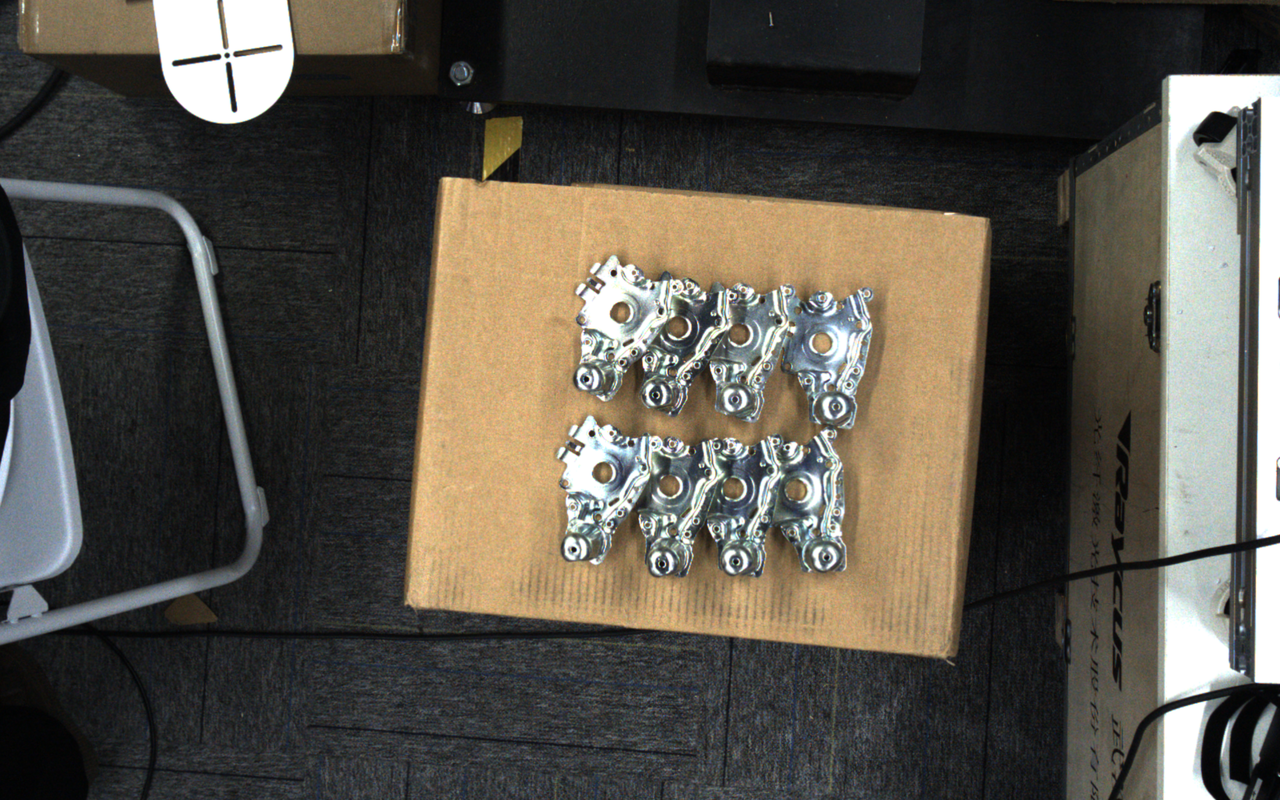
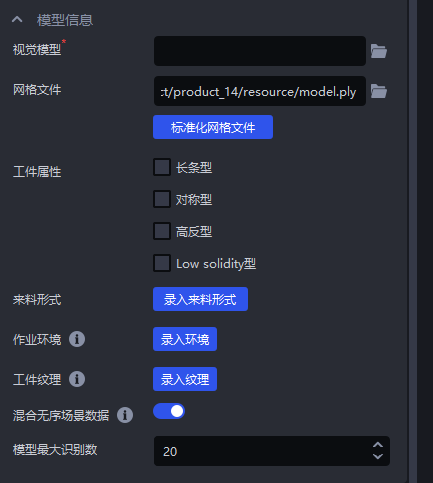
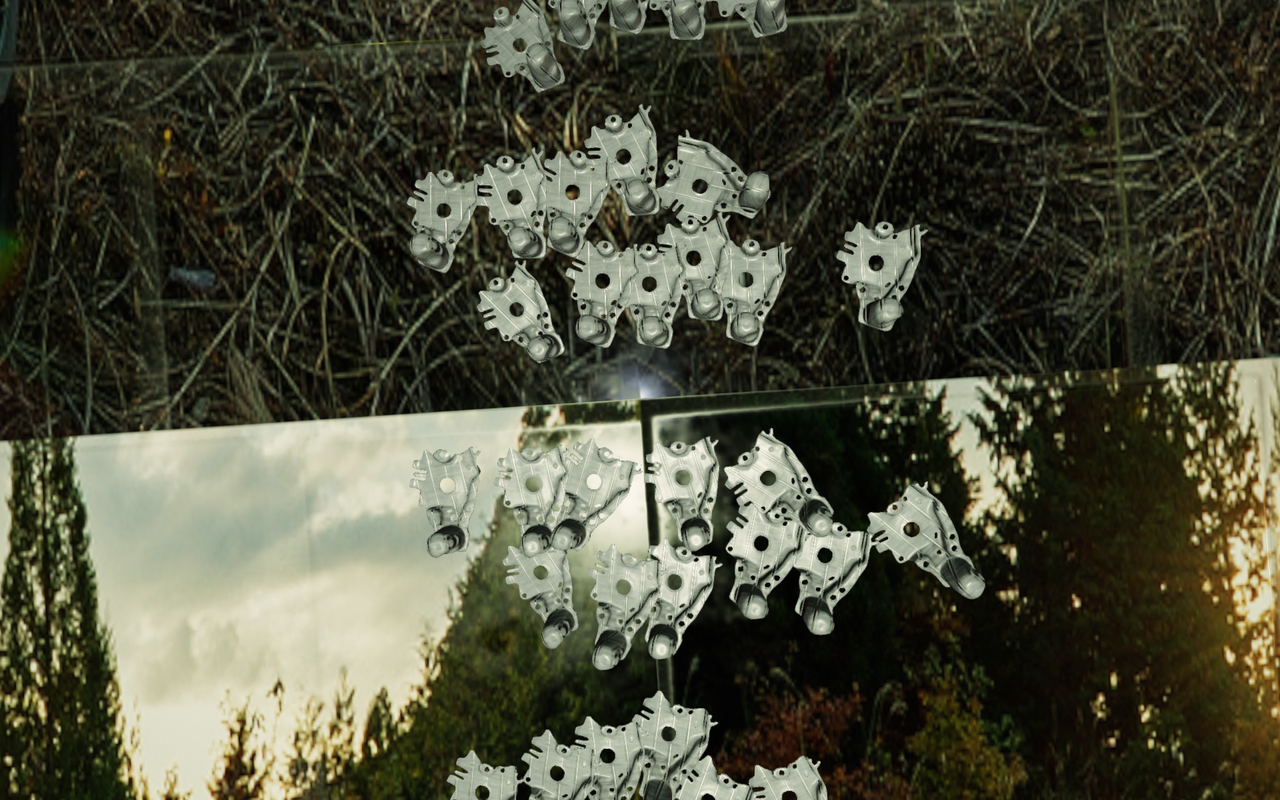
In a neatly arranged loading and unloading Scene involving general or plane type Targets, the Targets may be arranged in rows and columns but have inconsistent poses. In that case, enable Mix Randomly Arranged Scene Data. One-Click Connection will generate synthetic training data for both neatly arranged Scenes, with ordered rows and columns, and randomly arranged Scenes, with inconsistent poses. This improves the trained model's identification performance and robustness when Target poses vary.
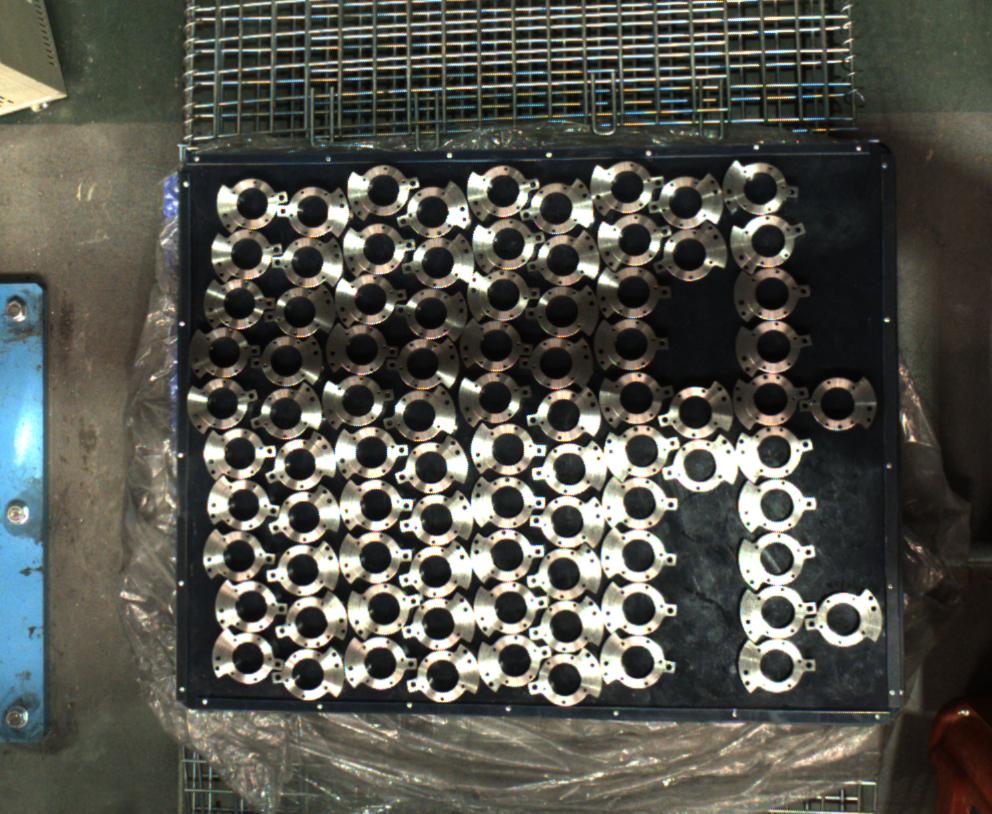
Example: The front and back of a plane type, symmetrical Target differ only slightly. If Mix Randomly Arranged Scene Data is enabled, the generated training data contains multiple poses, and the model will misidentify the Target's front and back, as shown below.
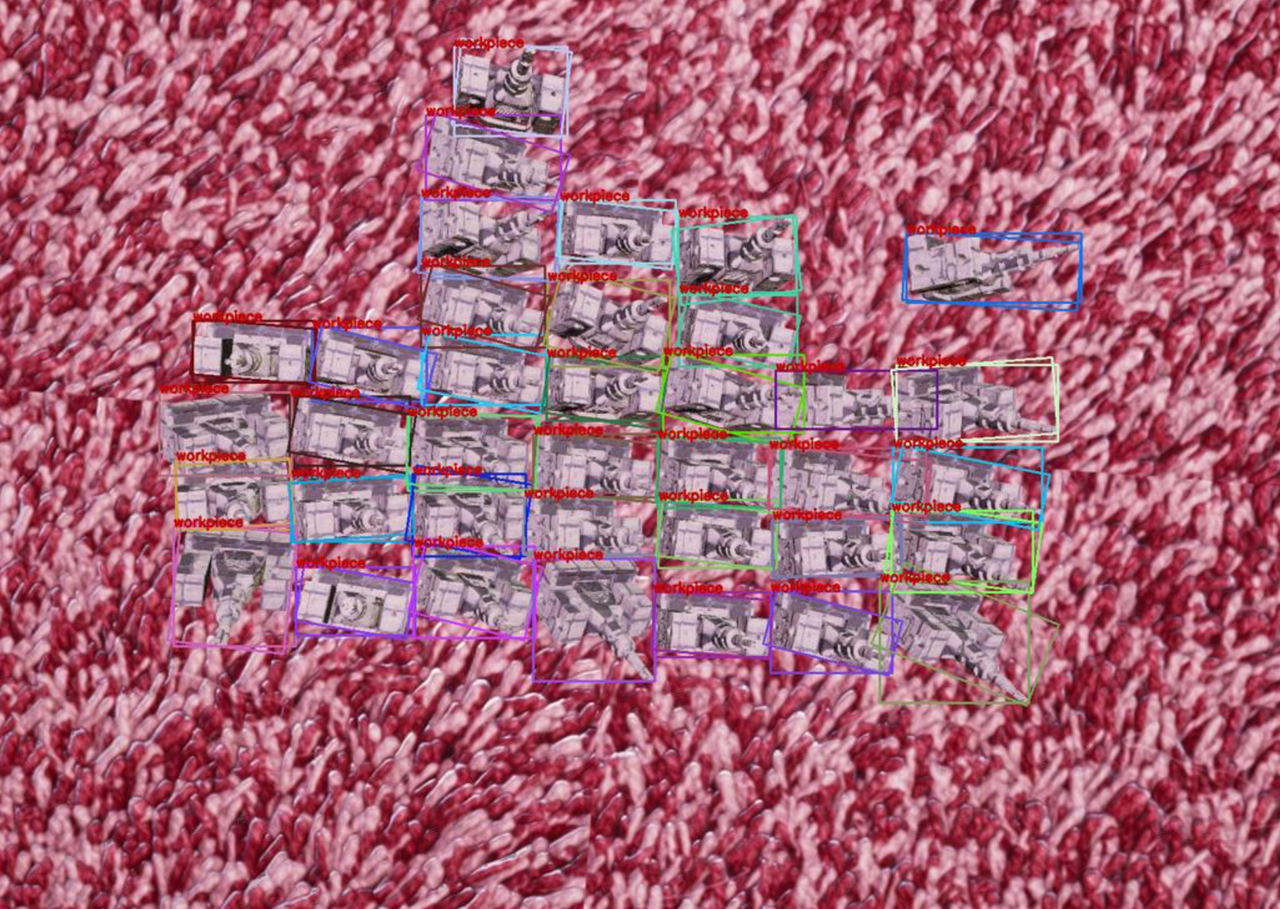
Example: In a neatly arranged loading and unloading Scene involving general Targets, enabling Mix Randomly Arranged Scene Data produces synthetic images after One-Click Connection is triggered that include both the ordered rows and columns of a neatly arranged Scene and the inconsistent poses of a randomly arranged Scene.
2.2.8 Maximum Model Detections
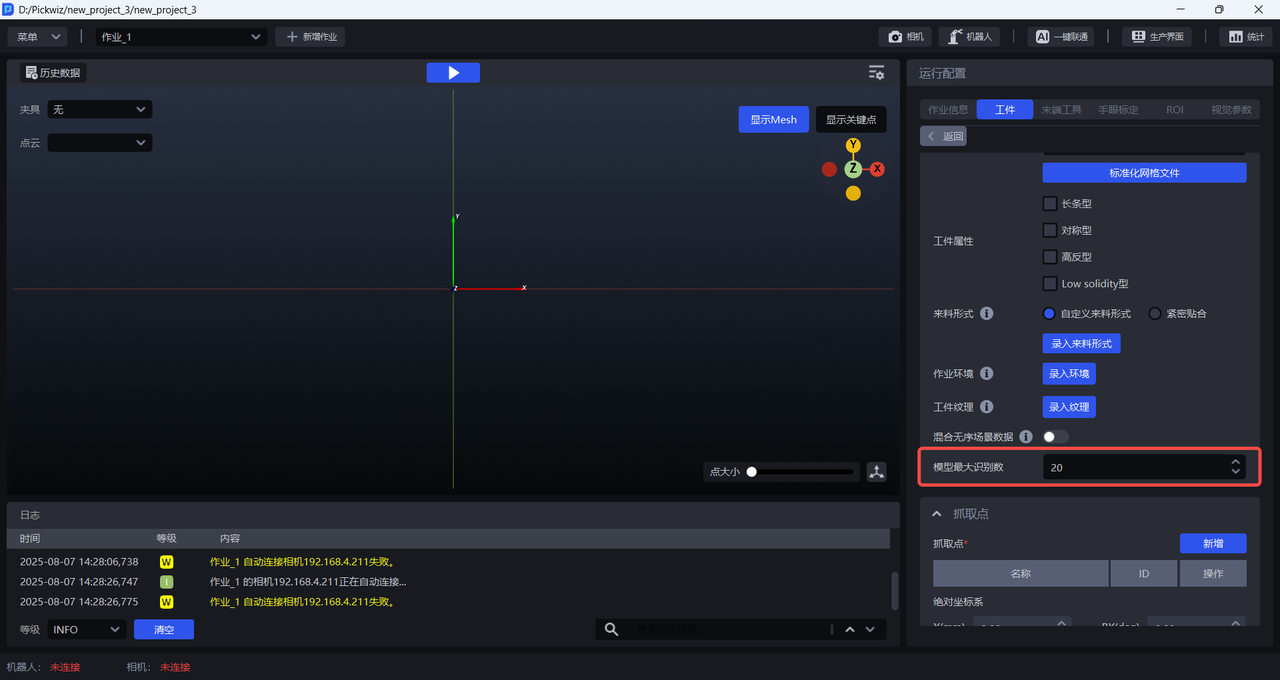
Maximum Model Detections is the maximum number of instance detection results that a model can output when performing Inference on a single image. Limiting this number primarily reduces computing resources and processing time during Inference, improving Cycle time. The default is 20. You can change it according to the number of Targets in the actual Scene.
2.2.9 Function Options
When training a model for a general Target or plane type Target, select the relevant Function Options. After One-Click Connection is triggered, the generated training data includes different Target types, orientations, textures, and local features. This improves the trained model's ability to identify Targets as the actual Scene changes.
Visual Classification
Visual Classification groups Targets by orientation, texture, and other characteristics.
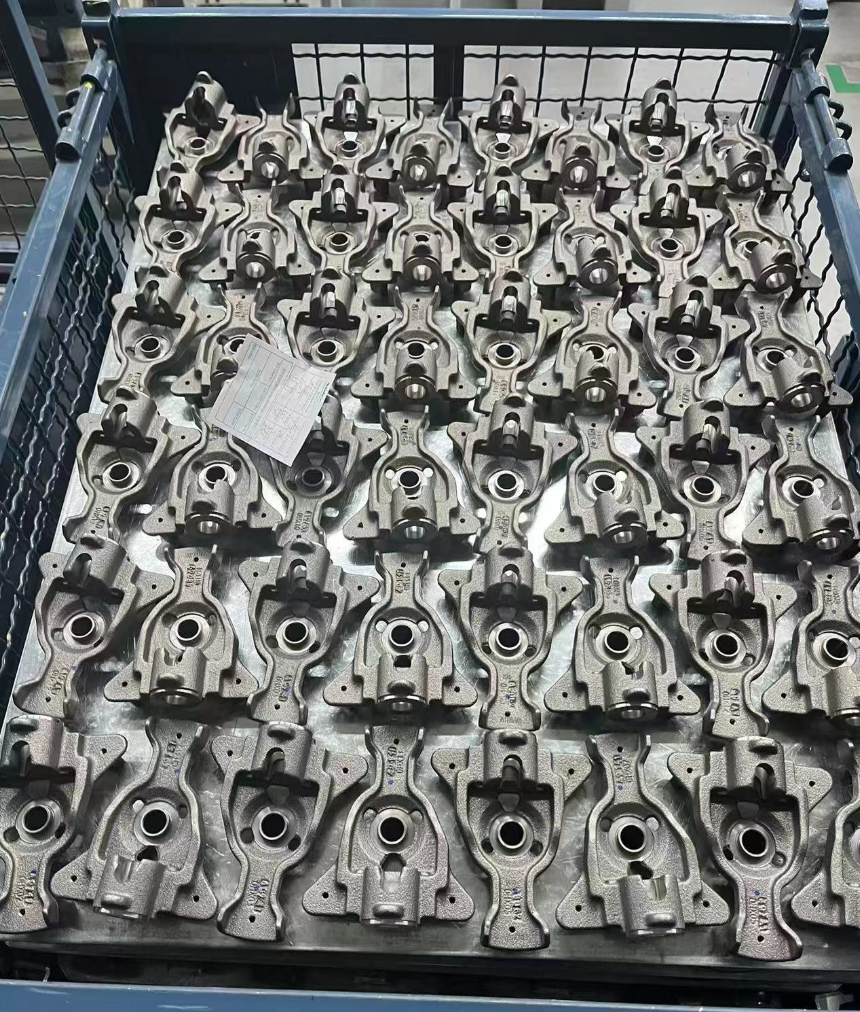
Example: Targets have two placement orientations. Targets facing one direction must be picked before Targets facing the opposite direction. With Visual Classification selected, the model trained through One-Click Connection can classify Targets by orientation, allowing them to be picked by orientation.
Type Identification
Type Identification distinguishes between different Target categories. The training data generated by One-Click Connection is classified according to preset categories. By learning from image data for each category, the model can determine which category a Target belongs to.
You can treat the front and back of a Target as two types and use Type Identification to generate training data for both. To train front and back identification using Type Identification, upload Point Clouds of both sides of the Target.
Example: A Target has a complex structure whose features vary substantially from different angles. When creating its Point Cloud, create Point Clouds of both the front and back and combine them into one Point Cloud file.
Local Identification
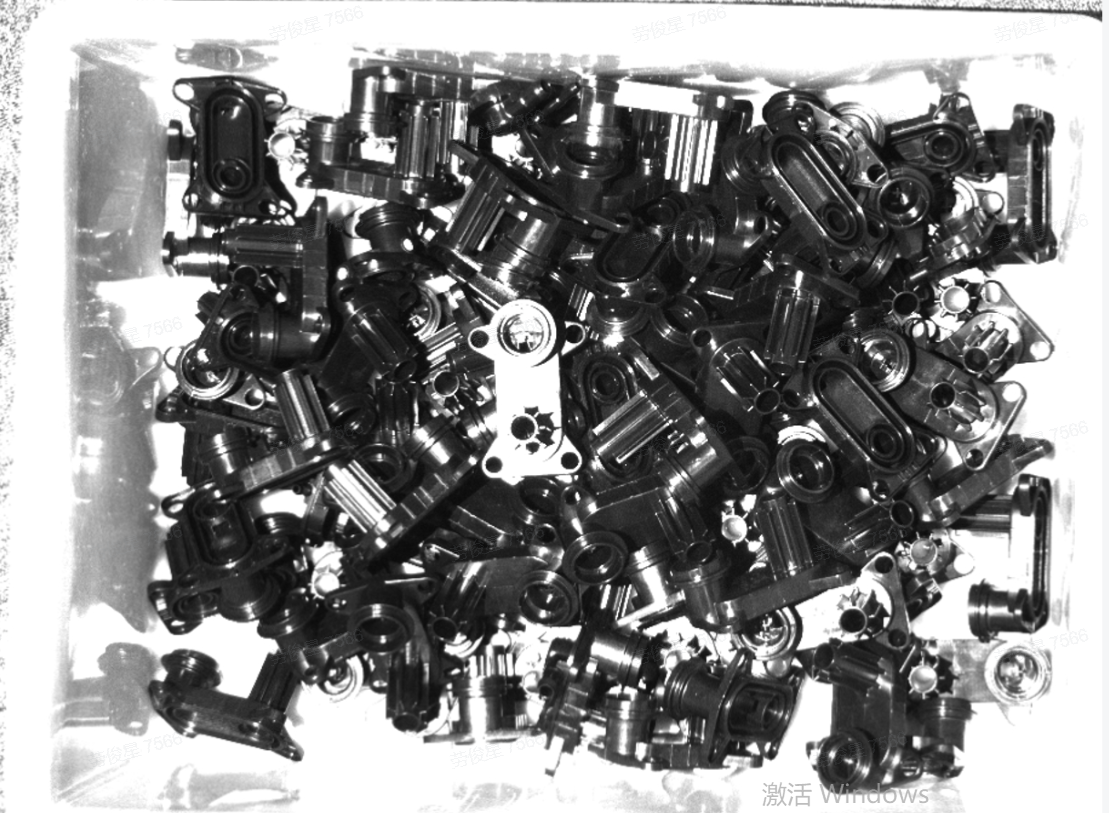
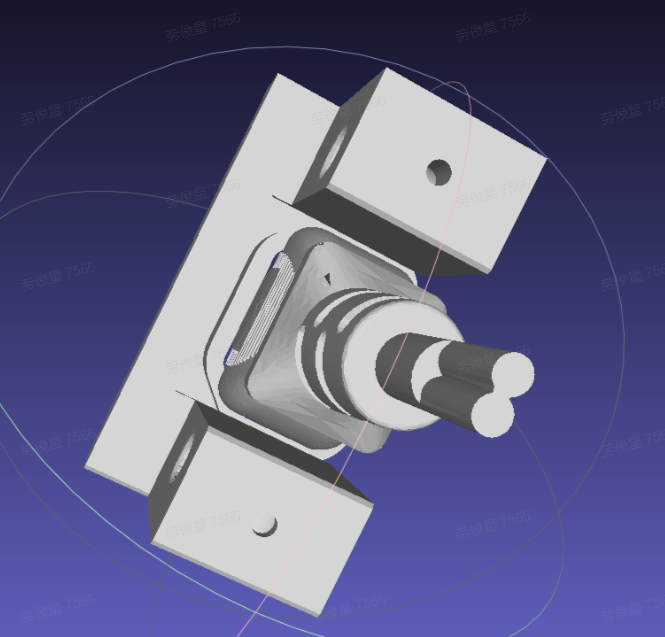
Local Identification recognizes local features of a Target, such as holes or protrusions.
Local Identification is not currently supported for randomly arranged picking Scenes involving plane type Targets.
Example: If only one Target is within the Camera's field of view, the Scene can be treated as neatly arranged so that One-Click Connection can be used. Use the complete CAD model to simulate occlusion of the surface to be identified.
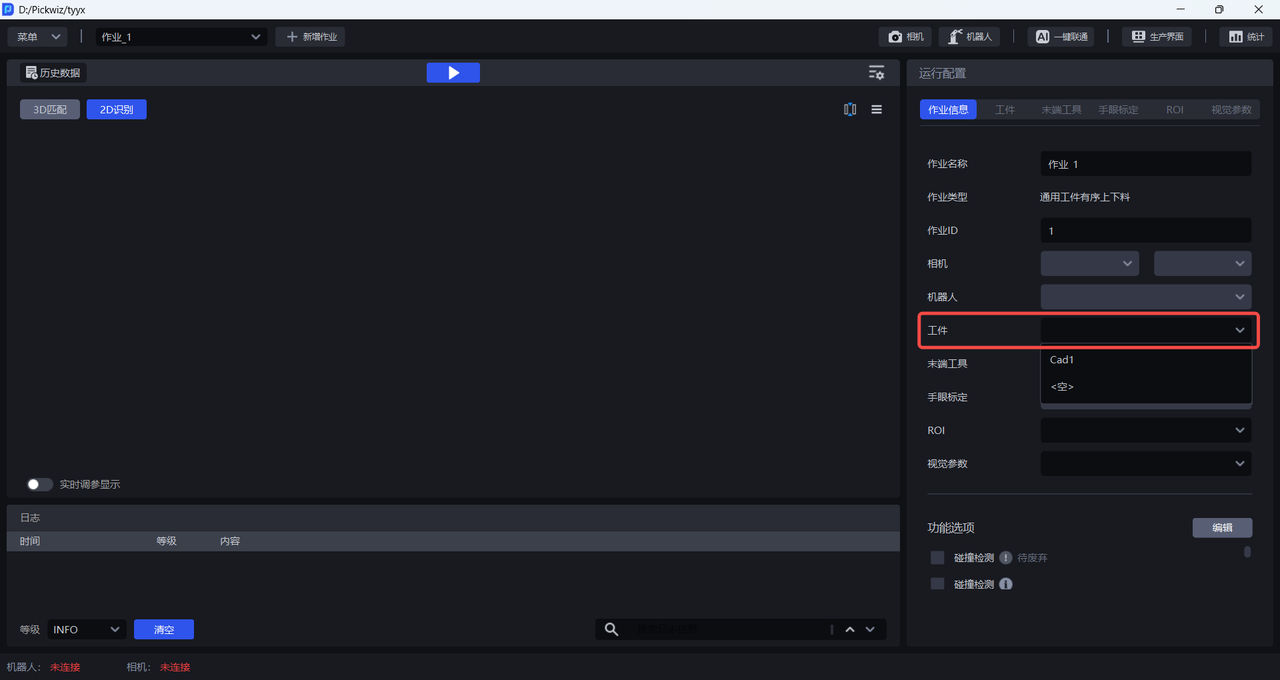
After configuring the Target, select the newly added Target configuration in Task Information.
2.2.10 Camera-to-Target Height Range
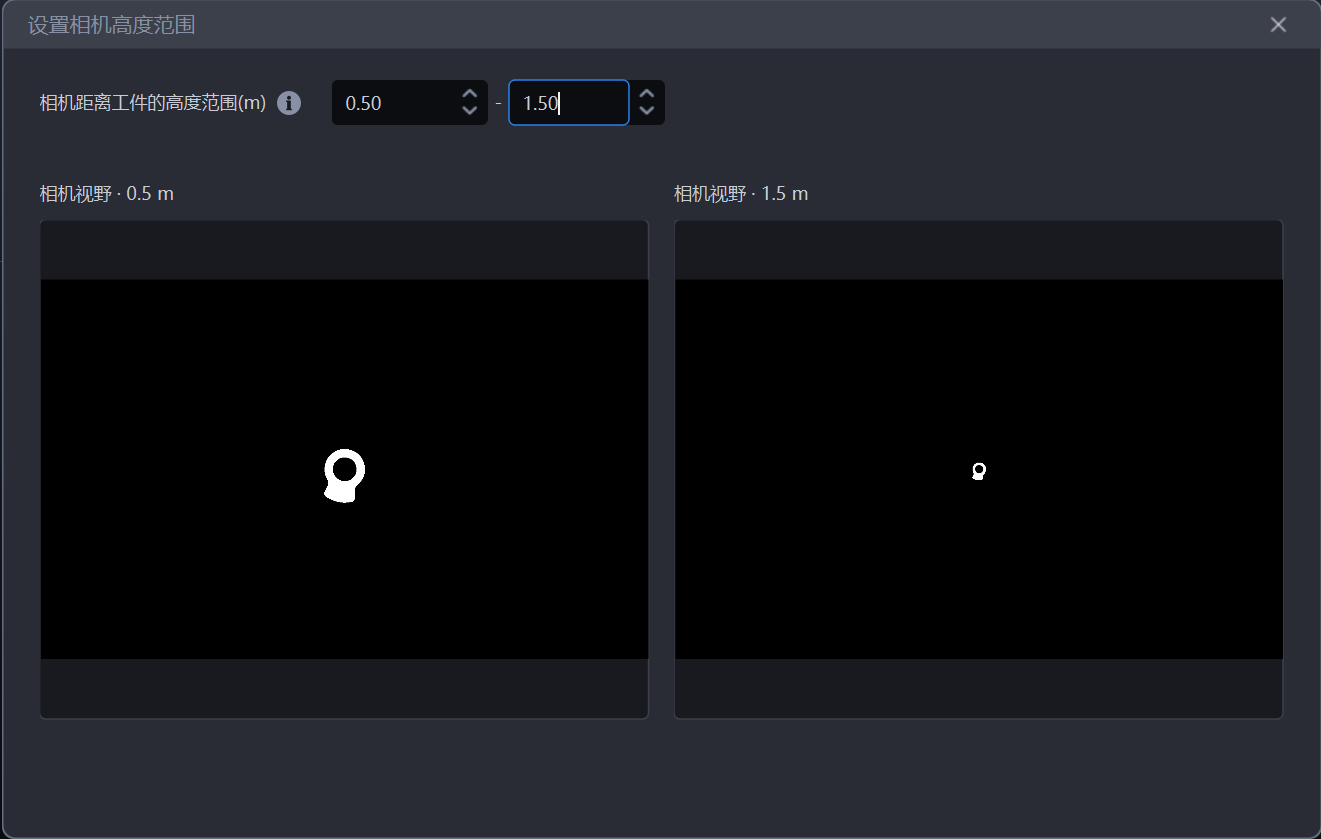
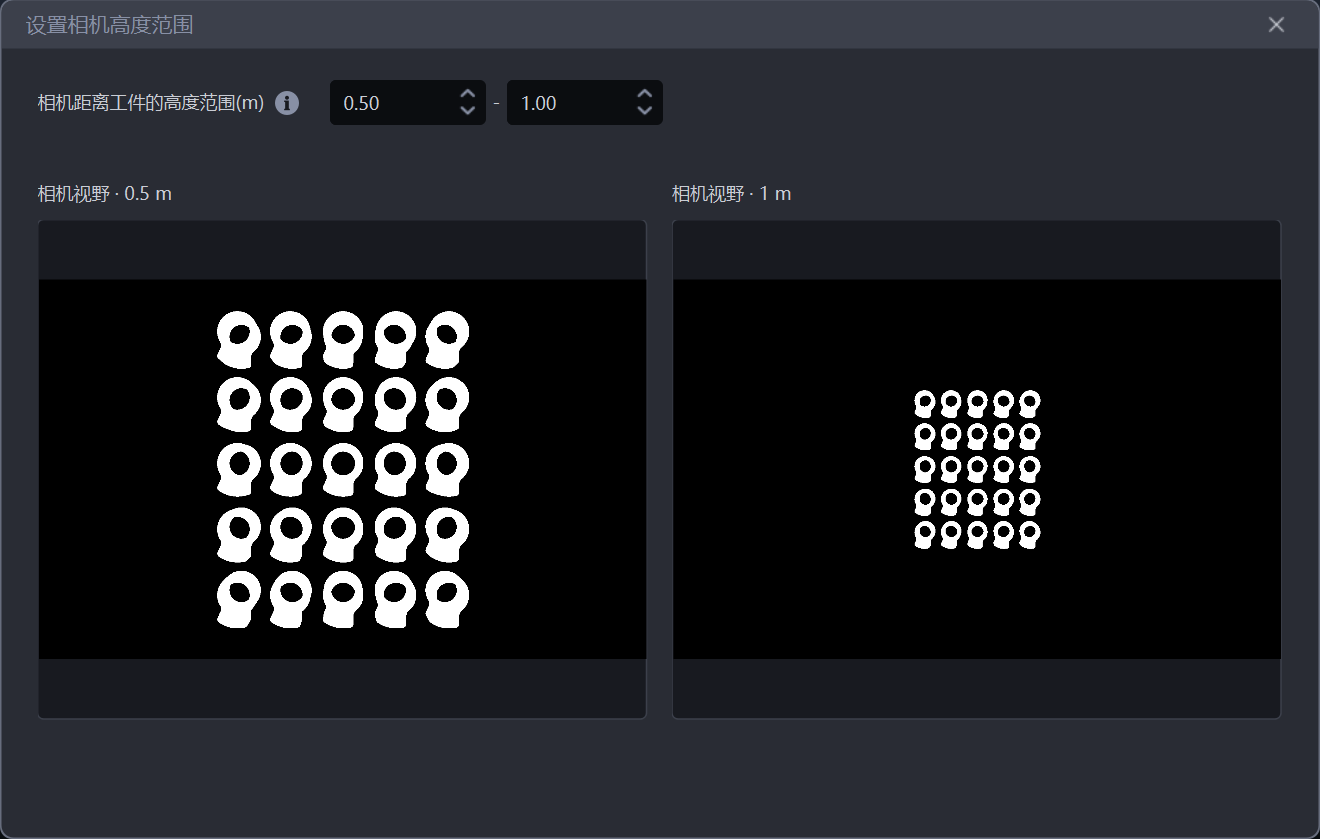
In Scenes that support One-Click Connection, enter the Camera-to-Target height range on the Target Configuration page based on the actual Camera mounting height. The page previews One-Click Connection data rendering in real time using the current Target Mesh file, Pattern Mask, and Camera height. After a training task is submitted, the system uses the entered height range for data rendering and model training. Keep the actual mounting height, the entered range, and the range used for training consistent.
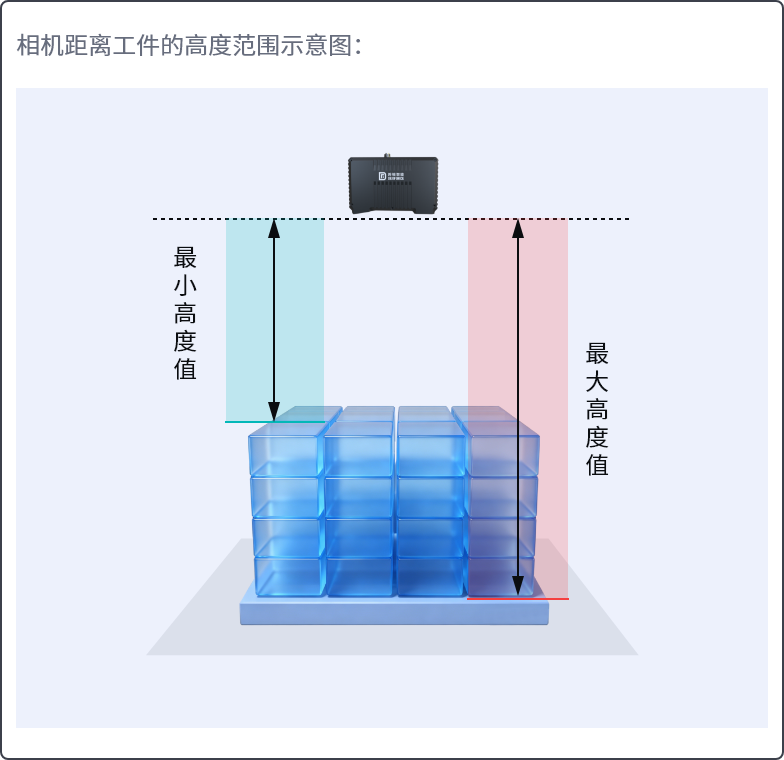
Before entering the Camera-to-Target height, you must import the Target Mesh file. You can preview how much of the Camera's field of view the Target occupies at heights within the entered range.
After recording the Pattern mask, you can preview the size of multiple Targets within the field of view.
3. Train a Visual Model
After configuring the Target and ROI, click One-Click Connection to trigger Visual Model training. If you need to manually edit the input data, select Export Training Configuration Only. If you do not need to edit the input data, select Automatically Create Training Task.
3.1 Export Training Configuration Only
This option is for users who need to edit the data manually. You will then need to create the training task manually on the DexVerse platform.
- On the main screen, click
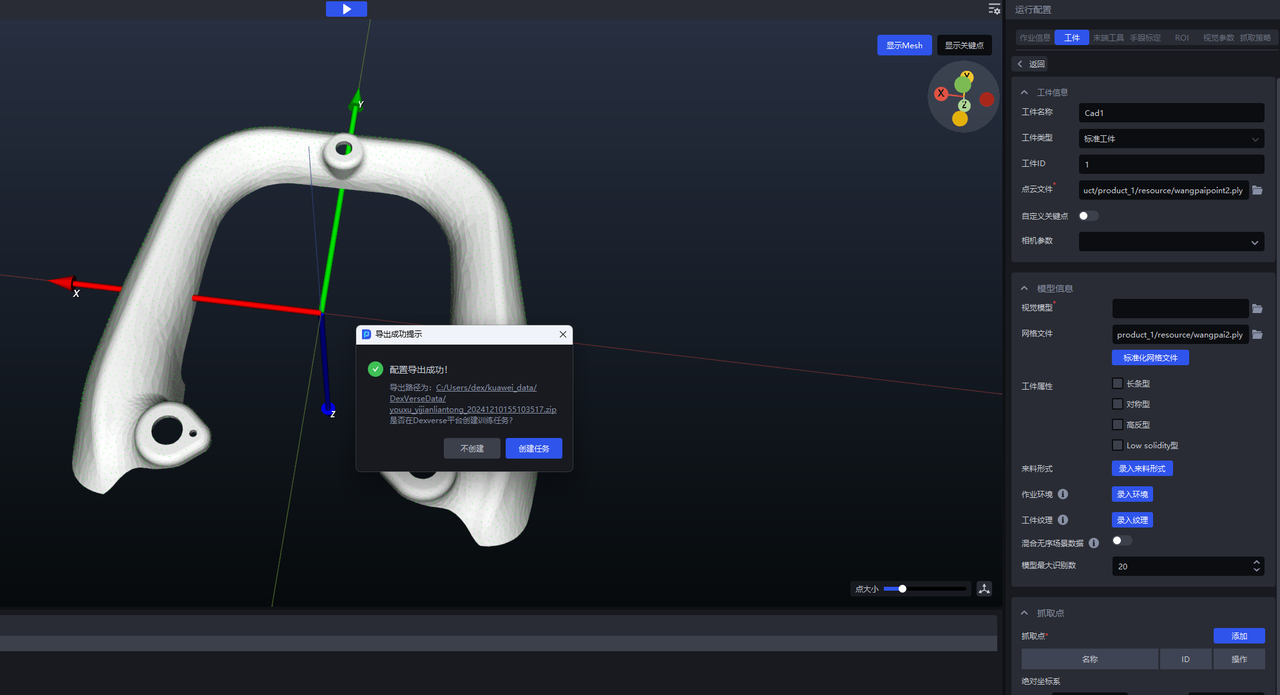
One-Click Connection. In theOne-Click Connectiondialog, selectVisual Model, as shown below.
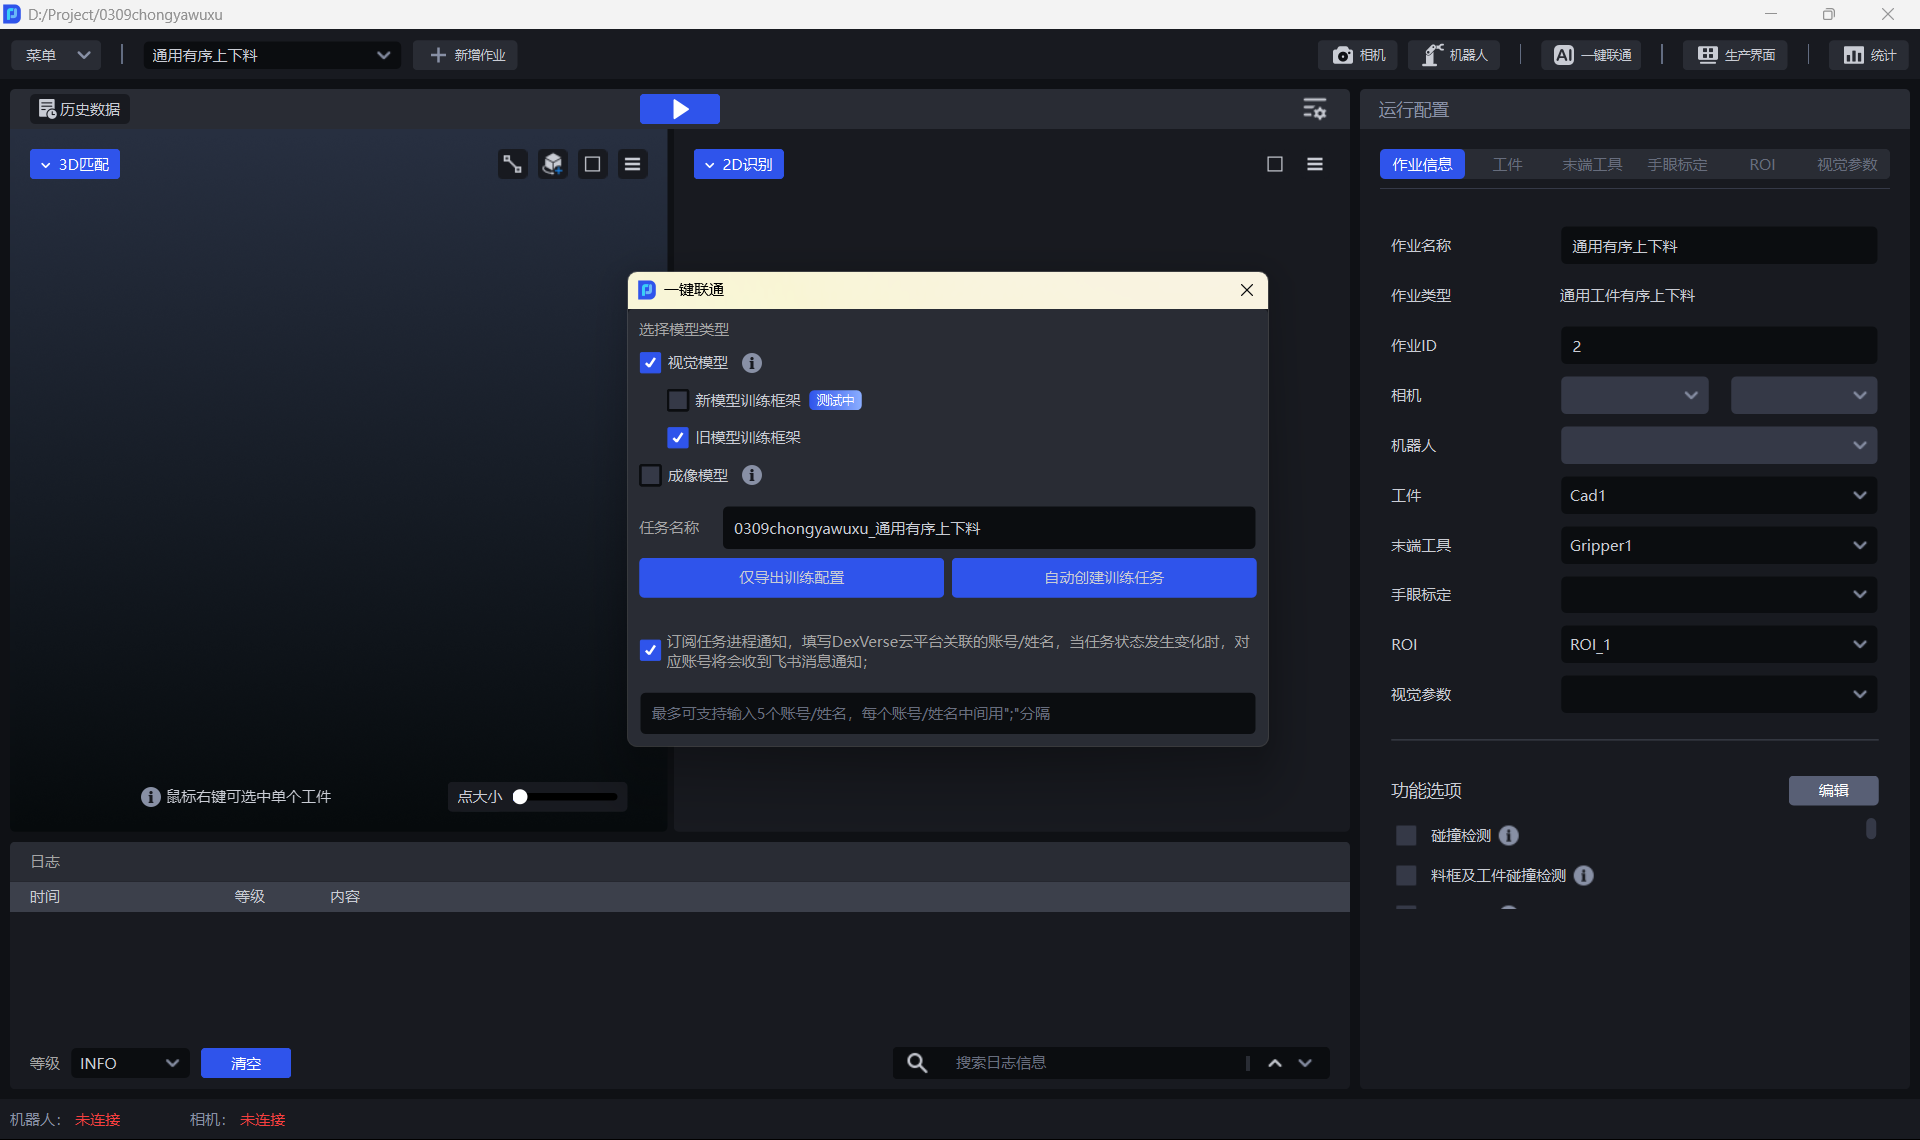
Click
Export Training Configuration Only. You can click the link at the bottom of the dialog to view the contents of the compressed data package or modify the configuration.Go to the DexVerse platform to create a training task.
3.2 Automatically Create a Training Task
This option applies to most Scenes. After configuring the Target, ROI, and other items in PickWiz, you can automatically create a training task on the DexVerse platform.
On the main screen, click
One-Click Connectionto open theOne-Click Connectiondialog, as shown below.Select
Visual Model, then name the training task so that it is easy to find in DexVerse. ClickAutomatically Create Training Task.Go to the DexVerse platform to view the automatically created training task.
Subscribe to task progress notifications and enter the account/name associated with the DexVerse cloud platform. When the task status changes, the corresponding account will receive a Feishu notification.
3.3 Export Visual Model Formats
After Visual Model training, One-Click Connection results can be exported directly in ONNX, TRT, PTH, or other formats without manually converting the Visual Model. Models in the same format are compatible with NVIDIA RTX 3050, 3060, and 5050 GPUs, with essentially the same inference performance.
Direct export in multiple formats currently applies only to Visual Models. An Imaging Model still needs manual conversion if TRT format is required.
3.4 Keypoint Model Compatibility
In V1.9.0, keypoints in Visual Models that use Target keypoints are reordered consistently during training, import, and inference to prevent inaccurate pose matching or system errors caused by incorrect keypoint order. For neatly arranged general-target loading and unloading and randomly arranged general-target picking, Visual Models with keypoints from earlier versions cannot be used directly in V1.9.0. Submit a new One-Click Connection training task to retrain them.
4. Train an Imaging Model
4.1 Configure the Stereo Camera
In V1.9.0, One-Click Connection can train Imaging Models for KFC series cameras, including KINGFISHER-S-602 and KINGFISHER-W-3004, to improve imaging results.
4.1.1 Connect the Stereo Camera
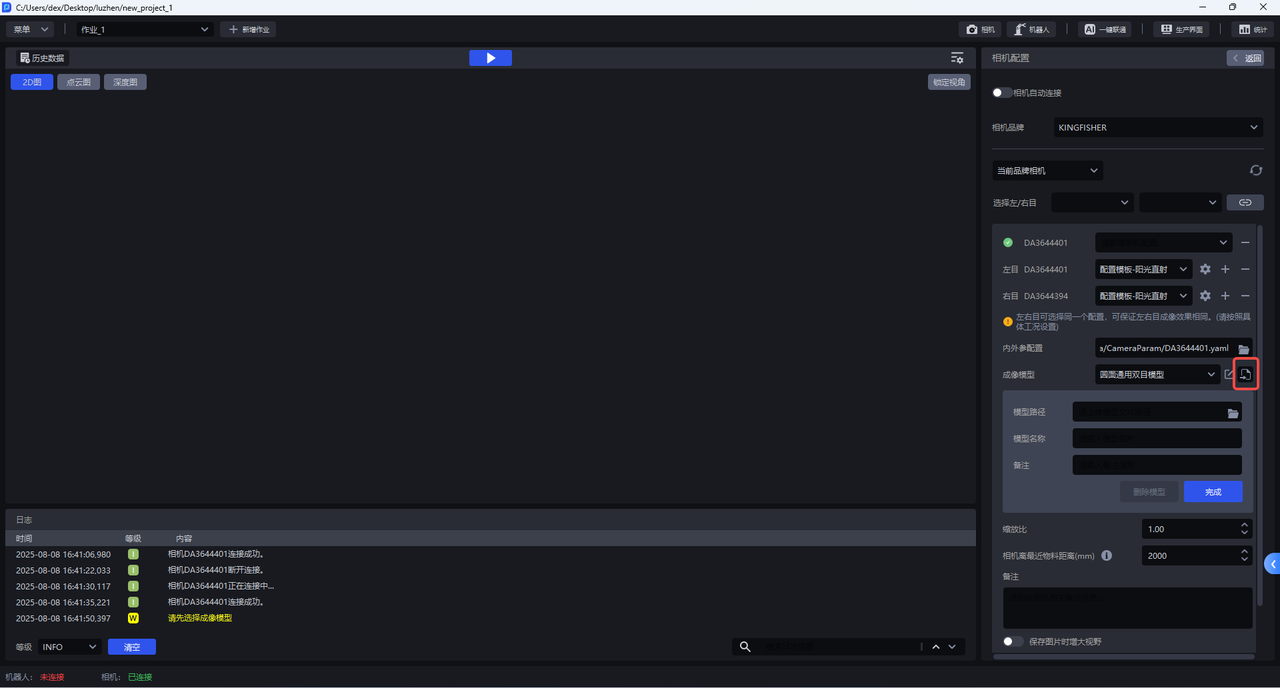
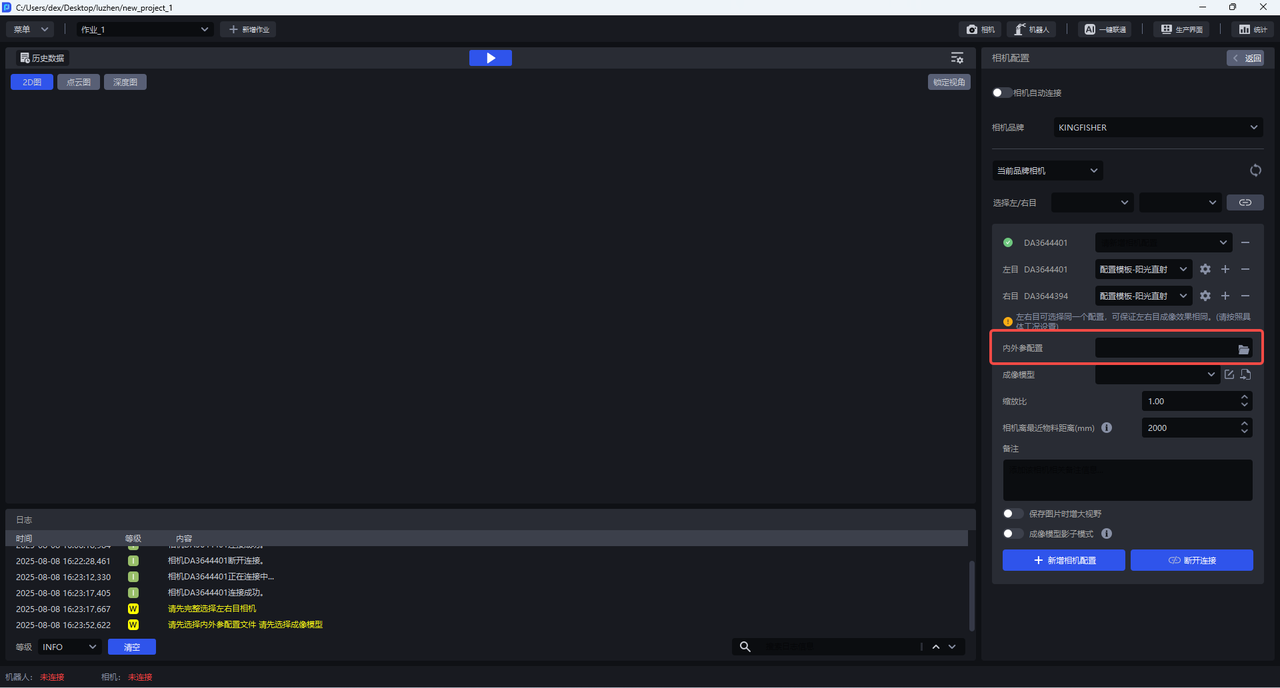
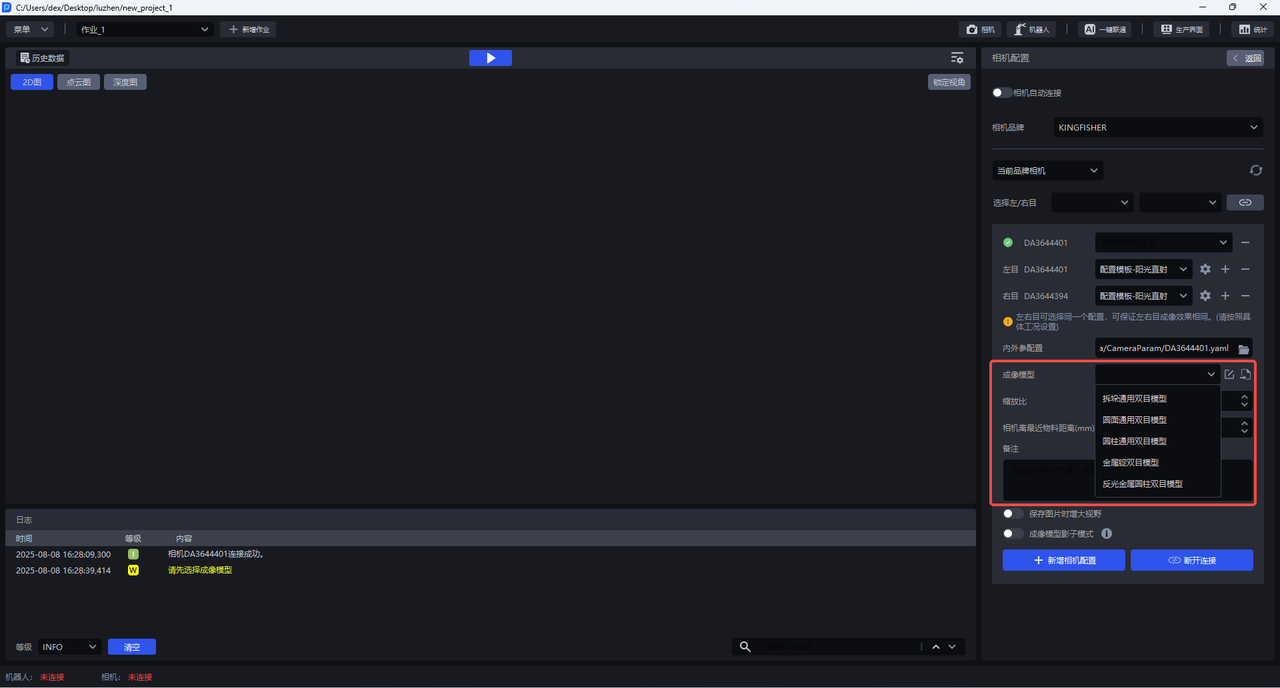
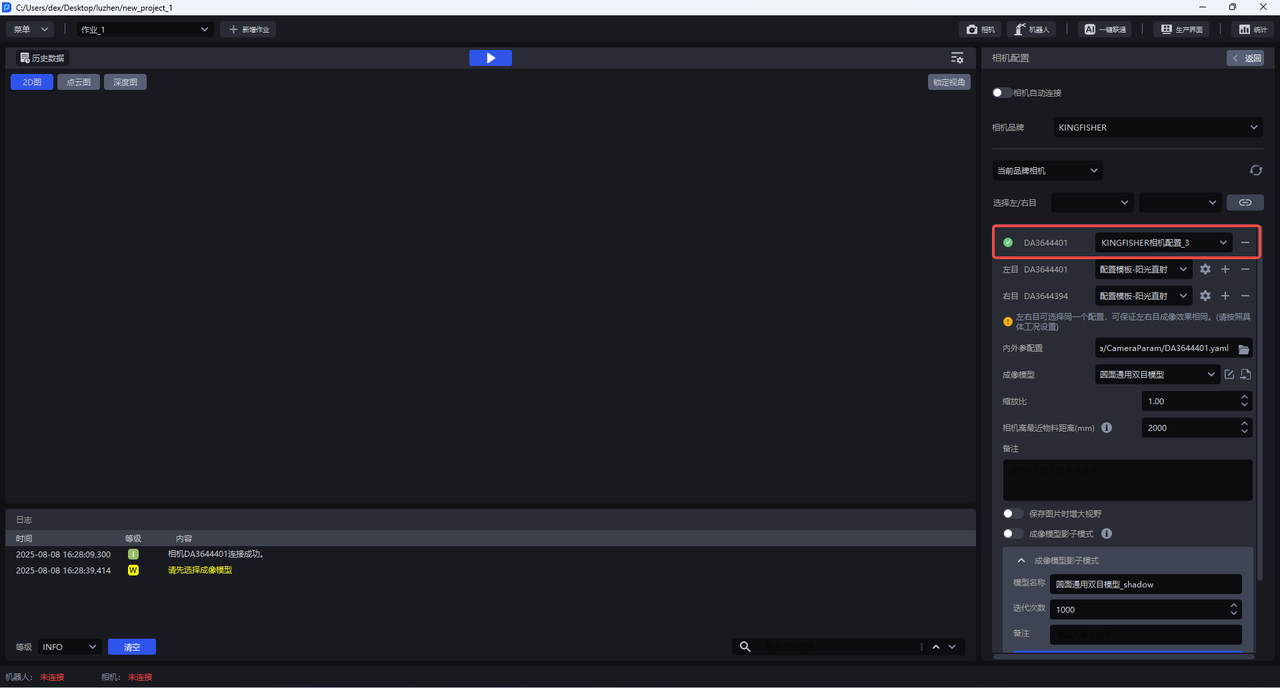
After installing the stereo KINGFISHER Camera, connect it in PickWiz, set the scaling ratio, select an Imaging Model, and set the minimum distance according to the actual conditions.
(1) Connect the stereo Camera.
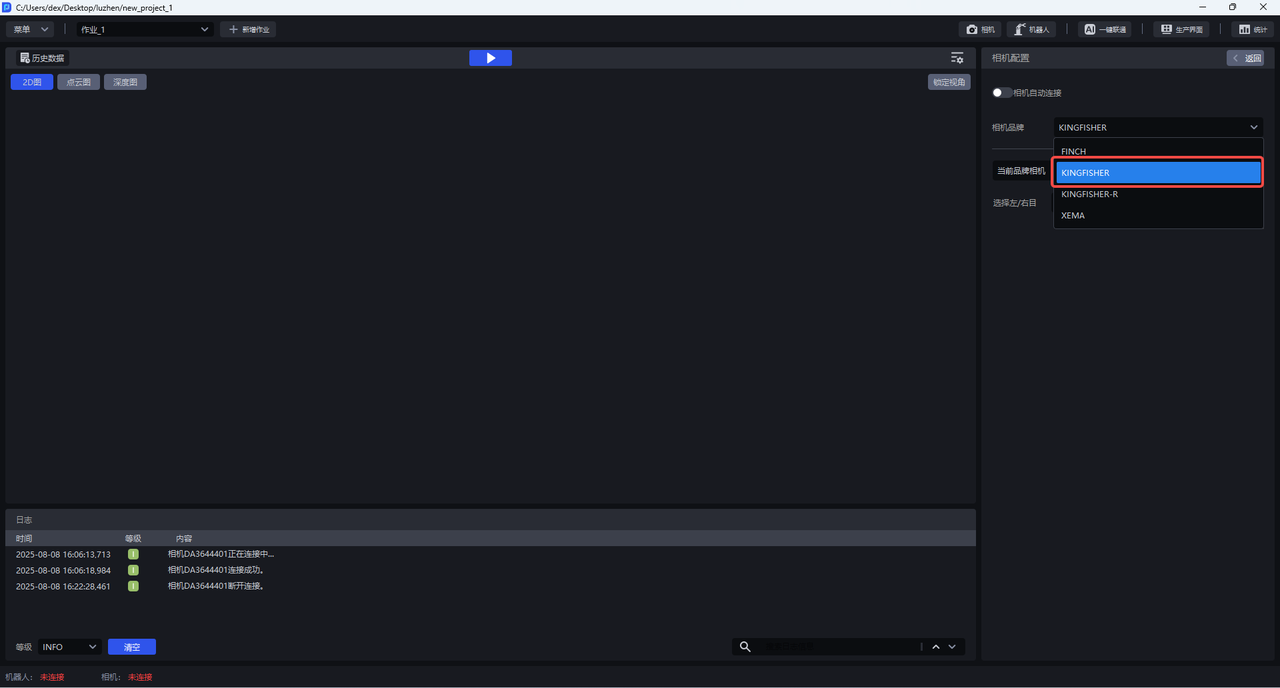
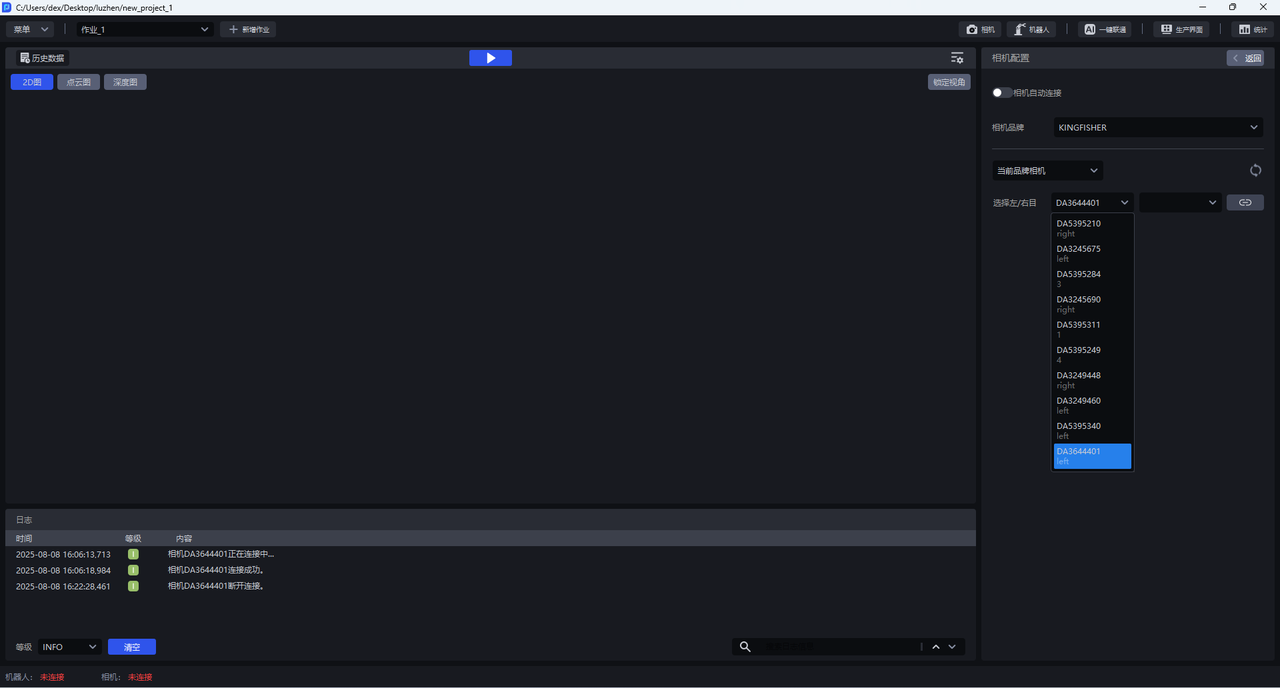
(2) Import the stereo Camera's Intrinsic and Extrinsic Parameter configuration file. This file will be read when training the Imaging Model.
(3) Select a general model or import an Imaging Model trained specifically for the Scene. This is the Imaging Model that One-Click Connection will train.
(4) Click + Add Camera Configuration.
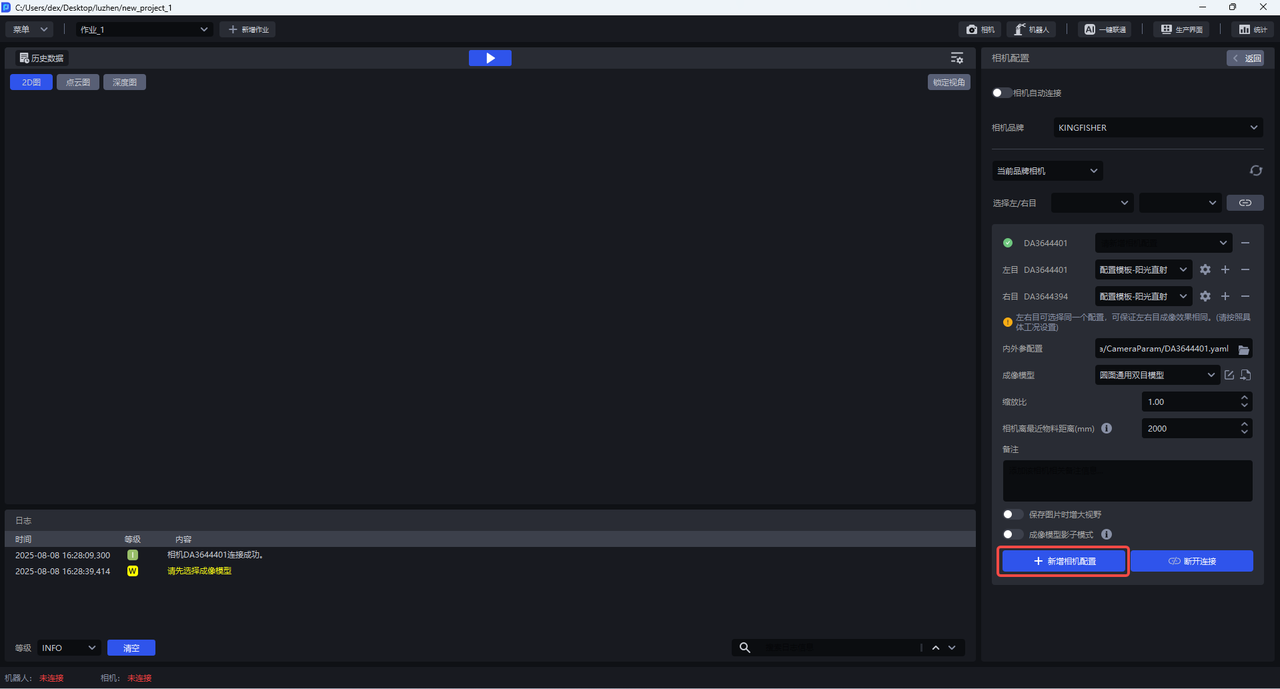
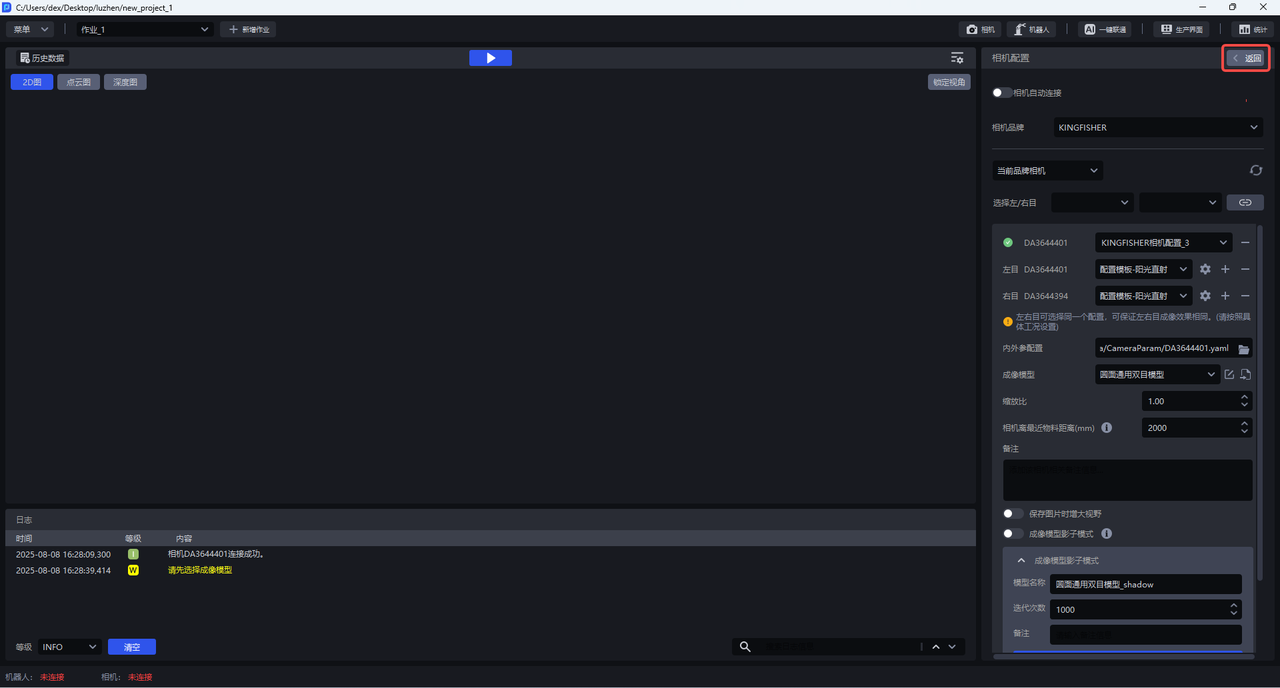
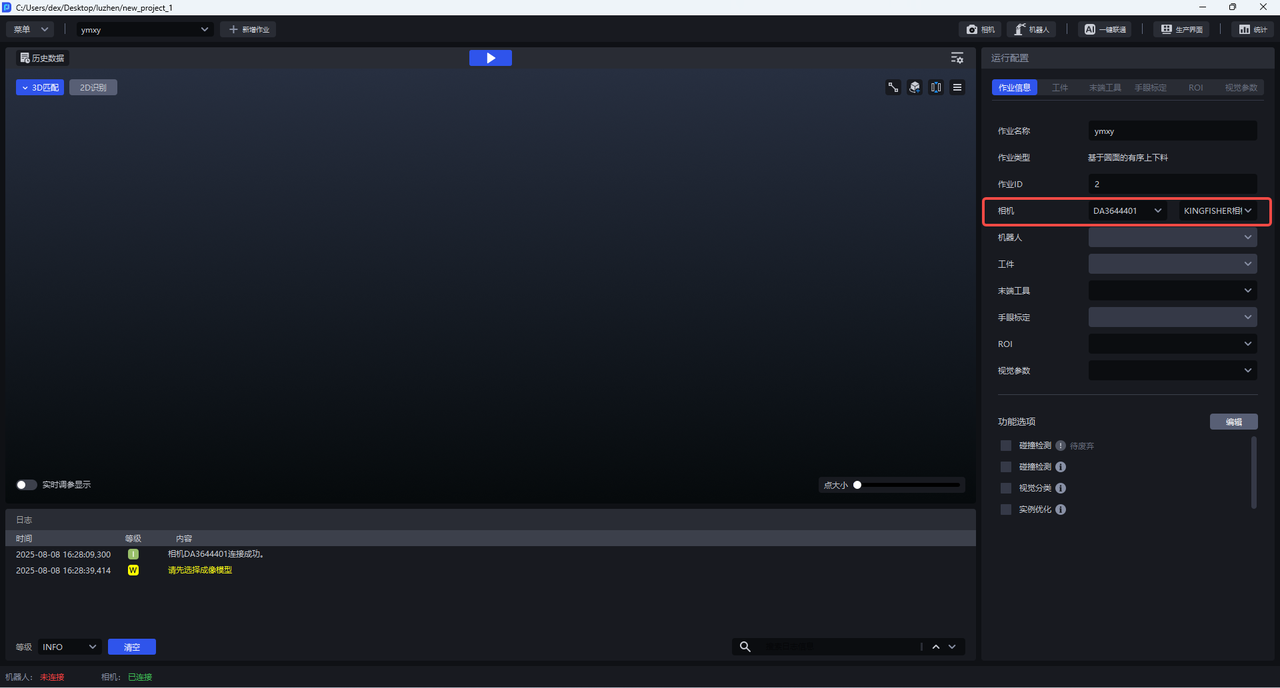
(5) Click Back, then select the newly added Camera configuration in Task Information.
4.1.2 Select a Stereo Camera Model Without Connecting a Camera
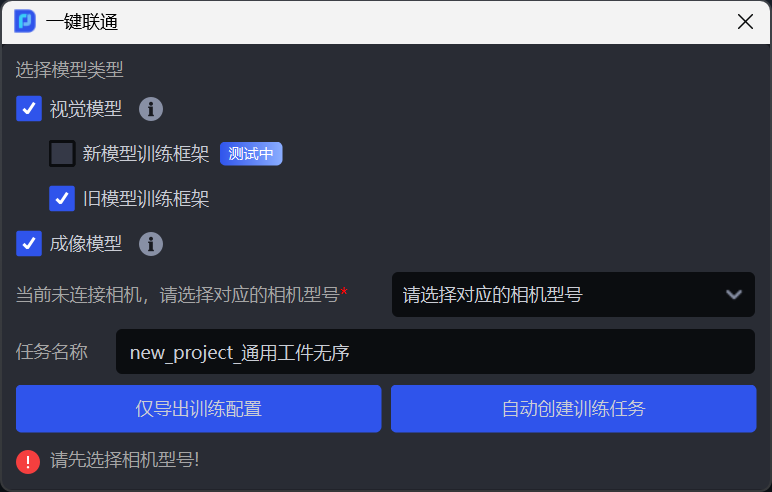
If no Camera is connected, complete the Target and ROI configuration under “Pre-training Configuration” and the Scene Object configuration in this chapter. Then start One-Click Connection and select Imaging Model. A prompt will indicate that no Camera is connected, and you can select the corresponding Camera model.
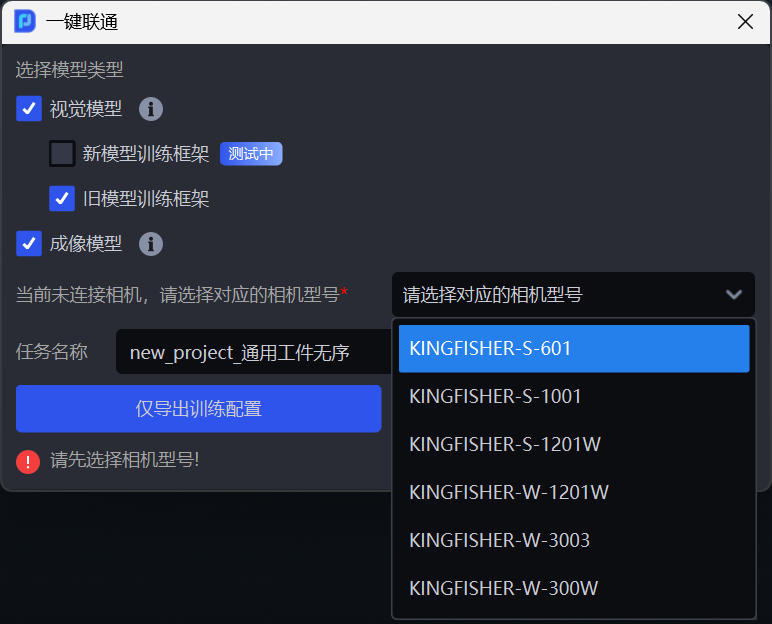
4.2 Configure the Scene Object
In a general randomly arranged Scene with a bin where the Collision Detection Function Option is used, configure a Scene Object and upload the bin's Mesh file. The Scene Object dimensions must match the actual bin dimensions.
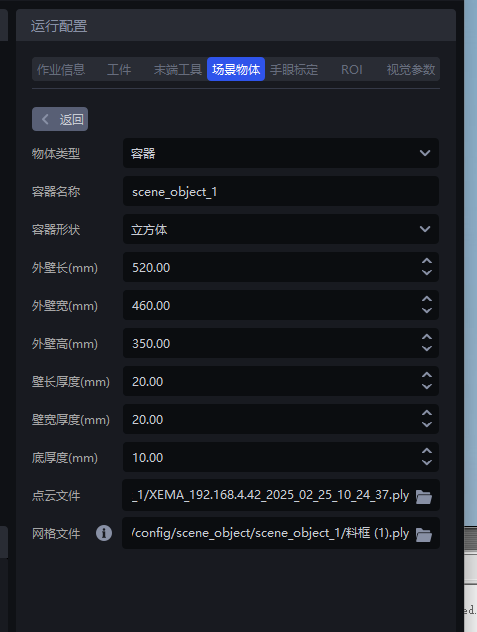
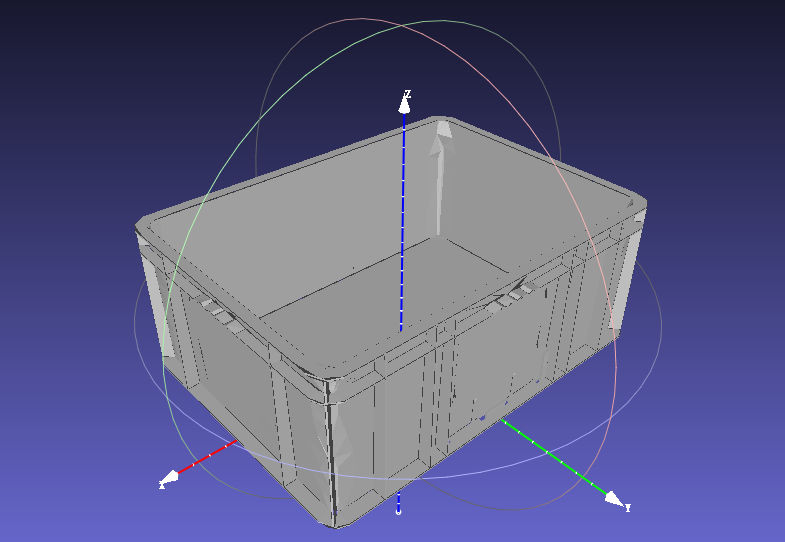
After configuring the Camera, Target, and ROI, click One-Click Connection to trigger Imaging Model training.
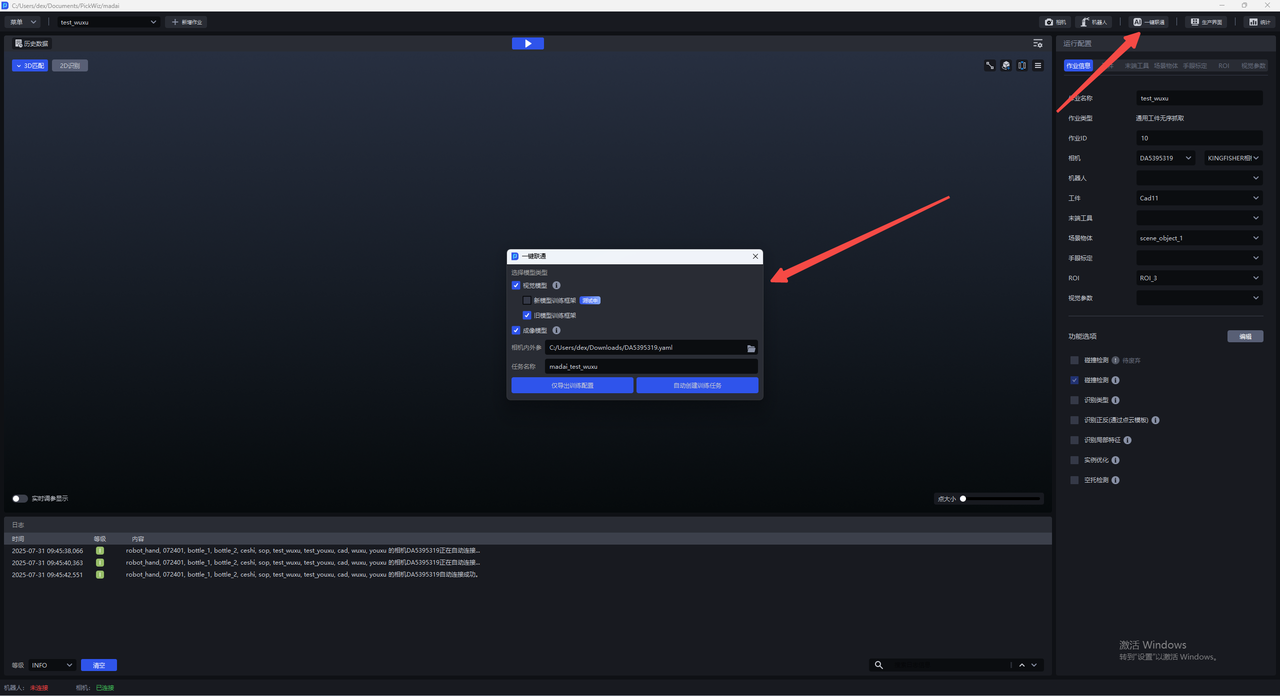
If you need to manually edit the input data, select Export Training Configuration Only. If you do not need to edit the input data, select Automatically Create Training Task.
4.3 Export Training Configuration Only
This option is for users who need to edit the data manually. You will then need to create the training task manually on the DexVerse platform.
- On the main screen, click
One-Click Connection. In theOne-Click Connectiondialog, selectImaging Model, as shown below.
Click
Export Training Configuration Only. You can click the link at the bottom of the dialog to view the contents of the compressed data package or modify the configuration.Go to the DexVerse platform to create a training task.
4.4 Automatically Create a Training Task
This option applies to most Scenes. After configuring the Target, ROI, and other items in PickWiz, you can automatically create a training task on the DexVerse platform.
On the main screen, click
One-Click Connectionto open theOne-Click Connectiondialog, as shown below.Select
Imaging Model, then name the training task so that it is easy to find in DexVerse. ClickAutomatically Create Training Task.Go to the DexVerse platform to view the automatically created training task.
Subscribe to task progress notifications and enter the account/name associated with the DexVerse cloud platform. When the task status changes, the corresponding account will receive a Feishu notification.
5 Train Both the Visual Model and Imaging Model
In the One-Click Connection dialog in PickWiz, you can select both Visual Model and Imaging Model, then click Export Training Configuration Only or Automatically Create Training Task.